There’s just something magical about fresh cherries—they’re sweet, juicy, and make everything feel like summer. Whether you just picked a bunch from the market or went cherry-picking for the first time, you might be wondering what to actually do with them (besides eating them straight out of the bowl). That’s where these fresh cherry recipes come in. From breakfast to dessert, I’ve got delicious ideas that’ll let those ruby gems shine.
Ready to make the most of cherry season? Let’s dive into the deliciousness.
Fresh Cherry Recipes
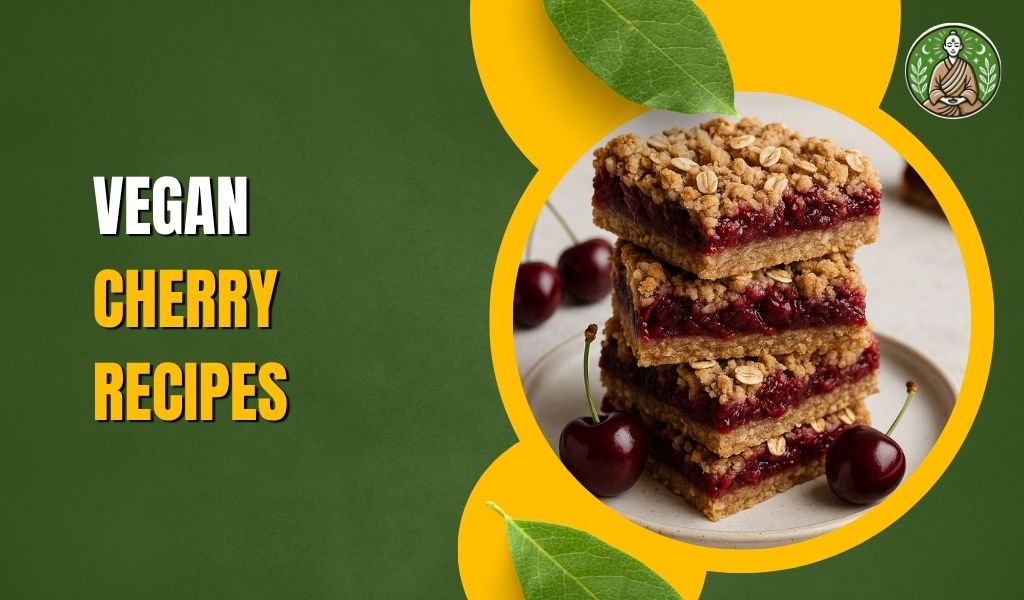
1. Vegan Cherry Crumble Bars

Whenever I’m craving something sweet, fruity, and easy to share, these Vegan Cherry Crumble Bars are my go-to. They’re buttery (without butter), packed with juicy fresh cherries, and layered between a golden oat-almond crust and a crumbly topping. These bars strike the perfect balance between a soft baked dessert and a rustic fruit tart — ideal for picnics, potlucks, or just a cozy afternoon treat with coffee.
Ingredients
For the crust and crumble topping:
- 1 ½ cups rolled oats — Creates a hearty base and adds a chewy, rustic texture.
- 1 cup almond flour — Gives the crust a tender, nutty richness and keeps it gluten-free.
- ½ cup coconut oil (melted) — Binds the crust while adding moisture and a subtle tropical flavor.
- ⅓ cup maple syrup — Naturally sweetens the base and topping.
- 1 teaspoon vanilla extract — Adds a warm depth to the oat-almond blend.
- Pinch of sea salt — Balances the sweetness and brings out the flavor.
For the cherry filling:
- 2 cups fresh cherries (pitted and halved) — The star ingredient; juicy, sweet, and slightly tart.
- 1 tablespoon lemon juice — Brightens the flavor and enhances the cherries.
- 1 tablespoon cornstarch — Thickens the filling as it bakes so it doesn’t turn runny.
- 2 tablespoons maple syrup — Sweetens the cherries just enough to make them shine.
Step-by-Step Process
1. Prep the Oven and Pan
I start by preheating my oven to 350°F (175°C). Then, I line an 8×8-inch baking dish with parchment paper, leaving a bit of overhang on the sides for easy removal later.
2. Make the Crust and Crumble
In a large bowl, I combine the rolled oats, almond flour, melted coconut oil, maple syrup, vanilla extract, and sea salt. I stir everything together until a moist, crumbly dough forms.
I take about ¾ of this mixture and press it firmly into the bottom of the prepared pan to create an even base. I set the remaining ¼ aside for the crumble topping.
3. Prepare the Cherry Filling
In another bowl, I mix the fresh pitted cherries with lemon juice, cornstarch, and maple syrup. I stir gently until the cherries are evenly coated and glossy. The cornstarch will help the juices thicken during baking, preventing sogginess.
I pour the cherry mixture evenly over the pressed crust, making sure to spread the fruit all the way to the edges.
4. Add the Crumble Topping
I take the reserved oat-almond mixture and crumble it over the cherry layer. I like to leave some chunks larger than others for that rustic look and textural contrast.
5. Bake
I bake the bars for 35–40 minutes, or until the top is golden brown and the cherry filling is bubbling around the edges. The smell is divine — warm, nutty, and fruity all at once.
6. Cool and Slice
I let the bars cool completely in the pan — this is crucial, as the filling needs time to set. Once cool, I use the parchment overhang to lift the bars out of the pan, then slice them into squares or rectangles.
Why These Cherry Crumble Bars Are Loved
These bars are loved for their contrast of textures — a soft, jammy cherry center between a tender base and a crisp crumble top. They’re naturally sweetened, gluten-free, and 100% vegan, making them perfect for nearly any guest.
They also travel well, making them a smart choice for summer gatherings, hikes, or afternoon treats on the go.
Pro Tips for Perfect Bars
- Don’t skip the parchment paper — it makes removing the bars a breeze.
- Cool fully before cutting — this ensures clean slices that hold their shape.
- Use a cherry pitter — it saves time and keeps the fruit intact.
Serving Suggestions
These bars are perfect on their own, but I also love pairing them with:
- A dollop of vegan whipped cream
- A scoop of vanilla coconut ice cream
- A light dusting of powdered sugar just before serving
They’re just as good at room temperature as they are chilled straight from the fridge.
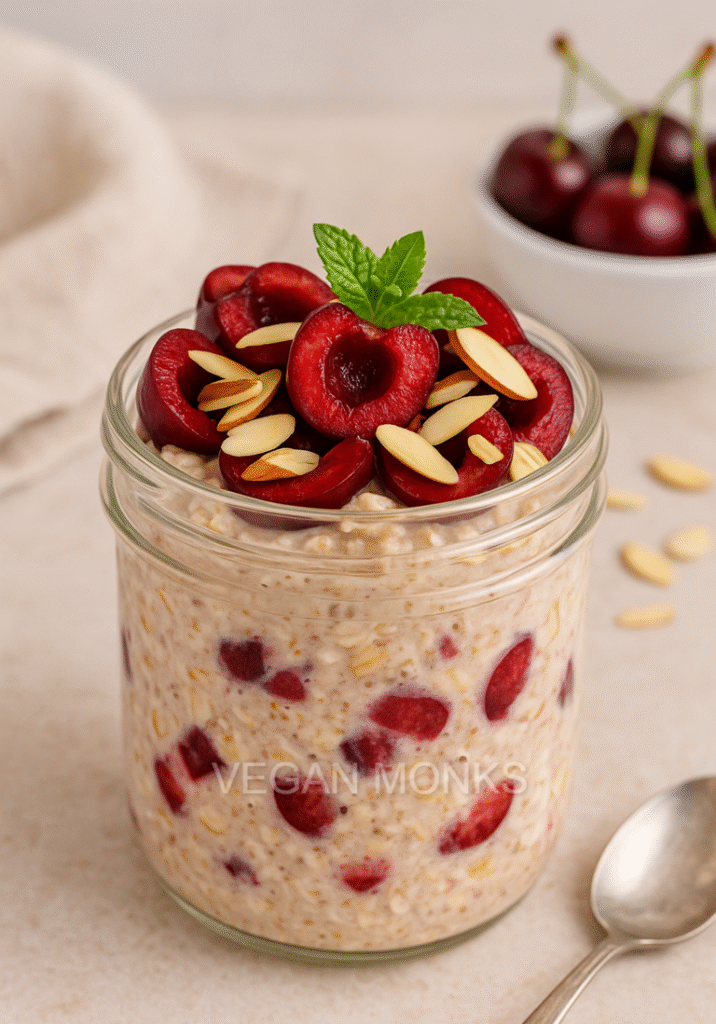
2. Fresh Cherry & Almond Overnight Oats

When I need a quick, wholesome breakfast that feels like dessert, I always go for these Fresh Cherry & Almond Overnight Oats. They’re creamy, naturally sweet, and full of texture, thanks to the soft oats, juicy cherries, and crunchy almonds. The best part? I prep everything the night before, and by morning I have a cool, nourishing meal ready to enjoy — no cooking required.
This is one of those feel-good recipes that’s as perfect for busy weekdays as it is for slow weekend mornings, and the fresh cherries bring a burst of summer in every spoonful.
Ingredients
For one serving (easily doubled or tripled):
- ½ cup rolled oats — The base of the recipe; they soak up liquid overnight to become soft and creamy.
- ¾ cup unsweetened almond milk — Adds moisture and nutty flavor while keeping it dairy-free.
- 1 tablespoon chia seeds — Helps thicken the oats and adds fiber and omega-3s.
- 1–2 teaspoons maple syrup — Naturally sweetens the oats without refined sugar.
- ¼ teaspoon almond extract — Gives a bold, marzipan-like aroma that pairs perfectly with cherries.
- ½ cup fresh cherries (pitted and halved) — Juicy and slightly tart, they add bursts of real fruit flavor.
- 2 tablespoons sliced almonds (toasted or raw) — For added crunch and a nutty contrast.
Optional toppings:
- A dollop of vegan yogurt
- Extra cherries or almonds
- A drizzle of almond butter
Step-by-Step Process
1. Mix the Base
I start by adding the rolled oats, almond milk, chia seeds, maple syrup, and almond extract into a small jar or bowl. I stir everything together until well combined. The almond extract is powerful, so just a little goes a long way. It really transforms the oats and makes them taste like a cherry-almond pastry.
2. Add the Cherries
Next, I gently stir in the fresh cherries, making sure they’re evenly distributed throughout the mixture. You can slice or quarter them depending on the size, but I like to leave them halved for those juicy bites.
3. Let It Soak
I cover the jar or bowl with a lid or plastic wrap and place it in the refrigerator overnight — or for at least 4 hours. This gives the oats and chia seeds time to absorb the almond milk and soften into a creamy, spoonable texture.
4. Serve and Add Toppings
In the morning, I give the oats a good stir. If the mixture looks a bit too thick, I add a splash more almond milk to loosen it up.
I top the oats with extra cherries, a generous sprinkle of sliced almonds, and sometimes a dollop of vegan yogurt or a swirl of almond butter for even more richness.
It’s fresh, satisfying, and keeps me full for hours.
Why This Recipe Is Loved
These overnight oats are loved because they’re refreshing, nutrient-packed, and incredibly easy to make. The cherry-almond combo is a classic that never gets old — it’s sweet, slightly tangy, and deeply comforting all at once.
This recipe also travels well, making it ideal for meal prep or grab-and-go breakfasts. And it’s 100% vegan, with no refined sugars or artificial flavors.
Pro Tips for Perfect Overnight Oats
- Use rolled oats, not quick oats — They hold their shape better and give the best texture after soaking.
- Add toppings right before serving — This keeps nuts crunchy and fruit fresh.
- Toast the almonds — A quick toasting step brings out their natural oils and makes the flavor pop.
Serving Suggestions
I love pairing these overnight oats with:
- A hot mug of vegan latte in the morning
- A glass jar for on-the-go breakfast
- A side of seasonal fruit salad for brunch spreads
They also make a great post-workout snack if you need something cool and nourishing.
3. Vegan Cherry Chocolate Chip Ice Cream

This Vegan Cherry Chocolate Chip Ice Cream is what summer dreams are made of — creamy, scoopable, loaded with juicy bits of fresh cherries and flecks of dark chocolate in every bite. It tastes like a nostalgic cherry ice cream sundae but is made entirely dairy-free, naturally sweetened, and unbelievably easy to prepare.
You don’t need any fancy ingredients or store-bought base — just a blender, a freezer, and a little patience while it sets. The result is a rich, refreshing, indulgent dessert that’ll keep you coming back for more.
Ingredients
For the ice cream base:
- 2 cups full-fat coconut milk (from a can) — This is the creamy foundation; it gives the ice cream richness and a smooth mouthfeel.
- 1 ½ cups fresh cherries (pitted and halved) — Adds real fruit flavor and beautiful color; some will be blended and some folded in.
- ¼ cup maple syrup — Naturally sweetens the ice cream without refined sugar.
- 1 teaspoon vanilla extract — Enhances both the chocolate and cherry notes.
- Pinch of sea salt — Balances the sweetness and deepens the flavor.
Mix-ins:
- ½ cup chopped dark vegan chocolate or mini chocolate chips — Gives a crunchy, bitter contrast to the sweet, creamy base.
- ½ cup additional chopped cherries — For juicy cherry bites throughout.
Step-by-Step Process
1. Prepare the Cherries
I start by pitting and halving the fresh cherries. I divide them into two portions: one for blending and one for folding in later. If the cherries are extra juicy, I pat them dry with a paper towel to avoid adding too much moisture to the base.
2. Blend the Ice Cream Base
In a high-speed blender, I combine:
- 2 cups coconut milk
- 1 ½ cups cherries (the portion reserved for blending)
- ¼ cup maple syrup
- 1 teaspoon vanilla extract
- A pinch of sea salt
I blend everything until the mixture is completely smooth and turns a beautiful pale pink with a hint of cherry sweetness.
3. Chill the Mixture
Once blended, I pour the ice cream base into a bowl or container and chill it in the fridge for at least 1–2 hours. This step helps the ice cream churn or freeze more evenly later.
If I’m using an ice cream maker, I follow the manufacturer’s instructions — usually starting with a fully chilled base is essential for a smooth result.
4. Add the Mix-ins
After chilling, I fold in the chopped dark chocolate and the remaining ½ cup of chopped cherries. I stir gently so everything is well distributed without breaking up the fruit.
5. Freeze
Option 1: With an ice cream maker
I churn the mixture until it reaches a soft-serve consistency (usually about 20–25 minutes), then transfer it to a lidded container and freeze for 2–4 hours to firm up.
Option 2: No ice cream maker
I pour the chilled base into a freezer-safe container, stir in the mix-ins, and freeze it. Every 30–45 minutes, I stir the mixture vigorously with a fork or whisk to break up ice crystals — repeating this for about 3–4 hours until the texture is smooth and scoopable.
6. Scoop and Serve
Once the ice cream is firm, I let it sit at room temperature for 5–10 minutes before scooping. It softens beautifully and becomes super creamy — just like traditional ice cream, but with a fruity, vegan twist.
Why This Recipe Is Loved
People love this ice cream because it’s:
- Sweet and fruity, but not overpowering
- Creamy and rich, without a drop of dairy
- Packed with real cherry pieces and dark chocolate chunks
- A perfect treat for both kids and adults
And it’s far more wholesome than store-bought options full of additives and preservatives.
Pro Tips for Perfect Vegan Ice Cream
- Use full-fat coconut milk — Avoid the lite version; you need the fat for creaminess.
- Chill the base thoroughly — This step improves texture, especially for no-churn methods.
- Add chocolate last — Mixing it in after churning keeps it from melting into the base.
- Let it soften before serving — Vegan ice cream needs a few minutes at room temp to become scoopable.
Serving Suggestions
This ice cream is perfect on its own, but here’s how I love to serve it:
- In a waffle cone, topped with a fresh cherry and shaved dark chocolate.
- Sandwiched between vegan cookies for an indulgent ice cream sandwich.
- With a drizzle of cherry compote or a splash of coconut cream on top.
4. Cherry Balsamic Glazed Tofu Skewers

While most people think of cherries as dessert material, I love using them in savory dishes too, especially in this stunning recipe for Cherry Balsamic Glazed Tofu Skewers. These skewers are smoky, sticky, sweet, and tangy with a deep, rich flavor from the balsamic glaze and bursts of juiciness from fresh cherries.
It’s a dish that always surprises guests. The tofu is marinated until flavorful, grilled or baked until golden, and brushed with a cherry glaze that caramelizes beautifully. It’s perfect for barbecues, meal prep, or anytime you want something different and delicious with a gourmet feel.
Ingredients
For the tofu skewers:
- 1 block extra-firm tofu (pressed and cut into cubes) — Provides the protein and soaks up all the flavors.
- 1 tablespoon olive oil — Helps with browning and adds richness.
- 1 tablespoon tamari or soy sauce — Adds umami depth to the tofu.
- ½ teaspoon garlic powder — Adds savory flavor without overpowering.
- 1 red bell pepper (cut into chunks) — Adds sweetness and color.
- ½ red onion (cut into chunks) — Adds a mild bite and roasts beautifully.
- 1 cup fresh cherries (pitted and halved) — Adds juicy pops of flavor on each skewer.
For the cherry balsamic glaze:
- 1 cup fresh cherries (pitted and halved) — The base of the glaze; naturally sweet and vibrant.
- ¼ cup balsamic vinegar — Gives the glaze its tangy, rich depth.
- 1 tablespoon maple syrup — Balances the acidity of the vinegar and enhances the cherries.
- ½ teaspoon Dijon mustard — Adds subtle sharpness and helps emulsify the glaze.
- Salt and pepper to taste
Step-by-Step Process
1. Press and Marinate the Tofu
I begin by pressing the tofu for at least 15–30 minutes to remove excess moisture. This step is crucial for achieving a firm texture that can hold up on the grill or in the oven.
Once pressed, I cut the tofu into bite-sized cubes and place them in a bowl with:
- Olive oil
- Tamari or soy sauce
- Garlic powder
I gently toss to coat and let the tofu marinate while I prep the glaze and vegetables. Even 20 minutes makes a difference, but longer is better if time allows.
2. Prepare the Cherry Balsamic Glaze
In a small saucepan, I combine:
- 1 cup fresh cherries
- Balsamic vinegar
- Maple syrup
- Dijon mustard
I simmer the mixture over medium heat for 10–15 minutes, stirring occasionally. The cherries break down, and the liquid reduces into a glossy, thick glaze. I use a spoon to gently mash the cherries for more texture, or I blend it for a smooth glaze — depending on the look I want.
Once thickened, I remove it from the heat and season with salt and pepper to taste.
3. Assemble the Skewers
I thread the tofu cubes, bell pepper chunks, onion, and fresh cherry halves alternately onto skewers. I like to keep some space between each item so the heat circulates evenly during cooking.
If I’m grilling, I soak the wooden skewers in water for 30 minutes beforehand to prevent burning.
4. Grill or Bake
Grill Method:
I place the skewers on a preheated grill and cook for 10–12 minutes, turning every few minutes. During the last few minutes, I brush the skewers generously with the cherry balsamic glaze, allowing it to caramelize and slightly char.
Oven Method:
I place the skewers on a parchment-lined baking sheet and roast at 400°F (200°C) for 20–25 minutes, flipping halfway. Again, I brush with glaze during the final 5–10 minutes to allow it to thicken and coat the tofu beautifully.
5. Serve
I plate the skewers hot, brushing them with a little extra glaze for shine and serving the remaining glaze on the side. They’re a gorgeous, flavorful centerpiece — tangy, sweet, and smoky with juicy cherries in every bite.
Why This Recipe Is Loved
These skewers are loved because they offer a unexpected way to use fresh cherries. The contrast between the tender tofu, sweet glaze, and roasted veggies is bold, elegant, and satisfying. It’s a dish that feels fancy but is simple to prepare, making it a favorite for cookouts, vegan dinner parties, or weeknight meals with flair.
Plus, it’s completely gluten-free, soy-flexible, and high in plant-based protein.
Pro Tips for Perfect Tofu Skewers
- Use extra-firm tofu and press it well — This gives the best texture and helps it hold together on the skewer.
- Double the glaze — It’s that good, and leftovers can be used on roasted veggies or grain bowls.
- Don’t overpack the skewers — Allowing space between pieces ensures even cooking and better caramelization.
Serving Suggestions
These tofu skewers pair wonderfully with:
- A side of lemon herb quinoa or grilled corn salad
- A bed of baby greens with a splash of olive oil and lemon
- A chilled glass of sparkling water with lime and mint
They’re perfect as a main dish, but can also be served as small plates or even deconstructed in a bowl format.
5. Vegan Cherry Clafoutis

There’s something timeless and elegant about a clafoutis — the French countryside dessert that combines fresh cherries and a custard-like batter into a warm, spoonable delight. Traditionally made with eggs and cream, I’ve created a vegan version that’s just as luscious, using plant-based ingredients to mimic that silky, rich texture.
This Vegan Cherry Clafoutis is slightly crisp on the edges, soft and custardy in the center, and bursting with sweet, juicy cherries throughout. It’s perfect as a brunch centerpiece, a light summer dessert, or even a decadent breakfast. Serve it warm, and you’ll see exactly why this recipe has a place in my regular rotation.
Ingredients
For one 9-inch baking dish:
- 1 cup full-fat coconut milk — Creates a creamy base and adds richness.
- ½ cup almond flour — Adds body and a subtle nutty flavor to the custard.
- ¼ cup all-purpose flour (or gluten-free blend) — Helps structure the batter while keeping it tender.
- ¼ cup maple syrup — Naturally sweetens the dish without refined sugar.
- 2 tablespoons cornstarch — Replaces eggs and helps thicken the custard.
- 1 tablespoon almond butter — Adds depth and a touch of nuttiness that pairs beautifully with cherries.
- 1 teaspoon vanilla extract — Adds warm, aromatic notes.
- ¼ teaspoon almond extract — Accentuates the cherry flavor with that classic cherry-almond pairing.
- Pinch of salt — Balances the sweetness.
- 1 ½ cups fresh cherries (pitted and halved) — The star of the show; sweet, juicy, and full of summer flavor.
- Powdered sugar (optional, for dusting) — For a light finishing touch.
Step-by-Step Process
1. Preheat the Oven and Prepare the Dish
I begin by preheating the oven to 375°F (190°C) and lightly greasing a 9-inch pie dish or shallow baking dish with a bit of coconut oil or vegan butter. This helps prevent sticking and gives the clafoutis a lovely edge crisp.
2. Pit and Prep the Cherries
Next, I pit and halve the cherries. I usually leave them in halves to retain their shape and juiciness during baking. If you don’t have a cherry pitter, slicing around the pit with a paring knife works just fine — though it takes a bit of patience, it’s absolutely worth it.
I scatter the cherry halves evenly over the bottom of the prepared baking dish.
3. Make the Vegan Custard Batter
In a blender or mixing bowl, I combine:
- Coconut milk
- Almond flour
- All-purpose flour
- Maple syrup
- Cornstarch
- Almond butter
- Vanilla extract
- Almond extract
- Salt
I blend until the mixture is completely smooth and silky — this takes about 30 seconds in a high-speed blender or 1–2 minutes by hand with a whisk. The batter will be slightly thick but pourable.
4. Pour and Bake
I slowly pour the batter over the cherries in the baking dish, spreading gently with a spatula if needed to make sure the fruit is evenly covered.
Then I place the dish in the center rack of the oven and bake for 35–40 minutes, or until the top is lightly golden, the edges are firm, and the center has just set (a slight jiggle in the center is okay — it will firm up as it cools).
5. Cool and Serve
Once baked, I let the clafoutis cool for about 10–15 minutes. This rest time helps the custard finish setting and makes it easier to slice or scoop. I often dust the top with a little powdered sugar right before serving for a classic French touch.
Serve it warm or room temperature — both are delicious. I especially love it slightly warm with a scoop of vegan vanilla ice cream or a spoonful of coconut yogurt.
Why This Recipe Is Loved
This vegan cherry clafoutis is loved because it feels both rustic and refined, like something you’d find in a countryside café, but made entirely plant-based and naturally sweetened. The texture is silky and custardy without eggs, and the cherries get beautifully jammy as they bake.
It’s elegant enough for entertaining, yet simple enough for weeknight dessert. And it’s gluten-free adaptable with excellent results.
Pro Tips for Perfect Vegan Clafoutis
- Use full-fat coconut milk — The fat is essential for the creamy texture.
- Blend the batter until smooth — This prevents any floury lumps in the final dish.
- Bake until just set — Slight jiggle is okay; it firms up as it cools.
- Don’t skip the almond extract — It enhances the cherry flavor beautifully and adds authenticity.
Serving Suggestions
This clafoutis is best served:
- Slightly warm, with a sprinkle of powdered sugar
- With a scoop of vegan vanilla ice cream or whipped coconut cream
- As part of a brunch spread with coffee and fresh fruit
Leftovers can be refrigerated and enjoyed cold the next day — just as delicious.
6. Cherry Coconut Chia Parfaits
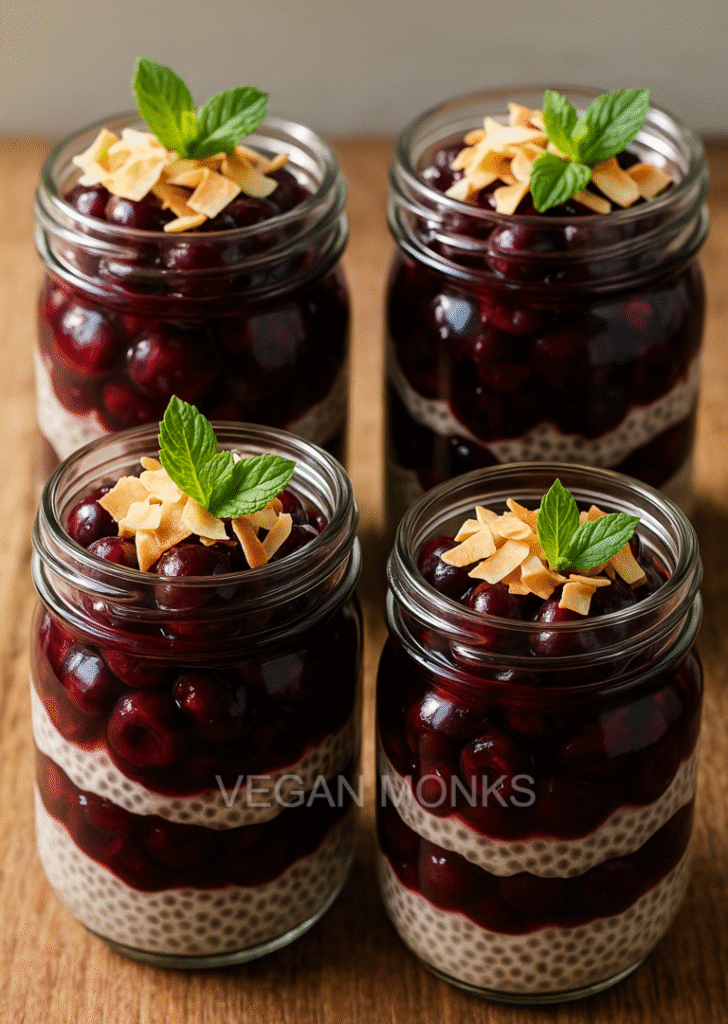
When I want a dessert that’s light, creamy, and packed with nutrition, these Cherry Coconut Chia Parfaits are my answer. They’re cool, refreshing, and layered with juicy fresh cherries, fluffy coconut chia pudding, and optional crunchy toppings for texture. The contrast between the tart-sweet cherries and the luscious coconut base makes every bite feel like a summer treat that’s also good for you.
Whether I serve them in jars for meal prep or in elegant glasses for brunch or dessert, these parfaits are as beautiful as they are satisfying — and they require zero cooking.
Ingredients
For the coconut chia pudding:
- ¼ cup chia seeds — The base of the pudding; they absorb liquid to create a thick, pudding-like texture.
- 1 cup full-fat coconut milk — Rich and creamy; gives the parfait a tropical flavor.
- 1–2 tablespoons maple syrup — Sweetens the pudding naturally.
- ½ teaspoon vanilla extract — Adds warmth and depth to the coconut flavor.
- Pinch of salt — Balances the sweetness.
For the cherry layer:
- 1 ½ cups fresh cherries (pitted and halved) — Juicy and bright; forms the fruity core of the parfait.
- 1 tablespoon maple syrup — Helps macerate the cherries and draw out their juices.
- 1 teaspoon lemon juice — Brightens the cherry flavor and adds a touch of acidity.
Optional toppings:
- Toasted coconut flakes — Adds crunch and flavor.
- Granola or chopped nuts — For added texture and heartiness.
- Fresh mint leaves — For garnish and aroma.
Step-by-Step Process
1. Prepare the Coconut Chia Pudding
In a medium bowl, I whisk together:
- Coconut milk
- Maple syrup
- Vanilla extract
- Pinch of salt
Once smooth, I slowly whisk in the chia seeds, stirring continuously to prevent clumps. I let the mixture sit for 5–10 minutes, then stir again to ensure the seeds are evenly distributed.
I cover the bowl and refrigerate it for at least 4 hours or overnight. The chia seeds swell and absorb the coconut milk, turning it into a thick, spoonable pudding.
2. Macerate the Cherries
While the pudding sets, I prepare the cherry layer. I combine the fresh pitted cherries with maple syrup and lemon juice in a small bowl.
I let them sit for at least 15–30 minutes at room temperature. The cherries begin to soften and release their juices, becoming sweet, glossy, and perfect for layering.
3. Assemble the Parfaits
Once the chia pudding is thickened and the cherries are juicy, I begin layering.
In clear jars or glasses, I start with a few spoonfuls of coconut chia pudding, followed by a layer of macerated cherries, then repeat until I reach the top. I make sure to drizzle some of the cherry syrup into the layers for extra flavor.
For a final flourish, I top each parfait with:
- Toasted coconut flakes
- A few extra cherries
- A sprig of fresh mint
4. Chill or Serve Immediately
I serve the parfaits immediately if I’m short on time, or let them chill for another 30–60 minutes to meld the flavors. They’re great straight from the fridge and even better the next day as the flavors deepen.
Why This Recipe Is Loved
These parfaits are loved for being:
- Naturally sweet, with no refined sugars
- Visually stunning, thanks to the bright cherry layers
- Full of texture, from creamy pudding to juicy fruit and crunchy toppings
- Nutrient-rich, making them perfect as breakfast, snack, or dessert
They’re quick to make and endlessly customizable, which makes them a favorite in both my home kitchen and at gatherings.
Pro Tips for Perfect Chia Parfaits
- Stir the chia pudding twice — Once after mixing and again after 10 minutes to prevent clumps.
- Use full-fat coconut milk — For the creamiest, most satisfying texture.
- Let cherries macerate — This brings out their flavor and creates a natural syrup for layering.
- Layer in clear jars or glasses — It’s all about the visual appeal with this one!
Serving Suggestions
These parfaits are fantastic:
- As a healthy dessert after a light summer dinner
- For make-ahead breakfast jars to grab from the fridge
- As part of a vegan brunch spread with fruit, muffins, and cold brew
They also travel well in jars for picnics or workday snacks.
7. No-Bake Cherry Cheesecake Cups
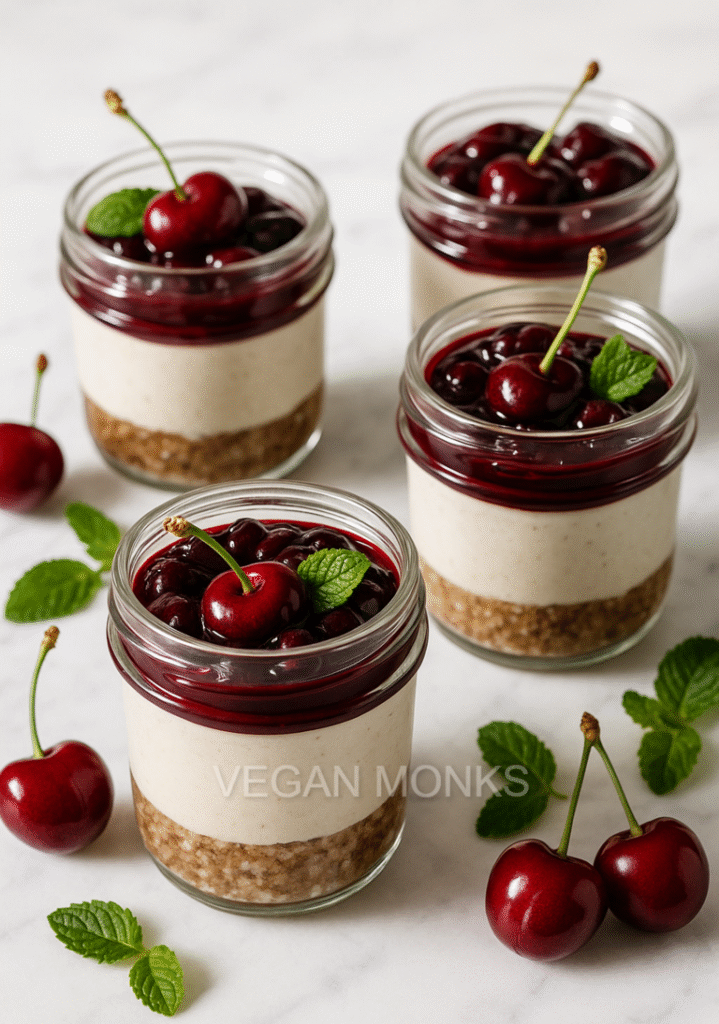
When I want to impress without turning on the oven, these No-Bake Cherry Cheesecake Cups always come to the rescue. Creamy, tangy, and perfectly sweet, they’re layered with a luscious vegan “cheesecake” filling, a crunchy almond-date crust, and a juicy cherry topping that steals the show.
Served in individual cups or jars, they’re ideal for summer gatherings, date nights, or when I’m simply craving a decadent dessert that feels light and refreshing — with no baking required.
Ingredients
For the crust (makes 4–6 servings):
- 1 cup raw almonds — Provides a nutty, crunchy base.
- 1 cup Medjool dates (pitted) — Natural sweetener and binder for the crust.
- 1 tablespoon coconut oil (melted) — Helps the crust hold together and adds richness.
- Pinch of salt — Enhances the flavors and balances the sweetness.
For the vegan cheesecake filling:
- 1 ½ cups raw cashews (soaked for 4–6 hours or overnight) — Forms the rich, creamy base that mimics cheesecake texture.
- ⅓ cup full-fat coconut milk — Adds smoothness and a hint of tropical flavor.
- ¼ cup maple syrup — Sweetens the filling without processed sugar.
- 2 tablespoons lemon juice — Adds tanginess for that classic cheesecake flavor.
- 1 teaspoon vanilla extract — Deepens the overall taste.
For the cherry topping:
- 1 ½ cups fresh cherries (pitted and halved) — Juicy, sweet, and the star of the show.
- 1 tablespoon maple syrup — Helps create a syrupy topping.
- 1 teaspoon lemon juice — Adds brightness and a touch of acidity.
- 1 teaspoon cornstarch (optional) — For a thicker, jam-like cherry topping.
Step-by-Step Process
1. Prepare the Crust
In a food processor, I combine:
- Raw almonds
- Pitted dates
- Melted coconut oil
- Pinch of salt
I pulse until the mixture becomes crumbly and sticky — it should hold together when pressed between fingers. If it feels too dry, I add an extra date or a small splash of water.
I divide the crust mixture evenly among 4–6 small jars or cups, pressing it into the bottom with a spoon to form a compact layer. Then I place the jars in the fridge while I make the filling.
2. Make the Cheesecake Filling
I drain the soaked cashews and add them to a high-speed blender along with:
- Coconut milk
- Maple syrup
- Lemon juice
- Vanilla extract
I blend until completely smooth and creamy — this takes about 1–2 minutes, depending on the blender. I pause to scrape down the sides as needed. The mixture should be silky, thick, and spoonable.
I spoon or pipe the filling over the chilled crusts, leaving room at the top for the cherry layer. I return the jars to the fridge to chill and set while I prepare the topping.
3. Make the Cherry Topping
In a small saucepan over medium heat, I combine:
- Cherries
- Maple syrup
- Lemon juice
I let the mixture simmer for about 5–7 minutes, until the cherries start to soften and release their juices. For a thicker texture, I stir in 1 teaspoon cornstarch dissolved in a tablespoon of water and cook for an additional 1–2 minutes until glossy and syrupy.
I let the cherry topping cool completely before spooning it over the cheesecake layer in each jar.
4. Chill and Serve
Once assembled, I chill the cheesecake cups for at least 2 hours, or until fully set. Before serving, I sometimes top with extra fresh cherries, a few toasted almond slivers, or a dollop of coconut whipped cream for a beautiful finish.
Why This Recipe Is Loved
These cheesecake cups are loved because they combine everything people want in a dessert:
- Creaminess from cashews and coconut
- Sweet-tart cherry topping
- Crunchy nutty crust
They’re fully vegan, gluten-free, refined sugar-free, and made with real, whole-food ingredients. Plus, individual portions make them ideal for parties, picnics, and date nights.
Pro Tips for Perfect Cheesecake Cups
- Soak the cashews long enough — It’s key to a super-smooth filling.
- Use ripe cherries — The sweeter and juicier, the better the topping.
- Let the cups chill fully — The texture improves with time; they’re even better the next day.
- Use clear cups or jars — It shows off the gorgeous layers and makes for a stunning presentation.
Serving Suggestions
I like to serve these chilled, garnished with:
- A fresh mint sprig
- A light dusting of cocoa powder or cinnamon
- A few cacao nibs for crunch and a hint of bitterness
They also pair beautifully with a glass of cold brew or a fruity iced tea.
8. Vegan Cherry Lemon Scones

Few things make a summer morning feel more special than the smell of freshly baked scones wafting through the kitchen. These Vegan Cherry Lemon Scones are soft, tender, and bursting with juicy cherries and zesty lemon flavor. They’re golden on the outside, fluffy inside, and made completely dairy-free, egg-free, and with clean, simple ingredients.
Perfect with a cup of tea, served at brunch, or enjoyed as an afternoon pick-me-up, these scones strike the ideal balance between wholesome and indulgent — and the cherry-lemon combo gives them a bright, summery twist that’s completely irresistible.
Ingredients
Dry ingredients:
- 2 cups all-purpose flour — The base of the scones; gives them structure and tenderness.
- ¼ cup coconut sugar — Lightly sweetens without refined white sugar.
- 1 tablespoon baking powder — Provides lift and fluffiness.
- ½ teaspoon sea salt — Balances the flavors.
Wet ingredients:
- ⅓ cup cold coconut oil or vegan butter — Cuts into the flour to create a crumbly, flaky texture.
- ¾ cup unsweetened almond milk — Moistens the dough while keeping it light.
- 1 tablespoon lemon zest — Infuses a fresh, citrusy aroma.
- 2 tablespoons lemon juice — Enhances the tang and reacts with the baking powder for extra rise.
- 1 teaspoon vanilla extract — Adds depth and warmth to the overall flavor.
Add-ins:
- 1 cup fresh cherries (pitted and halved or quartered) — Juicy bursts of sweetness in every bite.
Optional glaze:
- ½ cup powdered sugar
- 1 tablespoon lemon juice — Stir together until pourable, for drizzling over the cooled scones.
Step-by-Step Process
1. Preheat the Oven and Prep Baking Sheet
I begin by preheating my oven to 400°F (200°C). I line a baking sheet with parchment paper or a silicone mat to prevent sticking and ensure even browning.
2. Mix the Dry Ingredients
In a large mixing bowl, I whisk together:
- All-purpose flour
- Coconut sugar
- Baking powder
- Salt
This ensures the leavening agent is evenly distributed and the scones will rise uniformly.
3. Cut in the Coconut Oil
Next, I add the cold coconut oil or vegan butter to the flour mixture. Using a pastry cutter or my fingers, I quickly work it in until the mixture resembles coarse crumbs with pea-sized bits. It’s important not to overwork it — this step is what creates those tender, flaky layers in the scones.
4. Combine the Wet Ingredients
In a small bowl or measuring cup, I mix:
- Almond milk
- Lemon juice
- Lemon zest
- Vanilla extract
The lemon juice may slightly curdle the milk — that’s totally fine and even helps with the texture, acting like a vegan buttermilk.
5. Make the Dough
I pour the wet ingredients into the flour mixture and gently stir with a spatula or fork until just combined. Then I fold in the cherry pieces carefully to avoid overmixing and crushing the fruit. The dough will be slightly sticky — that’s exactly what I want.
6. Shape and Cut
On a lightly floured surface, I turn out the dough and gently pat it into a 1-inch thick circle. I use a sharp knife to cut it into 6 or 8 wedges, depending on the size I want. Alternatively, I can use a biscuit cutter for round scones. I transfer the pieces to the prepared baking sheet, spacing them slightly apart.
7. Bake
I bake the scones for 18–22 minutes, or until they’re lightly golden on top and firm to the touch. The smell of lemon and baked cherries is incredible.
8. Cool and Glaze (Optional)
Once out of the oven, I let the scones cool on a wire rack for 10–15 minutes. If I’m glazing, I whisk together powdered sugar and lemon juice to create a drizzle. I spoon or zigzag it over the tops for a glossy, citrusy finish.
Why This Recipe Is Loved
These scones are loved for their:
- Buttery texture (without the butter)
- Bright citrus flavor that lifts every bite
- Juicy cherries that stay moist and sweet after baking
- Beautiful appearance, with specks of red fruit and a golden crust
They’re also free of dairy and eggs, easily adaptable for gluten-free diets, and feel like a bakery treat you made from scratch at home.
Pro Tips for Perfect Vegan Scones
- Keep the coconut oil cold — Like with pie dough, this helps create a flaky texture.
- Use fresh lemon zest — It makes a big difference in flavor.
- Don’t overmix — The dough should just come together for tender results.
- Chill before baking (optional) — A quick 10-minute chill helps the scones hold their shape and rise better in the oven.
Serving Suggestions
These scones are perfect when served:
- Warm, with vegan butter or fruit jam
- Alongside a cup of black tea or oat milk latte
- As part of a weekend brunch with fruit and yogurt parfaits
They also store well in an airtight container for up to 3 days and can be frozen for longer storage.
9. Fresh Cherry Basil Smoothie
When I want something cool, vibrant, and hydrating, this Fresh Cherry Basil Smoothie hits every note. It’s sweet from ripe cherries, bright from a splash of lemon, and delightfully unexpected thanks to the addition of fresh basil. The combination is refreshing, energizing, and just herbal enough to feel sophisticated.
This smoothie is perfect for hot summer mornings, post-workout hydration, or even a light, fruity afternoon snack. It’s a great way to use up fresh cherries and herbs while getting in a dose of fiber, antioxidants, and plant-based nutrition — all in one delicious glass.
Ingredients
Makes 1 large or 2 smaller servings:
- 1 ½ cups fresh cherries (pitted) — The star ingredient; naturally sweet, hydrating, and packed with antioxidants.
- 1 frozen banana — Adds creaminess and natural sweetness without overpowering the cherries.
- ¾ cup unsweetened almond milk — Blends everything smoothly and keeps it light.
- 1 tablespoon lemon juice — Adds brightness and enhances the cherry flavor.
- 4–6 fresh basil leaves — Adds a refreshing herbal twist that elevates the whole drink.
- 1 tablespoon chia seeds (optional) — For extra fiber and omega-3s.
- ½ cup ice (optional) — For a thicker, frostier texture.
Optional Add-ins:
- 1 scoop vegan protein powder — To make it a more filling meal.
- ½ teaspoon vanilla extract — Adds depth and a creamy background flavor.
- Maple syrup (if needed) — Only if your cherries aren’t super sweet.
Step-by-Step Process
1. Prep the Ingredients
I start by pitting the cherries and making sure they’re sweet and juicy. If I’m using cherries that are a bit tart, I keep some maple syrup nearby to adjust sweetness later. I also peel and freeze a banana ahead of time — this adds natural sweetness and gives the smoothie a thick, creamy texture without the need for yogurt or ice cream.
2. Blend the Base
In a high-speed blender, I combine:
- Cherries
- Frozen banana
- Almond milk
- Lemon juice
- Fresh basil leaves
- Chia seeds (if using)
- Ice (if using for thickness)
I blend on high for about 30–45 seconds, until the smoothie is completely smooth and creamy. The basil gets chopped finely and disperses evenly, infusing the smoothie with a subtle, fresh flavor that lingers after each sip.
3. Taste and Adjust
I taste the smoothie and adjust if needed — adding a splash more lemon juice for extra brightness, or a drizzle of maple syrup if the cherries weren’t quite sweet enough.
If I’m adding protein powder or other boosts, I blend again until everything is fully incorporated.
4. Serve Immediately
I pour the smoothie into a chilled glass or jar and garnish with a fresh basil leaf and a few cherry halves if I’m feeling fancy. It’s best served immediately while the flavor is fresh and vibrant.
Why This Recipe Is Loved
This smoothie is loved because it’s:
- Refreshing and clean, not overly sweet or heavy
- Full of antioxidants from cherries and basil
- Hydrating and nourishing, perfect for warm days
- Easy to make, and incredibly beautiful with its deep pink hue
The cherry-basil pairing surprises people in the best way — it’s a fresh twist that makes the smoothie feel gourmet without any extra effort.
Pro Tips for the Best Smoothie
- Use very ripe cherries and banana — Ripe fruit means maximum sweetness and flavor.
- Don’t skip the lemon juice — It brightens the entire smoothie and balances the sweet-savory notes.
- Start with 4 basil leaves — Then increase to taste. Basil is powerful, and a little goes a long way.
- Serve cold — This smoothie tastes best icy and chilled right from the blender.
Serving Suggestions
This smoothie is perfect as:
- A cool, energizing breakfast with a handful of nuts or granola
- A pre- or post-workout drink for hydration and recovery
- A beautiful brunch drink when served in clear glasses with fresh garnish
You can also freeze leftovers into smoothie popsicles for a creative, no-waste summer snack.
When cherries are in season, nothing beats enjoying their juicy sweetness in fresh recipes you make yourself. You’ll love how these recipes celebrate vibrant flavors and simple ingredients. They are perfect for brightening up your day or impressing guests with seasonal treats. Fresh cherries bring natural joy to every bite you take.
FAQs
Q1: What can I make with fresh cherries besides pie?
Fresh cherries are super versatile! Try adding them to salads, smoothies, yogurt bowls, salsas, or grilling them for a savory-sweet topping on meats and cheeses.
Q2: Do I need to pit cherries before cooking or baking with them?
Yes, unless you’re infusing liquids or making a decorative topping, you’ll want to remove the pits. A cherry pitter makes it super easy, but a straw or chopstick can also do the trick.
Q3: Can fresh cherry recipes be frozen or made ahead?
Absolutely! Many recipes like cherry compote, jam, or cherry crumble freeze well. You can also pit and freeze raw cherries to use later in smoothies or baked goods.
These fresh cherry recipes are proof that plant-based can be bold, beautiful, and bursting with flavor. From breakfast to dessert, every bite celebrates the sweetness of summer’s best fruit. No dairy, no fuss – just real ingredients and vibrant taste.
So grab those cherries while they’re ripe and get cooking – deliciousness awaits