Let’s be real—tailgating is all about the food. As a lifelong foodie and vegan, I’ve learned how to turn classic game-day snacks into plant-based crowd favorites. Whether you’re posted up outside the stadium or hosting a watch party at home, these recipes bring all the flavor without the meat or dairy. I’ve made each one travel-friendly, easy to prep, and most importantly downright addictive. Ready to wow your crew with vegan eats they won’t even realize are vegan? Let’s dig in.
Tailgate Recipes
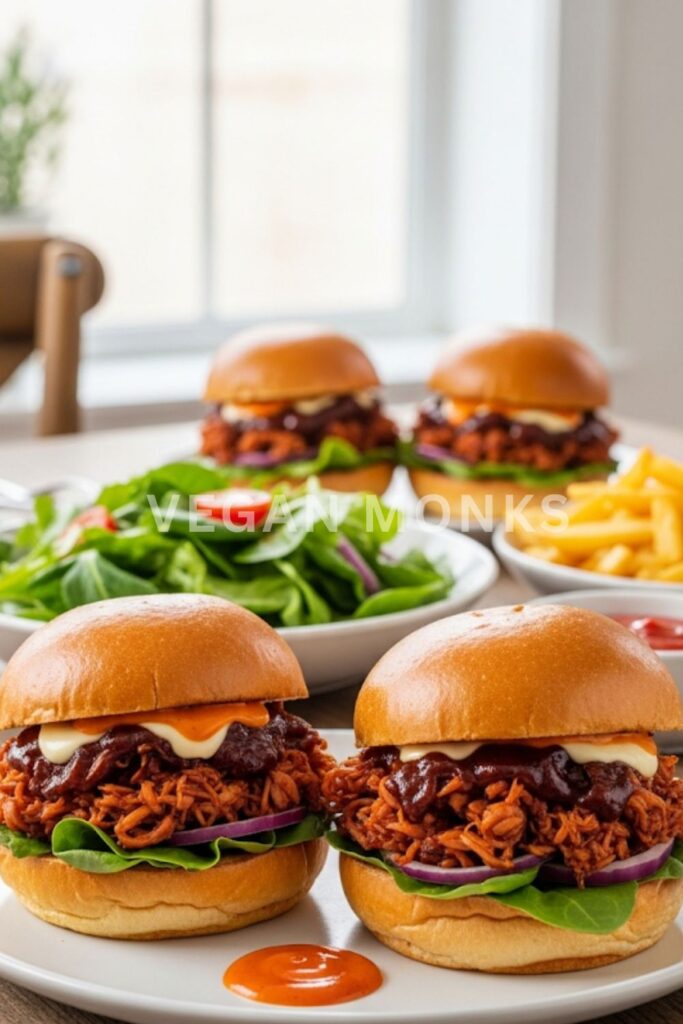
BBQ Jackfruit Sliders
Why You’ll Love It
If there’s one thing that screams tailgate food, it’s something smoky, tangy, and served between two buns. Enter these BBQ Jackfruit Sliders—the ultimate vegan alternative to pulled pork sandwiches. Jackfruit is a tropical fruit that shreds like meat and soaks up flavors beautifully, making it a go-to for plant-based BBQ recipes. These sliders are perfect for prepping ahead and can be served warm or at room temperature, making them ideal for travel and sharing. Whether you’re feeding a crowd at a stadium parking lot or throwing a backyard bash, these sliders are guaranteed to disappear fast.
Jackfruit not only mimics the texture of shredded meat but is also low in fat and packed with fiber. Combine that with your favorite BBQ sauce and pillowy buns, and you’ve got the kind of hand-held comfort food that makes people ask, “Wait… this is vegan?”
Ingredients
- 2 cans of young green jackfruit (in water or brine, not syrup)
- 1 tablespoon oil (olive or any neutral oil)
- 1 teaspoon smoked paprika
- ½ teaspoon garlic powder
- ½ teaspoon onion powder
- 1 teaspoon chili powder (optional for heat)
- Salt and pepper to taste
- 1 cup vegan BBQ sauce (look for one without honey)
- Slider buns (8–10, depending on size)
- Vegan coleslaw (optional but highly recommended for crunch and creaminess)
- Pickles (for tangy contrast)
Instructions
Step 1: Prepare the Jackfruit
Open and drain the jackfruit cans. Rinse well to remove the brine. Trim off any hard cores and discard the seeds if desired. Use your fingers or two forks to shred the jackfruit into bite-sized pieces—don’t worry about making it perfect.
Step 2: Sauté the Jackfruit
In a large skillet, heat 1 tablespoon of oil over medium heat. Add the shredded jackfruit and cook for 5–7 minutes, stirring occasionally, until it starts to brown slightly. This step helps deepen the flavor.
Step 3: Add Seasonings
Sprinkle in smoked paprika, garlic powder, onion powder, chili powder (if using), and a pinch of salt and pepper. Stir to coat the jackfruit evenly. Let it cook another 2–3 minutes.
Step 4: Add the BBQ Sauce
Pour in about ¾ cup of the vegan BBQ sauce, reserving the rest for later. Stir well and reduce the heat to low. Let the jackfruit simmer for 10–15 minutes, stirring occasionally. The mixture should become thick, sticky, and flavorful.
Step 5: Toast the Buns
While the jackfruit simmers, slice your slider buns and toast them lightly in a dry skillet or oven. This step is optional but prevents sogginess and adds a nice texture.
Step 6: Assemble the Sliders
Add a generous spoonful of the BBQ jackfruit mixture onto the bottom half of each bun. Top with vegan coleslaw and a couple of pickles if you like a sweet and sour contrast. Drizzle with a bit more BBQ sauce if desired, and cap it off with the top bun.
Tips & Serving Suggestions
- Make Ahead: You can cook the jackfruit up to two days in advance and store it in the fridge. Just reheat and assemble on the day of your tailgate event.
- Heat It Up: Keep the filling warm using a slow cooker or insulated container for long tailgating hours.
- Texture Tip: If you like crispy edges, spread the jackfruit on a baking sheet after cooking and bake at 400°F for 10–15 minutes before assembling.
- Serving Idea: Set up a DIY slider bar with buns, jackfruit, slaw, pickles, and extra BBQ sauce so guests can build their own.
- Pair With: These sliders go great with baked fries, grilled corn, or a big bowl of vegan potato salad.
Vegan Buffalo Cauliflower Bites

Why You’ll Love It
No tailgate party is complete without something spicy, crunchy, and just messy enough to make you lick your fingers. That’s where these Vegan Buffalo Cauliflower Bites come in. They’re the perfect plant-based alternative to traditional chicken wings but without the grease or guilt. Crispy on the outside, tender inside, and drenched in tangy buffalo sauce, they’re ideal for passing around during pre-game excitement. They also happen to be gluten-free-friendly if you use the right flour. And when paired with a vegan ranch dip, these bites will convert even the most skeptical meat lovers.
Buffalo cauliflower isn’t just a trend—it’s here to stay because it’s unbelievably good and super easy to make with basic ingredients.
Ingredients
- 1 medium head cauliflower, cut into medium-sized florets
- ¾ cup all-purpose flour (or gluten-free flour blend)
- ¾ cup unsweetened plant milk (like almond or oat)
- 1 teaspoon garlic powder
- ½ teaspoon smoked paprika
- ½ teaspoon salt
- ¼ teaspoon black pepper
- ½ cup vegan buffalo sauce
- 1 tablespoon melted vegan butter or olive oil (optional, for extra richness)
Instructions
Step 1: Preheat Oven and Prep Baking Sheet
Preheat your oven to 425°F (220°C). Line a baking sheet with parchment paper or a silicone mat to prevent sticking and ensure even cooking.
Step 2: Make the Batter
In a large bowl, whisk together the flour, plant milk, garlic powder, paprika, salt, and pepper. The batter should be smooth and slightly thick enough to cling to the cauliflower without dripping too much.
Step 3: Coat the Cauliflower
Add cauliflower florets to the bowl in batches, ensuring each piece is coated evenly in the batter. Shake off the excess and place them on the prepared baking sheet, leaving space between each floret.
Step 4: First Bake
Bake for 20 minutes, flipping halfway through to get even browning. The florets should begin to crisp and turn slightly golden.
Step 5: Add the Buffalo Sauce
Remove the cauliflower from the oven and toss them in a bowl with the buffalo sauce. For a creamier texture, stir in a tablespoon of melted vegan butter or oil before tossing. Return the sauced florets to the baking sheet.
Step 6: Final Bake
Bake for another 10–12 minutes until the cauliflower is slightly caramelized and sticky with sauce.
Step 7: Serve Hot
Serve immediately with vegan ranch or blue cheese dressing and celery sticks for the full wing experience.
Tips & Serving Suggestions
- Crispy Factor: For extra crunch, add a tablespoon of cornstarch to the batter or broil the bites for 2–3 minutes after the final bake.
- Air Fryer Option: You can also air fry these in batches at 400°F for 15–18 minutes, flipping once.
- Spice It Up or Down: Adjust the heat by choosing a milder or hotter buffalo sauce. You can even drizzle maple syrup over them for a sweet-and-spicy combo.
- Tailgate Travel Tip: Keep warm in a thermos or portable warmer, and bring the dipping sauce in a chilled container.
- Pair With: These go great with tortilla chips, cucumber spears, or mini slider rolls if you want to turn them into sandwiches.
Loaded Vegan Nachos
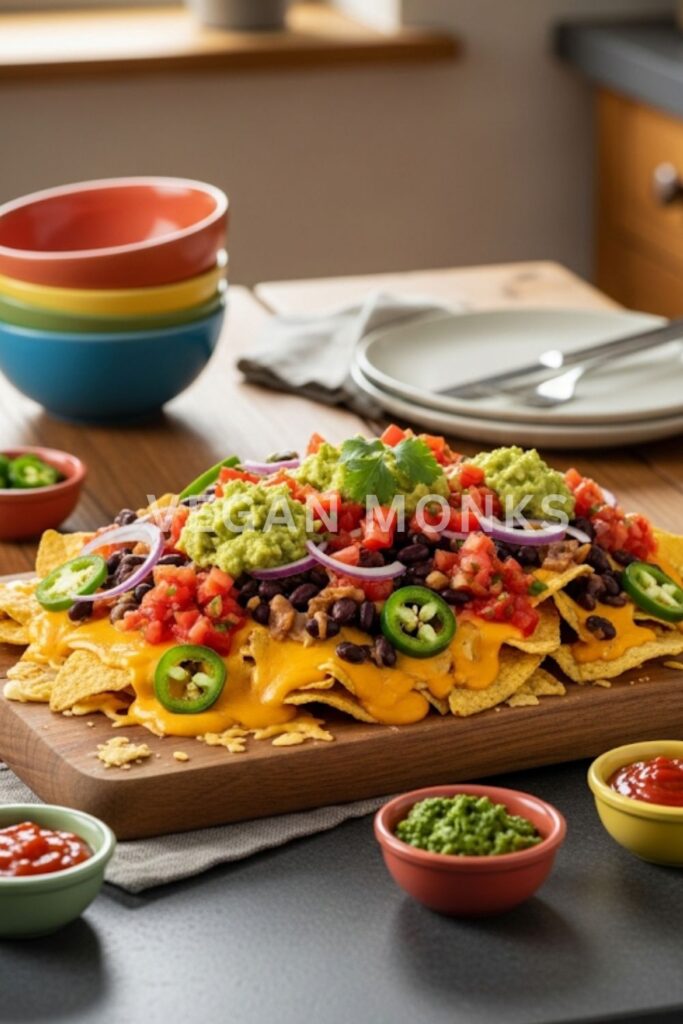
Why You’ll Love It
Nachos are the MVP of tailgate food—everyone loves them, they’re easy to customize, and they’re made for crowd-pleasing. These Loaded Vegan Nachos pack all the cheesy, spicy, zesty goodness you’d expect, but in a fully plant-based format. Whether you’re feeding a crowd or just snacking between quarters, they’re fast to assemble and endlessly adaptable.
With hearty beans, melty vegan cheese or queso, and vibrant fresh toppings like tomatoes and guac, every bite is layered with bold flavor. The key is balancing textures: warm and crunchy chips, creamy cheese, and cool toppings. Perfection.
Ingredients
- Tortilla chips (sturdy ones, not thin restaurant-style)
- 1 can black beans, drained and rinsed
- 1 cup vegan cheese shreds or 1 cup vegan queso
- ½ cup diced tomatoes
- ½ cup guacamole or sliced avocado
- ¼ cup pickled jalapeños
- ¼ cup chopped red onions or scallions
- Fresh cilantro, chopped
- Lime wedges, for serving
Instructions
Step 1: Preheat and Prep
Preheat your oven to 375°F. Line a baking tray with parchment paper or foil for easy cleanup.
Step 2: Layer the Base
Spread a generous layer of tortilla chips on the tray. Scatter the black beans evenly over the chips, followed by vegan cheese shreds or dollops of queso.
Step 3: Bake Until Melty
Bake the nachos for 8–10 minutes, just until the cheese melts and everything is warmed through. Don’t overbake or the chips may burn.
Step 4: Add Fresh Toppings
Remove from the oven and immediately top with diced tomatoes, jalapeños, onions, guac, and cilantro. Squeeze lime juice over the top for a bright finish.
Step 5: Serve Immediately
Serve right off the tray or transfer to a large platter. Provide extra napkins—these get messy in the best way.
Tips & Serving Suggestions
- Cheese Tip: For gooey queso, use a store-bought vegan queso or make your own using soaked cashews, nutritional yeast, and spices.
- Make It Meaty: Add crumbled tofu or tempeh spiced with taco seasoning for extra protein.
- Avoid Soggy Chips: Don’t overdo the fresh toppings—serve some on the side if transporting the nachos to your tailgate spot.
- Pack It Smart: You can assemble the dry layers at home, wrap tightly, and warm them on a grill at your tailgate. Add cold toppings just before serving.
- Pair with: Serve with spicy salsa, vegan sour cream, or even a jalapeño lime margarita if you’re really going all out.
Vegan Chili in a Thermos
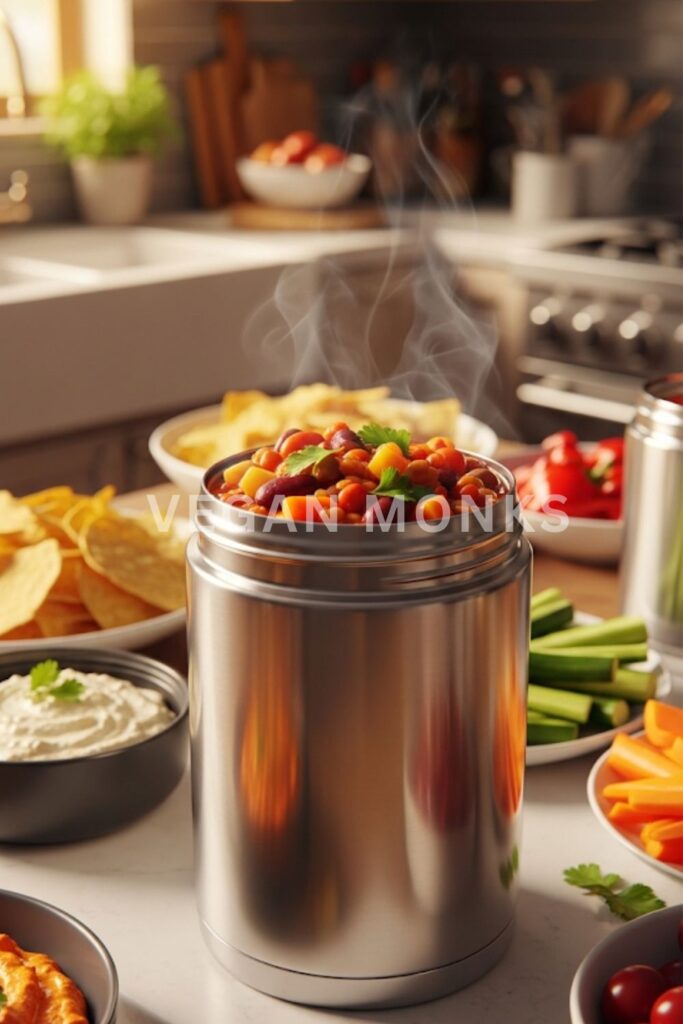
Why You’ll Love It
There’s something so comforting about chili—it’s warm, filling, and packed with flavor. For tailgating, it becomes even more perfect when you serve it in a thermos. Vegan Chili in a Thermos is not only a practical solution to feeding people on the go, but also a rich, hearty option that pleases everyone, whether they’re plant-based or not.
What makes this chili shine is its depth of flavor: savory beans, sweet tomatoes, smoky spices, and a bit of heat, all slow-simmered to perfection. It’s a complete meal in a cup, and when packed in an insulated container, it stays warm for hours. Ideal for cold-weather games and post-kickoff hunger pangs.
Ingredients
- 1 tablespoon olive oil
- 1 yellow onion, diced
- 3 cloves garlic, minced
- 1 bell pepper, diced
- 1 can black beans, drained
- 1 can kidney beans, drained
- 1 can corn, drained
- 1 can crushed tomatoes (14 oz)
- 1 tablespoon tomato paste
- 1 tablespoon chili powder
- 1 teaspoon cumin
- ½ teaspoon smoked paprika
- Salt and black pepper, to taste
- 1 cup vegetable broth
- Optional toppings: vegan sour cream, chopped green onions, avocado, lime
Instructions
Step 1: Sauté the Aromatics
In a large pot, heat olive oil over medium heat. Add diced onion and sauté for 3–4 minutes until softened. Add garlic and bell pepper and cook for another 2–3 minutes until fragrant.
Step 2: Add Beans and Tomatoes
Stir in the black beans, kidney beans, corn, tomato paste, and crushed tomatoes. Mix well to combine and coat everything evenly.
Step 3: Add Spices and Simmer
Sprinkle in chili powder, cumin, paprika, salt, and pepper. Pour in the vegetable broth and stir. Bring everything to a boil, then reduce heat and let it simmer for at least 30 minutes, uncovered. Stir occasionally to prevent sticking.
Step 4: Taste and Adjust
Once thickened, taste the chili and adjust seasoning as needed. If it’s too thick, add a splash more broth. If you want more heat, a pinch of cayenne works well.
Step 5: Pack and Serve
Ladle the hot chili into an insulated thermos or soup container. Seal tightly and bring it to your tailgate. It will stay hot for 3–4 hours if your container is good quality.
Tips & Serving Suggestions
- Make It Ahead: Chili tastes even better the next day, so you can prep it the night before your event and reheat in the morning.
- Double the Batch: Chili freezes well. Make a large batch and freeze half for your next tailgate.
- Toppings To-Go: Pack a small topping station with separate containers of chopped avocado, vegan sour cream, tortilla strips, and lime wedges.
- Serving Tip: Pour into individual cups or bowls. You can even serve with a side of cornbread muffins or tortilla chips for dunking.
- Spice Variation: If you like a smoky flavor, try adding a chipotle pepper in adobo sauce during the simmer stage.
Mini Vegan Corn Dogs

Why You’ll Love It
Everyone loves food on a stick—and these Mini Vegan Corn Dogs deliver big flavor in a little bite. They’re nostalgic, savory, and the perfect combination of crispy, sweet corn batter and plant-based hot dog. These are tailgate gold, especially when served with a variety of dips.
Whether you’re serving kids, teens, or adults, this recipe wins on taste and convenience. Plus, they can be made ahead and served warm or at room temp. It’s everything you love about the fair food classic—just without the animal products.
Ingredients
- 6 vegan hot dogs (cut into thirds)
- 1 cup cornmeal
- ¾ cup all-purpose flour
- 1 tablespoon sugar
- 1 tablespoon baking powder
- ¾ cup unsweetened plant milk
- 1 tablespoon ground flax + 3 tbsp water (flax egg)
- ½ teaspoon salt
- Vegetable oil, for frying
- Small skewers or toothpicks
Instructions
Step 1: Prep the Hot Dogs
Cut each vegan hot dog into thirds to create 18 mini dogs. Pat dry with a paper towel. Insert skewers or toothpicks halfway through each piece.
Step 2: Make the Batter
In a bowl, whisk together cornmeal, flour, sugar, baking powder, and salt. In a separate bowl, mix plant milk and the flax egg (let sit for 5 minutes before using). Combine wet and dry ingredients to form a thick batter.
Step 3: Heat Oil
In a deep saucepan, heat 2–3 inches of oil to 350°F (175°C). The oil is ready when a drop of batter sizzles and floats.
Step 4: Dip and Fry
Dip each hot dog into the batter, coating it evenly. Use a spoon to help if needed. Carefully place into the hot oil. Fry in batches for 3–4 minutes, turning occasionally until golden brown.
Step 5: Drain and Cool
Remove the corn dogs with tongs and place on a paper towel-lined plate to drain. Cool for a few minutes before serving.
Tips & Serving Suggestions
- Keep Warm: Store in foil-lined containers or reheat on a grill or hot plate at your tailgate.
- Dip Ideas: Serve with ketchup, mustard, vegan cheese sauce, or chipotle mayo for dipping.
- Make It Gluten-Free: Use a gluten-free flour blend in place of the all-purpose flour.
- Air Fry Option: For a lighter version, bake or air-fry them at 400°F for 12–15 minutes.
- Kids Love These: A total hit with little ones—perfect for family-friendly events.
Vegan 7-Layer Dip Cups
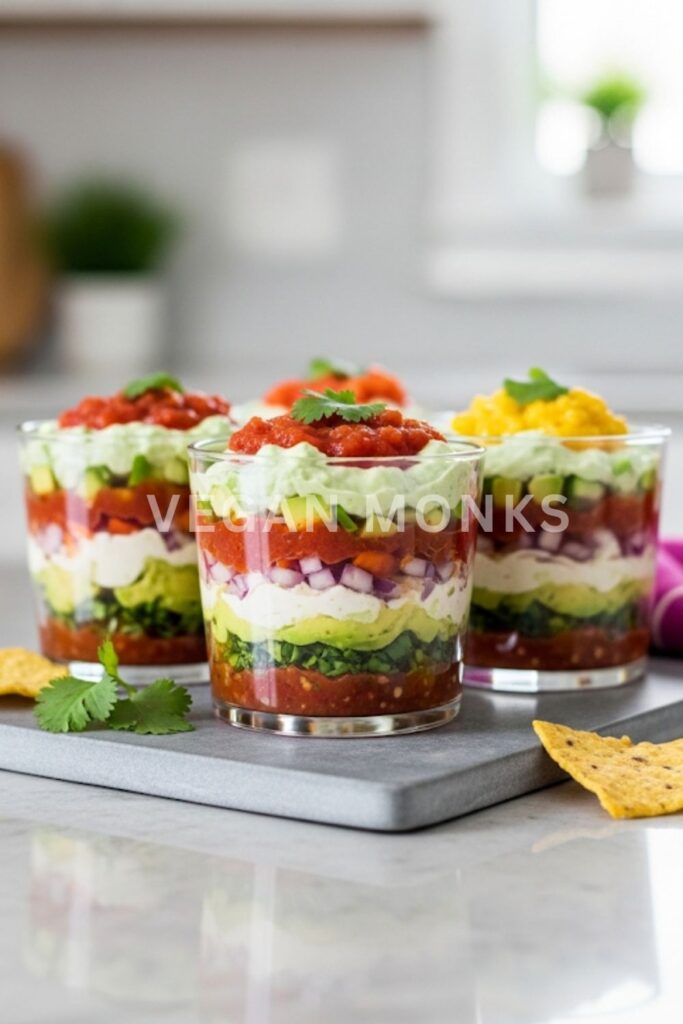
Why You’ll Love It
Tailgating usually means shared dishes, but sometimes you want your own portion without worrying about double-dipping. That’s what makes these Vegan 7-Layer Dip Cups so genius. All the delicious layers of the classic party dip—refried beans, guac, salsa, vegan sour cream, veggies—neatly portioned into individual clear cups. Not only do they look gorgeous (hello, Instagram-worthy), but they also keep things hygienic and easy to serve.
Every scoop delivers a burst of creamy, crunchy, tangy, and savory flavors. You can prep them ahead of time and chill until ready to go. Pair them with a handful of tortilla chips, and you’ve got a grab-and-go tailgate snack that’s both practical and downright addictive.
Ingredients
- 1 can of vegan refried beans
- 1 cup guacamole (store-bought or homemade)
- 1 cup chunky salsa or pico de gallo
- ½ cup vegan sour cream
- ½ cup diced tomatoes
- ½ cup chopped black olives
- ½ cup chopped green onions
- Tortilla chips, for serving
- Clear 8 oz plastic cups, for layering
Instructions
Step 1: Choose Your Cups
Use clear 8 oz cups or small mason jars to show off all the colorful layers. You’ll want to make 6–8 servings depending on portion size.
Step 2: Layer 1 – Refried Beans
Spoon 2–3 tablespoons of refried beans into the bottom of each cup. Use the back of the spoon to flatten it into an even layer.
Step 3: Layer 2 – Guacamole
Next, gently spoon guacamole over the beans. Try not to mix the layers—smoothing them helps keep the dip visually appealing.
Step 4: Layer 3 – Salsa or Pico
Add 1–2 tablespoons of salsa. If your salsa is very liquidy, drain a bit before adding to avoid watery cups.
Step 5: Layer 4 – Vegan Sour Cream
Dollop a layer of vegan sour cream over the salsa. If your sour cream is thick, whisk it slightly for easier spreading.
Step 6: Layers 5–7 – Toppings
Top with diced tomatoes, chopped olives, and green onions. These add both flavor and visual pop.
Step 7: Chill and Serve
Cover each cup with a lid or plastic wrap and refrigerate until serving. Serve chilled with a bag of tortilla chips on the side or tucked right into each cup.
Tips & Serving Suggestions
- Customize It: You can add layers of vegan cheese shreds, corn, or seasoned tofu crumbles to make it even heartier.
- Keep It Cold: If your tailgate is outdoors, store the cups in a cooler with ice packs to keep them fresh.
- No Mess: Since each person gets their own serving, you avoid messy scooping or chip battles.
- Prep Hack: Layering is easiest with a piping bag or zip-top bag with the corner snipped off, especially for guac and sour cream.
- Serving Idea: Add a little flag or toothpick topper to each cup for a festive, sporty touch.
No-Bake Vegan Cookie Dough Balls

Why You’ll Love It
After all the savory, spicy snacks at a tailgate party, a little something sweet hits the spot—and that’s where these No-Bake Vegan Cookie Dough Balls come in. They taste just like classic cookie dough, but they’re completely safe to eat raw and 100% vegan. No eggs, no dairy, and no baking required.
These little treats are great for tailgates because they don’t melt or crumble, and you can pop one in your mouth between cheers. Made with oat flour, almond butter, and a touch of maple syrup, they’re also packed with healthy fats and fiber. Best of all? You can make them ahead of time and store them chilled until game day.
Ingredients
- 1 cup oat flour (you can make this by blending rolled oats)
- ½ cup almond butter (or peanut butter)
- ¼ cup maple syrup
- 1 teaspoon vanilla extract
- Pinch of sea salt
- ½ cup vegan chocolate chips
Optional:
- 2 tablespoons ground flaxseed (for extra fiber)
- 1 tablespoon plant milk (if dough is too dry)
Instructions
Step 1: Mix Dry Ingredients
In a mixing bowl, combine oat flour, salt, and flaxseed (if using). Stir to distribute evenly.
Step 2: Add Wet Ingredients
Add almond butter, maple syrup, and vanilla extract. Stir well using a spatula or your hands until a soft dough forms. If the dough feels dry or crumbly, add a tablespoon of plant milk to bring it together.
Step 3: Fold in Chocolate Chips
Add chocolate chips and mix until evenly distributed. Taste test a tiny bit—because you can.
Step 4: Roll Into Balls
Scoop out small portions of dough (about 1 tablespoon each) and roll into balls. You should get about 12–16 balls depending on size.
Step 5: Chill Until Firm
Place cookie dough balls on a plate or tray lined with parchment paper. Chill in the fridge for at least 30 minutes to firm up.
Step 6: Pack for Tailgate
Transfer to an airtight container. Store in the fridge or cooler until ready to serve. They’ll stay fresh for up to 5 days.
Tips & Serving Suggestions
- Nut-Free Option: Use sunflower seed butter instead of almond or peanut butter if allergies are a concern.
- Make It Fancy: Roll balls in cocoa powder, shredded coconut, or crushed pretzels for texture and flair.
- Tailgate Tip: These travel well—stack them in muffin liners inside a container for neat, easy serving.
- Add Protein: Stir in a scoop of your favorite vegan protein powder for a post-game energy boost.
- Kid-Friendly: Kids love helping roll these—and eating them too.
FAQs
1. What are the best vegan foods to bring to a tailgate?
Some of the best vegan tailgate foods are BBQ jackfruit sliders, cauliflower bites, vegan chili, nachos, and corn dogs. They’re flavorful, travel well, and satisfy both vegans and non-vegans alike.
2. Can you make vegan tailgate food ahead of time?
Absolutely! Many vegan tailgate recipes like chili, dip cups, and cookie dough balls can be made a day or two in advance. Just store them properly and reheat or chill as needed before serving.
3. How do I keep vegan food warm at a tailgate party?
Use thermoses, insulated food containers, or slow cookers plugged into your car (via adapter) to keep items like chili or jackfruit warm for hours. Foil-wrapped containers also help retain heat.
Tailgate food doesn’t have to be all about burgers and brats. With these 7 easy vegan recipes, you’ll bring the same game-day excitement, just in a kinder, cleaner way. Whether it’s sliders, chili, or those dangerously good cookie dough balls, there’s something here for everyone to love. So pack your cooler, gather your people, and serve up some plant-based magic this game day. Trust me, they’ll be coming back for seconds.