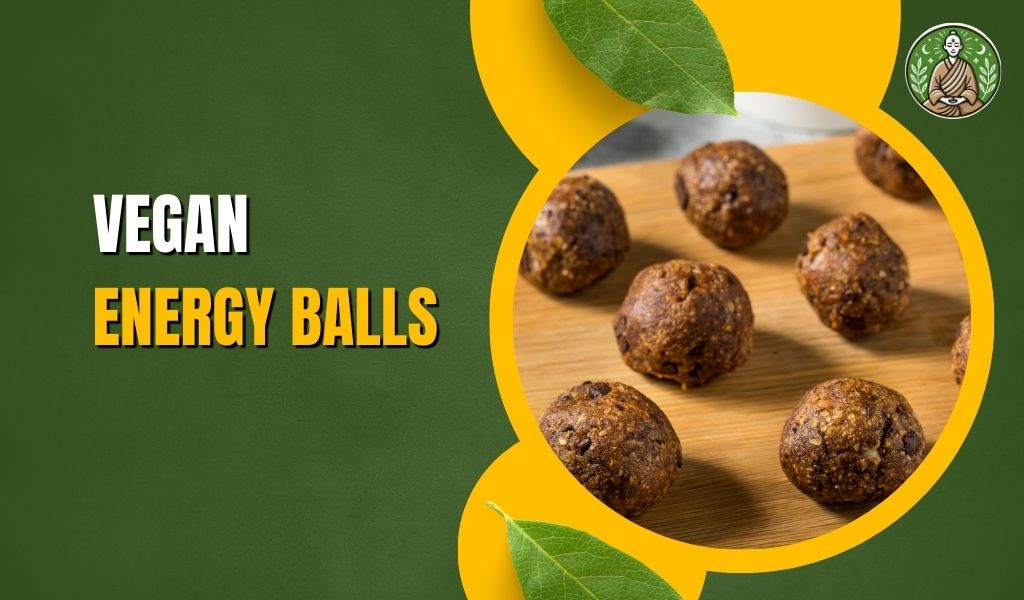
Whether you’re planning a Mario-themed party or just want to level up snack time, these Mario-themed vegan snacks are a total hit! As a lifelong Mario fan and vegan food lover, I had way too much fun creating treats inspired by mushrooms, fire flowers, and those adorable stars. Best part? Everything’s 100% plant-based and easy to whip up. Get ready to bring the Mushroom Kingdom to your kitchen—with snacks that are cute, nostalgic, and delicious!
Mario-themed snacks
Its great to bring some playful nostalgia to your snack time with vegan Mario-themed treats. Creative, colorful, and fun, these recipes make any gathering more exciting. They blend gaming spirit with great taste.
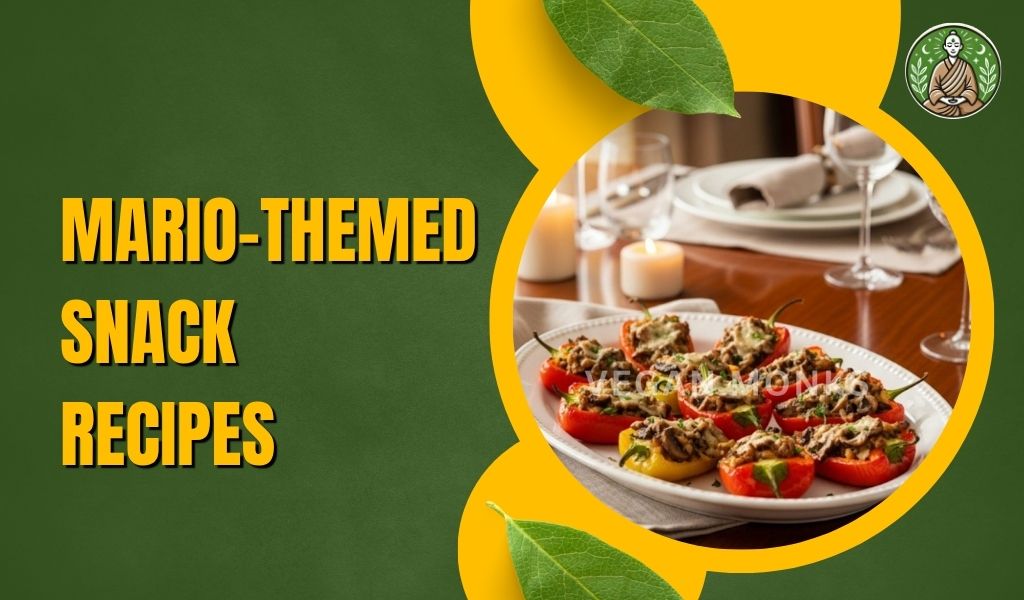
1. Super Mushroom Stuffed Mini Peppers

Why You’ll Love It
These adorable Super Mushroom Stuffed Mini Peppers are a hit every time I make them—for kids’ parties, themed movie nights, or game-day spreads. Inspired by the iconic red-and-white power-up mushrooms from the Mario universe, they’re cute enough to impress and tasty enough to disappear fast!
Inside each pepper is a creamy, herby vegan cheese filling made with cashews, nutritional yeast, and fresh garlic. The red mini bell peppers act as the mushroom caps, and you can decorate the tops with little white vegan cream cheese “spots” to mimic the look. They’re as fun to make as they are to eat!
Ingredients
For the filling:
- 1 cup raw cashews (soaked for 2–4 hours)
- 2 tablespoons lemon juice
- 2 tablespoons nutritional yeast
- 1 garlic clove
- Salt to taste
- 2–3 tablespoons water
- 1 tablespoon chopped parsley or chives (optional)
For the “mushrooms”:
- 10–12 red mini bell peppers
- 2 tablespoons vegan cream cheese or thick cashew spread (for the white spots)
Instructions
- Prepare the filling
Drain soaked cashews and add them to a blender along with lemon juice, nutritional yeast, garlic, and salt. Blend until smooth, adding water a little at a time to reach a thick, creamy texture. Stir in the herbs for color and freshness. - Prep the peppers
Slice the tops off the mini bell peppers and scoop out any seeds. If the bottoms don’t sit flat, trim just a bit so they’ll stand upright. - Fill and decorate
Use a spoon or piping bag to fill each pepper with the cashew cheese mixture. Once filled, spread a thin layer of vegan cream cheese on the top of each pepper and pipe or dab little white dots on top to replicate the Super Mushroom look. - Chill before serving
Refrigerate for at least 30 minutes before serving. This helps the filling set and makes the snacks easy to pick up and eat.
Pro Tip
If you want to take it up a notch, try roasting the peppers for a few minutes beforehand for extra flavor, or serve raw for a crisp, refreshing bite.
2. Fire Flower Spicy Cheese Bites

Why You’ll Love It
Mario’s fiery power-up inspires these Fire Flower Spicy Cheese Bites and packs a flavorful punch! I love how these bold, zesty bites mimic the look of the orange-yellow Fire Flower and add a kick to any party platter. They’re smoky, spicy, creamy, and addictive—think of them as vegan cheese balls with a heroic twist.
Whether you’re serving these warm or chilled, they disappear fast. I always double the batch for game nights, especially when I’m hosting a Mario Kart marathon. They’re simple to make and crowd-pleasing.
Ingredients
For the cheese base:
- 1 cup raw cashews (soaked for 2–4 hours)
- ¼ cup nutritional yeast
- 2 tablespoons lemon juice
- 2 tablespoons roasted red pepper (for color and sweetness)
- 1 garlic clove
- ½ teaspoon smoked paprika
- ¼ teaspoon cayenne pepper (adjust to taste)
- Salt to taste
- 2–3 tablespoons water
For coating:
- 2 tablespoons smoked paprika
- 1 tablespoon nutritional yeast
- 1 tablespoon crushed red pepper flakes (optional, for heat)
Instructions
- Blend the cheese mixture
Drain soaked cashews and blend them with lemon juice, roasted red pepper, nutritional yeast, garlic, smoked paprika, cayenne, salt, and a splash of water. Blend until smooth and thick. - Chill the mixture
Scoop the mixture into a bowl, cover, and refrigerate for at least 30–45 minutes. This helps it firm up so it’s easier to roll. - Shape into bites
Once chilled, scoop small spoonfuls and roll into bite-sized balls. - Coat and serve
Roll each ball in a mixture of smoked paprika, nutritional yeast, and red pepper flakes to give it that fiery Fire Flower look. Chill until ready to serve.
Pro Tip
For a milder version, skip the cayenne and use sweet paprika. These also freeze well—thaw before serving at your next game-themed party.
3. Yoshi’s Fruit Egg Skewers

Why You’ll Love It
These Yoshi’s Fruit Egg Skewers are colorful, refreshing, and a total hit with kids (and let’s be honest, adults too). Inspired by Yoshi’s white eggs with green spots, I used a mix of dragon fruit and kiwi to recreate the look, plus strawberries for a bright Mario color pop.
They’re super easy to make, healthy, and great for warm-weather events. You don’t need any fancy skills—just chop, skewer, and serve.
Ingredients
- 1 dragon fruit (white flesh, for “egg” base)
- 2 kiwis (green “spots”)
- 1 cup strawberries (optional, for Mario red)
- Small skewers or cocktail sticks
Instructions
- Prep the fruit
Peel the dragon fruit and cut into oval or egg-like chunks. Slice the kiwi into rounds, then cut small circles using a straw or piping tip to resemble green spots. Trim strawberries into small triangles or heart shapes for Mario flair. - Assemble skewers
Place a chunk of dragon fruit on each skewer. Decorate it with kiwi dots—pressing them gently into the soft flesh. You can alternate with strawberry pieces for extra color. - Serve chilled
Arrange the skewers on a platter and keep chilled until ready to serve.
Pro Tip
For themed parties, place the skewers in a “Yoshi egg carton” or decorate the tray with paper grass to make it extra fun!
4. Goomba Mushroom Sliders
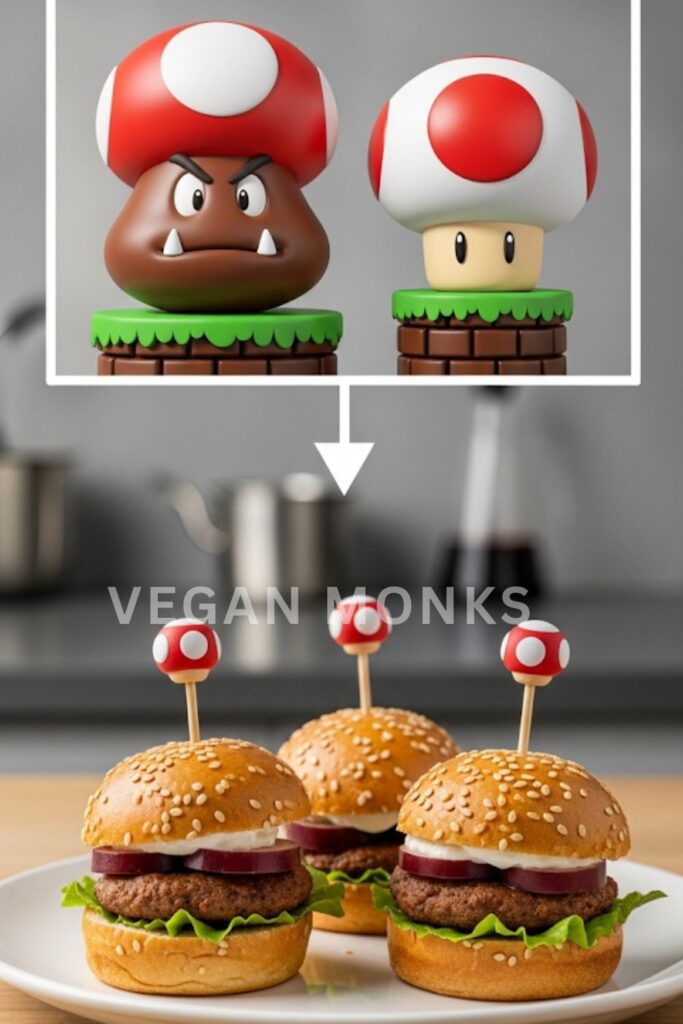
Why You’ll Love It
These Goomba Mushroom Sliders are probably the cutest (and tastiest) nod to Mario enemies I’ve ever made. They’re built using grilled portobello mushrooms as the “Goomba” caps, stuffed into slider buns with tangy vegan mayo, greens, and caramelized onions.
It’s such a satisfying snack—savory, meaty (without the meat), and visually spot-on. I’ve even used edible eyes to make them look more character-accurate for themed events!
Ingredients
- 6 small portobello mushroom caps
- 6 vegan slider buns
- 1 small red onion, caramelized
- ¼ cup vegan mayo or chipotle aioli
- A handful of baby spinach or arugula
- 1 tablespoon soy sauce or tamari
- Olive oil for grilling
- Optional: Edible candy eyes or cut-out vegan cheese circles for decoration
Instructions
- Prep the mushrooms
Clean mushroom caps and brush with olive oil and soy sauce. Grill or sauté until tender and lightly browned. - Toast the buns
Split the buns and lightly toast them. Spread vegan mayo on the bottom halves. - Assemble the sliders
Layer a few greens, caramelized onions, and top with a grilled mushroom cap. Place the bun top at an angle so the mushroom “head” is visible. - Decorate like Goombas
Use tiny pieces of vegan cheese or edible eyes to create Goomba faces if desired. Secure with a toothpick.
Pro Tip
These can be made ahead of time and warmed just before serving. Add sautéed garlic or balsamic glaze for even more flavor.
5. Piranha Plant Veggie Cups
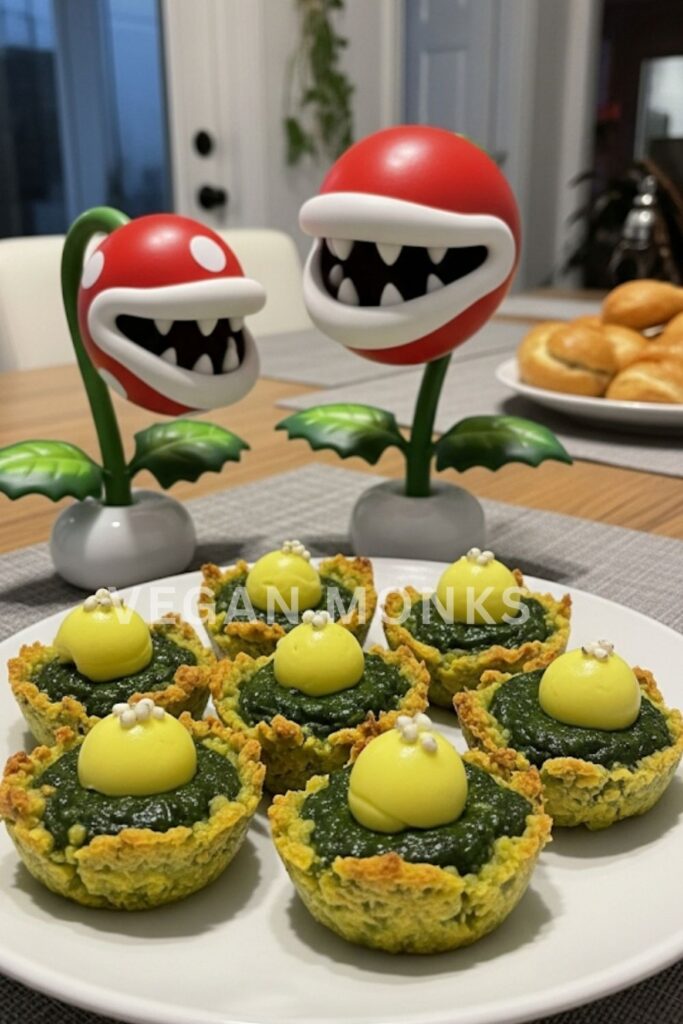
Why You’ll Love It
These Piranha Plant Veggie Cups are a playful (and healthy!) addition to any Mario-themed spread. Inspired by the chomping plants that pop out of pipes in the game, these veggie cups feature crisp cucumber “stems,” cherry tomato “heads,” and hummus “pipes.” They’re a nutritious way to balance out all the sweet and savory treats.
Kids love the fun presentation, and adults love the fresh flavors. They’re easy to assemble, require no cooking, and can be prepped ahead for parties or school events.
Ingredients
- 10 cherry tomatoes
- 1 cucumber, cut into thick sticks
- ½ cup vegan hummus
- 2 small radishes (for “teeth”)
- Fresh parsley (optional, for garnish)
- Small clear cups or ramekins
Instructions
- Prepare the veggie parts
Slice the cucumber into sticks (about 3–4 inches long). Slice the cherry tomatoes in half. Use a knife to carefully carve a small mouth opening in each tomato half. - Make the “teeth”
Thinly slice the radishes and cut out little triangles to form jagged Piranha Plant teeth. Gently insert them into the tomato mouths. - Assemble the plants
Fill each cup with 2–3 tablespoons of hummus. Stick a cucumber “stem” upright in the center. Place the tomato “head” on top with the open side facing forward. - Decorate
Garnish with parsley leaves to look like plant vines or add a sprinkle of smoked paprika to the hummus for flavor and color.
Pro Tip
If you want to go all out, serve the cups inside small green paper pipes (or plastic cups wrapped in green paper) to mimic the Piranha Plant’s iconic home.
6. Princess Peach Strawberry Shortcake Bites
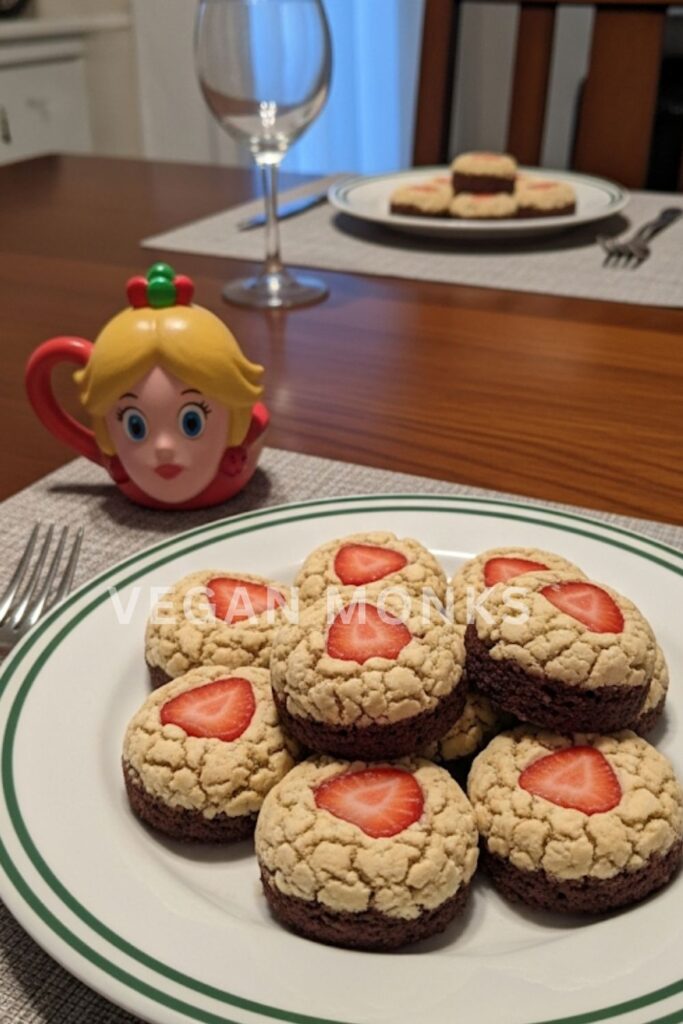
Why You’ll Love It
These Princess Peach Strawberry Shortcake Bites are sweet, elegant, and perfectly pink. I created them to honor everyone’s favorite royal, and they never fail to charm. They feature layers of soft vegan vanilla cake, coconut whipped cream, and fresh strawberries, assembled into bite-sized stacks or served in mini cups.
They’re light, fruity, and so easy to prep ahead. Whether you’re throwing a Mario-themed tea party or just want something fresh and fancy, these are the ultimate princess-approved treats.
Ingredients
For the cake (or use store-bought vegan vanilla cake):
- 1 cup all-purpose flour
- ½ cup sugar
- 1 tsp baking powder
- ½ cup almond milk
- ¼ cup oil
- 1 tsp vanilla extract
- Pinch of salt
For assembly:
- 1 cup sliced strawberries
- 1 cup coconut whipped cream
- Optional: edible glitter or gold sugar
Instructions
- Bake the cake
Mix cake ingredients, pour into a greased 8×8 pan, and bake at 350°F (175°C) for 20–22 minutes. Let cool and cut into 1-inch squares or rounds using a cookie cutter. - Whip the cream
If using canned coconut cream, chill it overnight and whip with a little powdered sugar until fluffy. - Assemble the bites
Layer cake, whipped cream, and strawberries in small stacks or mini dessert cups. Repeat the layers if space allows. - Decorate
Top with a strawberry slice and a pinch of edible glitter or gold dust to channel Peach’s regal flair.
Pro Tip
Add a drop of rose water or vanilla to your whipped cream for a more floral, luxurious flavor.
7. Question Block Cheddar Crackers

Why You’ll Love It
These Question Block Cheddar Crackers are golden, crunchy, and totally on theme. They’re inspired by the classic yellow? Blocks from Mario games and made with a sharp, cheesy vegan dough that bakes into the perfect party snack. I love serving these alongside dips or simply letting them shine in a snack bowl.
They’re fun to make with kids, too—use a piping bag or toothpick to “draw” the white question mark on top using vegan cream cheese or cashew spread.
Ingredients
For the crackers:
- 1 cup all-purpose flour
- 2 tbsp nutritional yeast
- ½ tsp garlic powder
- ½ tsp salt
- 2 tbsp vegan butter or coconut oil
- 2 tbsp vegan cheddar shreds (optional for color)
- 2–4 tbsp cold water
For decoration:
- Vegan cream cheese or thick cashew spread (for piping question marks)
Instructions
- Make the dough
In a bowl, combine flour, nutritional yeast, salt, garlic powder, and vegan butter. Mix until crumbly. Add vegan cheddar if using. Slowly add water until a dough forms. - Roll & cut
Roll out the dough thinly between parchment paper. Cut into small 1×1-inch squares to mimic the ? Blocks. - Bake
Bake at 350°F (175°C) for 10–12 minutes or until golden and crisp. Let cool completely. - Decorate
Once cooled, use a piping bag or toothpick to draw a white “?” on each cracker with vegan cream cheese.
Pro Tip
Add turmeric for a deeper yellow color or paprika for a smoky flavor. You can also use edible food markers to draw designs if you want to skip piping.
8. Luigi’s Green Guacamole Cups
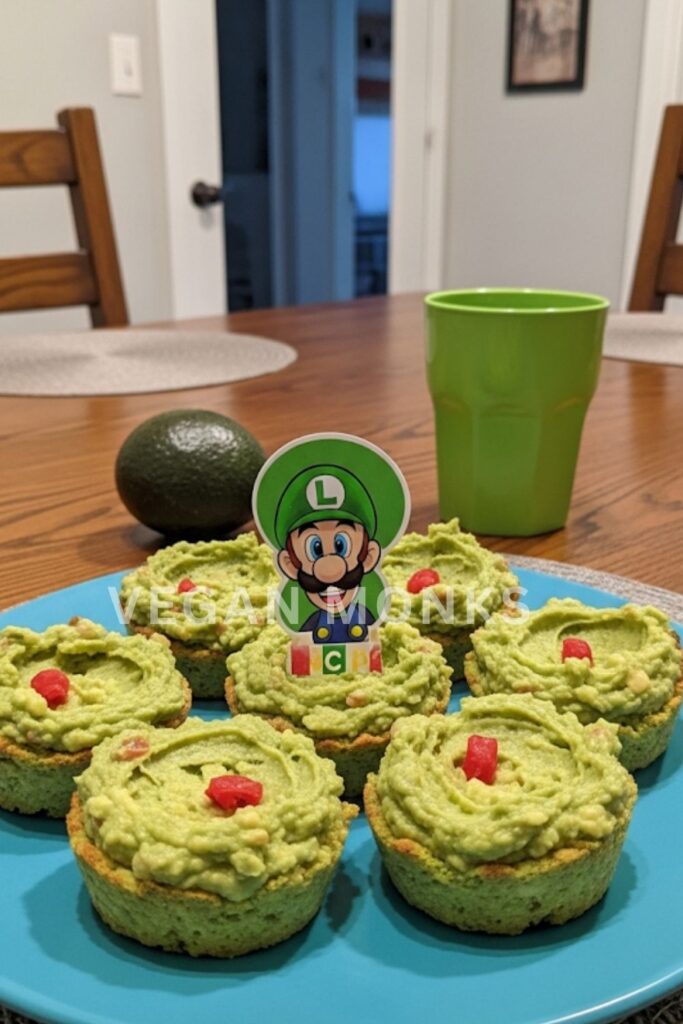
Why You’ll Love It
These Luigi’s Green Guacamole Cups are a fresh, vibrant, and savory snack that’s a total homage to Mario’s trusty green-capped brother. I love serving these for a pop of color on the snack table—and the individual servings make them super party-friendly.
They’re creamy, zesty, and loaded with flavor. I usually pipe a small green “L” tortilla chip or place a mini flag on top of each one so there’s no mistaking who they’re dedicated to. These guac cups always disappear fast, especially when there’s a crowd of hungry gamers.
Ingredients
For the guacamole:
- 2 ripe avocados
- Juice of 1 lime
- 1 clove garlic, minced
- ¼ cup finely chopped onion
- ¼ cup diced tomatoes
- 1 tablespoon chopped cilantro
- Salt and pepper to taste
For serving:
- 6–8 small green or clear cups
- 1–2 green tortilla wraps (for “L” chip toppers)
- Optional: mini flags or green mushroom toppers
Instructions
- Make the guacamole
In a bowl, mash the avocados and mix in lime juice, garlic, onion, tomatoes, cilantro, salt, and pepper. Taste and adjust seasonings as needed. - Prep the cups
Scoop the guacamole evenly into small cups or ramekins. Smooth the tops with a spoon. - Add Luigi flair
Cut out small “L” shapes from a green tortilla using kitchen scissors or a sharp knife. Toast them lightly in a pan or oven until crisp. - Garnish and serve
Insert a crisp “L” chip into each cup or top with a Luigi-inspired party pick. Serve immediately or chill for up to 2 hours.
Pro Tip
To prevent browning, press a small piece of plastic wrap directly onto the guac surface until ready to serve.
9. Mario Kart Banana Pops
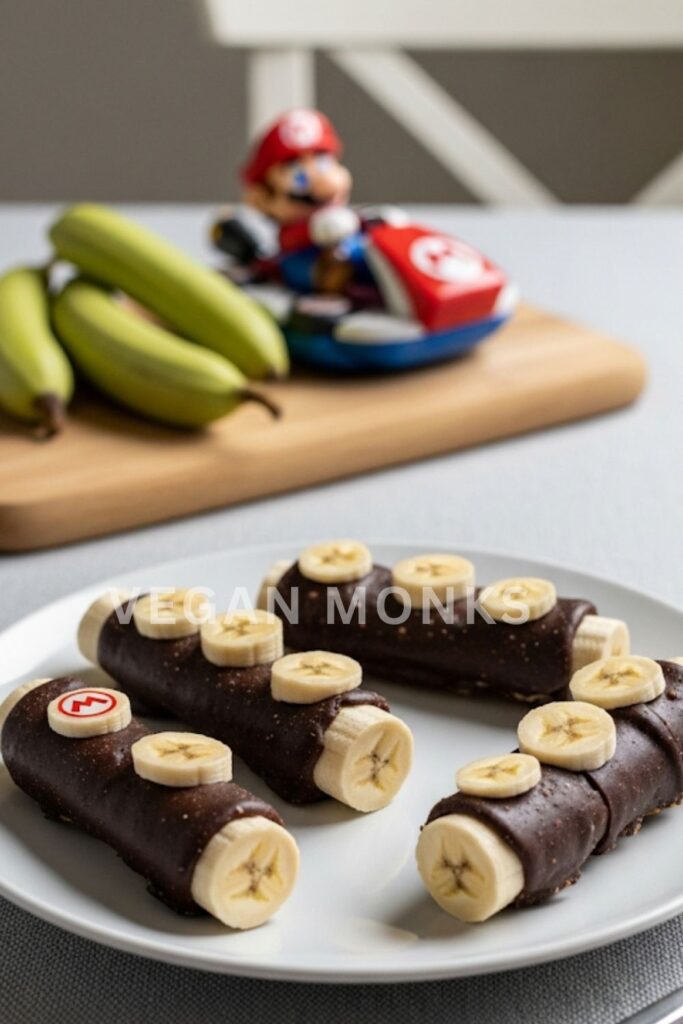
Why You’ll Love It
If you’ve ever skidded on a banana peel in Mario Kart, you’ll love turning that infamous hazard into an actual dessert! These Mario Kart Banana Pops are as fun to make as they are to eat—sweet, frozen banana slices dipped in chocolate and decorated with Mario’s iconic red “M” hat.
They’re perfect for warm weather parties, and kids love decorating their own. Plus, they’re naturally sweet and packed with potassium. Who says power-ups can’t be healthy?
Ingredients
- 3 ripe bananas (not overripe)
- 1 cup dairy-free dark chocolate chips
- 1 teaspoon coconut oil
- 9 small wooden pop sticks
- Red and white vegan candy melts (or food coloring + coconut butter)
- Optional: red paper “caps” or edible Mario face printouts
Instructions
- Prep the bananas
Cut bananas into thirds and insert a pop stick into each one. Place them on a tray and freeze for at least 30 minutes. - Melt the chocolate
In a microwave-safe bowl, melt the dark chocolate with coconut oil in 30-second bursts, stirring until smooth. - Dip the banana pops
Dip each frozen banana into the melted chocolate, coating fully or partially. Let excess drip off, then place back on parchment-lined tray. - Decorate with Mario flair
Once the chocolate hardens, drizzle a red stripe across the top third and pipe or paint a small white “M” using white melted chocolate or frosting.
Pro Tip
Freeze again for 10 minutes before serving for a refreshing, ice cream-like texture!
FAQs
1. Are these Mario-themed snacks easy enough for kids to help with?
Yes! Most of these recipes are no-bake or simple assembly-based, like fruit skewers, banana pops, and mini cups. It’s a great hands-on activity for kids (especially if they’re Mario fans).
2. Can I make these snacks ahead of time for a party?
Absolutely. Many of these can be prepped a day in advance, like the sliders, cheese bites, or veggie cups. Just store them in airtight containers and keep cold until serving time.
And just like that, your snack table is officially upgraded to Level 100! Whether you’re channeling Princess Peach with shortcake bites or dodging Goombas with mushroom sliders, these Mario-themed vegan snacks are the ultimate way to make game night or party time more creative—and more compassionate. All of these recipes are completely dairy- and egg-free, proving once again that vegan food can be playful, nostalgic, and delicious. If you try any of these ideas, be sure to share your creation on Instagram and tag me—I’d love to see your version of the Mushroom Kingdom! Until next snack quest… lets go!