Summer snacks just hit different, right? When it’s hot outside and you’re craving something light yet satisfying, vegan summer dip recipes are the ultimate go-to. Whether you’re hosting a BBQ, planning a picnic, or just chilling poolside, these dips are refreshing, flavorful, and 100% plant-based. Bonus: most of them whip up in under 10 minutes! Let’s dive into a bowl of deliciousness, shall we?
Summer Dip Recipes
1. Creamy Avocado-Lime Dip
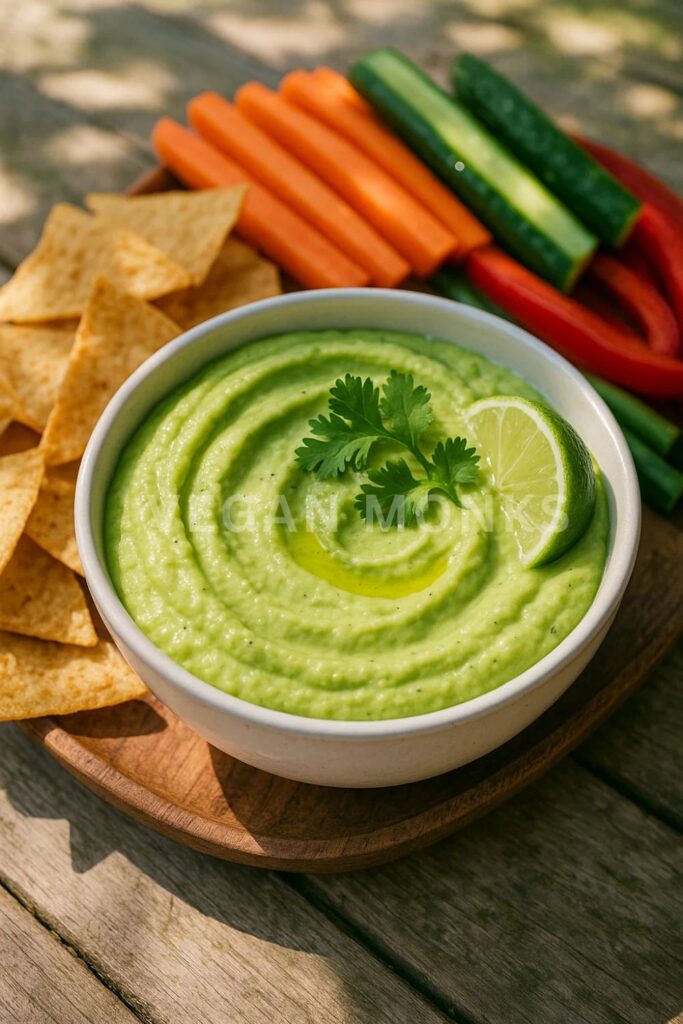
This Creamy Avocado-Lime Dip is my go-to when I want something refreshing, zesty, and gorgeously green. Unlike traditional guacamole, this version is smooth and tangy, thanks to a little plant-based yogurt or olive oil and plenty of fresh lime. The result is a dip that’s rich but still light, with a bright flavor that cuts through anything grilled, fried, or salty.
It’s absolutely delicious with raw veggies, tacos, chips, or spooned over grain bowls. And yes — I’ve eaten it straight off the spoon more than once.
Ingredients
Makes about 1½ cups
- 2 ripe avocados – Creamy and rich; the base of the dip.
- 3 tablespoons fresh lime juice – Adds brightness and tang.
- 2 tablespoons unsweetened vegan yogurt (or olive oil) – For creaminess and smooth texture.
- 1 garlic clove (minced or grated) – Adds sharpness and bite.
- ¼ cup fresh cilantro (chopped) – Herbal and refreshing.
- ¼ teaspoon ground cumin – Adds warmth and subtle earthiness.
- Salt and black pepper to taste
- Optional:
– 1 tablespoon finely chopped green onion or chives
– 1 teaspoon lime zest for extra citrus aroma
Step-by-Step Process
1. Prep the Ingredients
I start by slicing the avocados in half, removing the pits, and scooping the flesh into a medium-sized mixing bowl or food processor. I make sure they’re soft but not overripe — the kind that yields gently when pressed.
I squeeze the fresh lime juice directly into the bowl to keep the avocados from browning and add brightness to the flavor.
2. Blend or Mash
For an ultra-smooth dip, I use a food processor or high-speed blender to combine:
- Avocado
- Lime juice
- Vegan yogurt (or olive oil)
- Garlic
- Cumin
- Salt & pepper
I pulse until everything is creamy, fluffy, and pale green, stopping to scrape down the sides as needed.
For a rustic, chunkier dip, I mash everything by hand using a fork or potato masher, leaving small pieces of avocado intact for texture.
3. Fold in Fresh Herbs
Once the dip is blended to my desired texture, I stir in the chopped cilantro, and optionally, green onions or lime zest for extra lift and complexity.
I give it a final taste and adjust seasoning — sometimes I add a pinch more salt or another squeeze of lime to brighten it up.
4. Chill (Optional) and Serve
Although the dip can be served immediately, I like to chill it for 15–20 minutes to let the flavors meld and the texture firm up slightly. I serve it in a shallow bowl or wide ramekin for easy scooping.
To garnish, I top it with:
- A drizzle of olive oil
- A sprinkle of chopped herbs
- A thin slice of lime or a swirl of plant yogurt for contrast
Why This Recipe Is Loved
This dip is a favorite because it’s:
- Creamy, tangy, and fresh without being heavy
- Dairy-free and naturally gluten-free
- Quick to make — 5 minutes and done
- Perfect as a dip, dressing, spread, or taco topper
It’s ideal for summer because it complements everything from raw vegetables to grilled tofu or roasted corn.
Pro Tips for Best Results
- Use ripe avocados — they should feel soft but not mushy.
- Add a splash of cold water if it’s too thick after blending.
- Store with plastic wrap pressed directly onto the surface to prevent browning.
- Add a pinch of cayenne pepper or jalapeño for a spicy version.
Serving Suggestions
Serve it with:
- Raw veggie platters (carrots, cucumbers, bell pepper strips)
- Tortilla chips or grilled pita
- As a sauce over grain bowls or grilled skewers
- Spread on sandwiches, wraps, or avocado toast
It’s also a fantastic alternative to sour cream on tacos or nachos.
2. Smoky Roasted Red Pepper Hummus
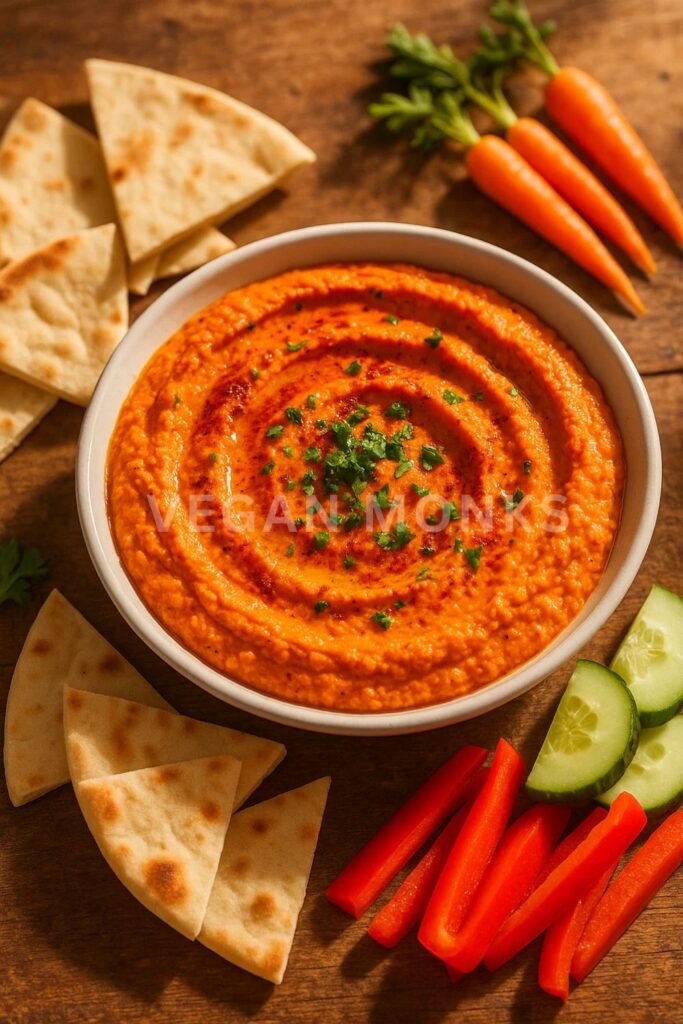
This Smoky Roasted Red Pepper Hummus is my answer to store-bought hummus fatigue. It’s rich, velvety, and filled with charred pepper sweetness, tahini creaminess, and a touch of smoked paprika for depth. It’s also incredibly versatile — I use it as a dip, sandwich spread, or even thinned out as a dressing for roasted veggie bowls.
It’s one of those dips that tastes better the next day, making it perfect for make-ahead summer meals.
Ingredients
Makes about 2 cups
- 1 can (15 oz) chickpeas – Drained and rinsed (or 1½ cups cooked)
- 1 large roasted red bell pepper – Jarred or homemade
- 3 tablespoons tahini – Adds rich creaminess and slight bitterness
- 2 tablespoons fresh lemon juice – Balances the richness
- 1 garlic clove (minced or grated) – Adds punch and aroma
- 1 tablespoon olive oil – For silky texture and richness
- 1 teaspoon smoked paprika – Adds smokiness and color
- ¼ teaspoon ground cumin – Warm and earthy
- Salt to taste (start with ½ teaspoon)
- 2–4 tablespoons cold water – To thin and fluff
Optional garnish:
- Olive oil drizzle
- Smoked paprika sprinkle
- Chopped parsley or sesame seeds
Step-by-Step Process
1. Roast the Bell Pepper (if using fresh)
If I’m not using jarred roasted peppers, I roast one myself:
- Preheat the oven to 450°F (230°C) or heat a gas flame.
- Place the red bell pepper directly on a baking sheet or over an open flame.
- Roast or char until the skin is blackened and blistered on all sides (about 10–15 minutes).
- Transfer to a bowl, cover, and let steam for 10 minutes, then peel off the skin, remove seeds, and slice.
This gives the dip a deep, roasted sweetness that jarred peppers can’t always match.
2. Blend the Base
In a food processor, I combine:
- Chickpeas
- Roasted red pepper
- Tahini
- Lemon juice
- Garlic
- Olive oil
- Smoked paprika
- Cumin
- Salt
I process until mostly smooth, then begin adding cold water, 1 tablespoon at a time, to fluff and loosen the texture.
I typically use about 3 tablespoons for a creamy, dippable consistency.
3. Taste and Adjust
Once blended, I give it a taste and fine-tune:
- More lemon juice for brightness
- More tahini for richness
- More paprika or cumin for a smokier profile
- A pinch more salt, depending on preference
The final flavor should be balanced, slightly sweet from the peppers, and warmly smoky from the paprika.
4. Chill and Serve
Although it can be served right away, I like to chill the hummus for 30 minutes before serving — it thickens slightly and the flavors deepen.
Before serving, I scoop it into a shallow bowl and garnish with:
- A drizzle of olive oil
- A light dusting of smoked paprika
- A sprinkle of parsley or sesame seeds for texture and color
Why This Recipe Is Loved
This hummus is a summer favorite because it’s:
- Smoky, creamy, and full of flavor
- Easy to make and stores beautifully in the fridge
- Perfect for meal prep, wraps, or veggie platters
- A healthy dip that’s protein-packed and oil-optional
It’s also a delicious upgrade to the usual hummus routine — and a great conversation starter when guests ask, “Wait, what’s in this?”
Pro Tips for Hummus Perfection
- Use ice-cold water to blend — it makes the hummus fluffy and creamy.
- Peel chickpeas for extra smoothness (optional but effective).
- Double the batch — this one goes fast and keeps well for 4–5 days.
- Add a pinch of cayenne or chipotle chili if you like more heat.
Serving Suggestions
Serve this hummus with:
- Grilled veggie skewers or flatbread
- Raw cucumber, radish, and bell pepper sticks
- As a sandwich spread or a burger base
- Swirled into grain bowls or topped on baked sweet potatoes
It’s also excellent alongside olives, roasted garlic, and vegan cheeses for a summer mezze platter.
3. Chilled Cucumber-Dill Vegan Yogurt Dip
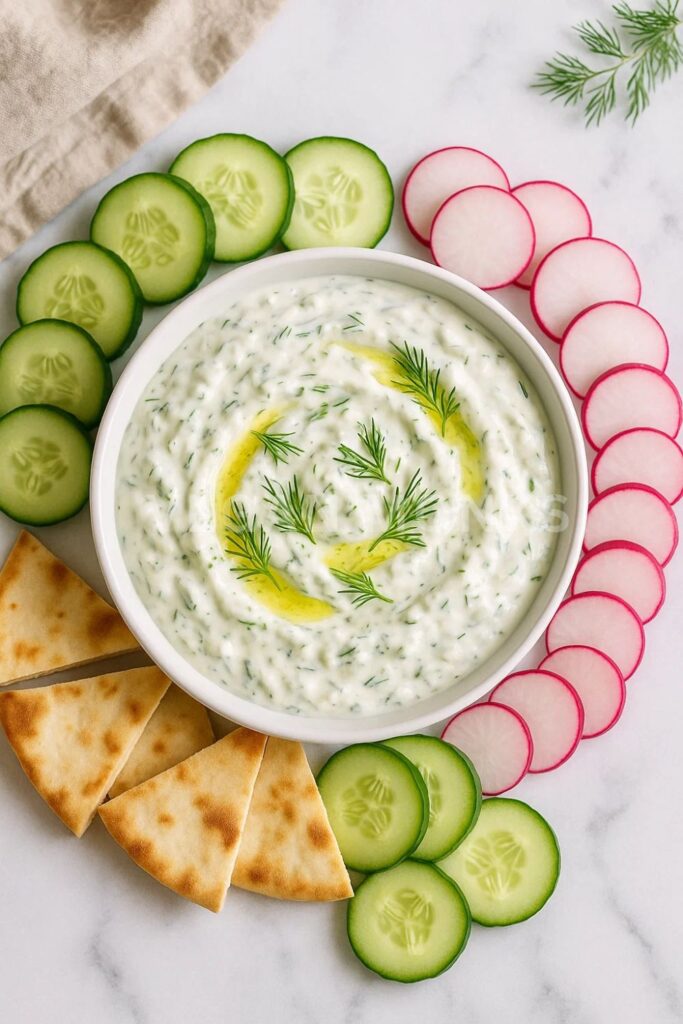
This Cucumber-Dill Dip is everything I crave when the temps start rising: cool, herby, tangy, and silky with just the right balance of creaminess and crunch. It’s made from a base of unsweetened plant-based yogurt (I prefer coconut or almond-based), and it comes together in under 10 minutes.
Think of it as a vegan tzatziki, but a little smoother, more versatile, and completely customizable — ideal for veggie trays, falafel wraps, or served alongside Mediterranean-style meals.
Ingredients
Makes about 1½ cups
- 1 cup unsweetened vegan yogurt (thick, Greek-style works best)
- ½ cup cucumber (grated) – Adds texture and a cooling, watery crunch
- 1 garlic clove (grated or finely minced) – A little raw bite goes a long way
- 2 tablespoons fresh dill (finely chopped) – Clean, grassy, and fresh
- 1 tablespoon lemon juice – Brightens and balances
- 1 teaspoon lemon zest – Optional, but adds lift
- ½ teaspoon olive oil – For subtle richness
- Salt and freshly ground black pepper to taste
- Optional: 1 tablespoon chopped mint or parsley for a more layered herb flavor
Step-by-Step Process
1. Prep the Cucumber
I grate the cucumber on the coarse side of a box grater and place it into a fine mesh sieve or cheesecloth.
To prevent the dip from becoming watery, I squeeze out the excess moisture by pressing with a spoon or twisting the cheesecloth. I want the cucumber to be moist but not soggy.
This step is key — too much water will thin out the dip and mute the flavor.
2. Mix the Dip Base
In a medium bowl, I combine:
- Vegan yogurt
- Lemon juice + zest
- Olive oil
- Grated garlic
- Salt and pepper
I whisk until smooth and creamy. Then I fold in the squeezed cucumber and chopped dill (plus mint or parsley, if using) until evenly distributed.
3. Taste and Adjust
I taste and fine-tune:
- More lemon juice if I want it tangier
- More dill for a punchier herb presence
- More salt if the yogurt is very plain
It should taste bright, lightly garlicky, and ultra-refreshing — not too sharp, not too bland.
4. Chill and Serve
While this dip can be eaten right away, I find it’s best after chilling for 20–30 minutes. This allows the flavors to meld and the garlic to mellow slightly.
I serve it in a shallow bowl or small ramekin, garnished with:
- A swirl of olive oil
- A pinch of chopped dill
- A light twist of black pepper or thin lemon slice
The chilled temperature really enhances the cool cucumber and fresh herbs.
Why This Recipe Is Loved
This dip is a warm-weather staple because it’s:
- Cold, crisp, and full of summer herbs
- Completely dairy-free, egg-free, and gluten-free
- Ultra-quick to make with no cooking required
- Perfect for meal prep, snacks, or as a refreshing side
It’s also lighter than mayo-based dips, making it ideal for those hot, heavy-lifting summer days.
Pro Tips for the Best Vegan Cucumber-Dill Dip
- Use Greek-style vegan yogurt for thickness — coconut, almond, or cashew-based varieties work best.
- Always squeeze out the cucumber water to avoid a watery dip.
- Let it chill! The flavor deepens after a short rest in the fridge.
- Add minced fresh mint for a more Mediterranean twist.
- Use fresh dill — dried dill just doesn’t compare in this case.
Serving Suggestions
Serve this dip with:
- Raw veggies like radishes, cucumbers, celery, and carrots
- Pita wedges, lavash, or seed crackers
- Grilled eggplant, mushrooms, or zucchini rounds
- As a sauce for falafel wraps, grain bowls, or veggie kebabs
It’s also an amazing alternative to mayo in pasta salads or sandwiches for a tangy-herb boost.
4. Spicy Mango Salsa Dip
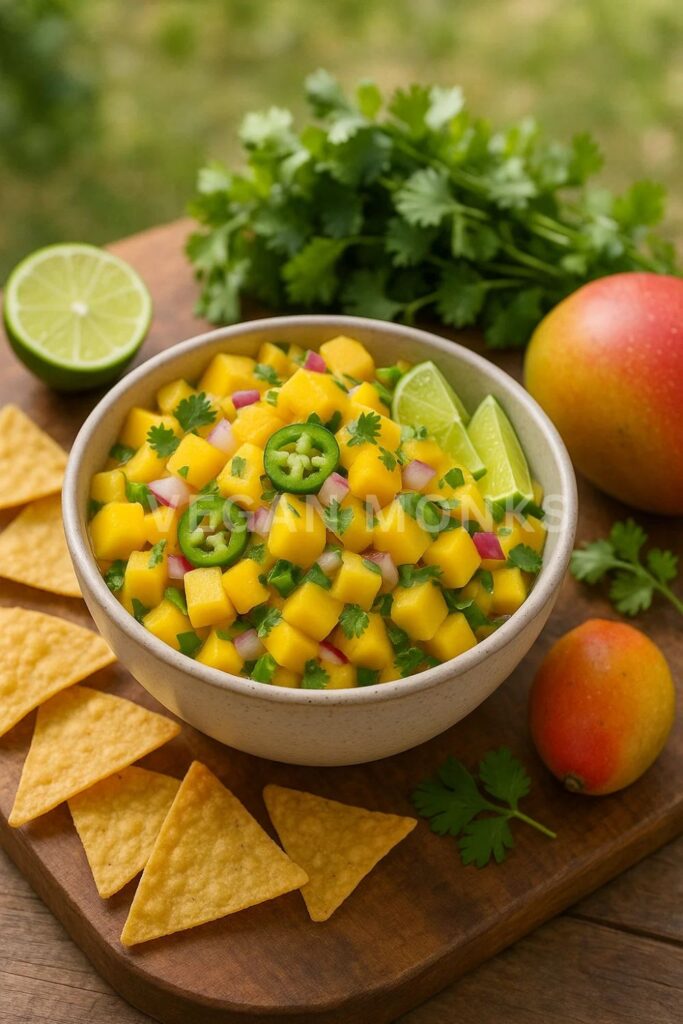
This Spicy Mango Salsa Dip is like sunshine in a bowl with a little kick. It’s made with ripe mangoes, red onion, jalapeño, lime juice, and cilantro, all finely chopped for maximum scoopability. The contrast of sweet mango and fiery chili makes it bright, bold, and super refreshing — the ultimate summer dip.
I serve this one cold and chunky so it doubles as a dip and topping. It’s raw, simple, and only gets better as it chills.
Ingredients
Makes about 2 cups
- 2 ripe mangoes (peeled, pitted, and finely diced) – Sweet and juicy base
- ½ small red onion (finely chopped) – Adds bite and color
- 1 small jalapeño (seeded and minced) – For heat (or serrano for more spice)
- 1 small red bell pepper (finely diced) – Adds crunch and sweetness
- ¼ cup fresh cilantro (chopped) – Herbal and bright
- Juice of 1 lime (about 2 tablespoons) – Balances the sweetness
- 1 teaspoon lime zest (optional) – For extra citrus aroma
- Pinch of salt – Enhances all flavors
- Optional: ½ avocado (diced) or 1 teaspoon maple syrup if mango is under-ripe
Step-by-Step Process
1. Prep the Mangoes
I start by peeling the mangoes and carefully slicing the fruit from the pit. I finely dice the flesh into ¼-inch cubes so the salsa is easy to scoop.
Tip: Use very ripe mangoes — they should feel soft when squeezed and smell sweet at the stem. If they’re too firm, I add a tiny drizzle of maple syrup to round out the flavor.
2. Chop and Combine
In a medium mixing bowl, I combine:
- Diced mango
- Red onion
- Jalapeño
- Red bell pepper
- Fresh cilantro
- Lime juice + zest
- Salt
I stir gently to mix, making sure not to mash the mango cubes. If using avocado, I fold it in last to avoid breaking it up.
3. Taste and Adjust
I taste the salsa and adjust:
- More lime for acidity
- More jalapeño for heat
- A pinch more salt or a drizzle of maple syrup for balance
I want the final result to taste sweet, tangy, and punchy, with just enough heat to make it interesting.
4. Chill Before Serving
I cover the bowl and chill for at least 20–30 minutes before serving. This gives the flavors time to meld and lets the mango release its juices, creating a naturally sweet-and-spicy “salsa brine” at the bottom of the bowl — perfect for scooping with chips.
5. Serve and Garnish
I serve the salsa cold in a shallow dish or bowl. For a little extra color and texture, I garnish with:
- A few cilantro leaves
- A thin lime wheel
- Diced red chili or chili flakes if I want a pop of color and spice
Why This Recipe Is Loved
This mango salsa dip is a summer favorite because it’s:
- No-cook, raw, and ready in under 15 minutes
- Naturally gluten-free, oil-free, and full of fresh ingredients
- Packed with vitamin C, hydration, and fiber
- Perfect as a dip, topper, or bright side dish
It’s ideal for beach days, BBQs, and anywhere you want something light and flavorful that won’t melt in the sun.
Pro Tips for Mango Salsa Success
- Use ripe mangoes — the sweeter, the better.
- Dice everything finely for a more scoopable texture.
- Wear gloves when chopping jalapeños if you’re sensitive to spice.
- Add diced avocado just before serving for a creamy upgrade.
- Let it chill before serving — it gets better with time.
Serving Suggestions
Serve this salsa dip with:
- Tortilla chips, plantain chips, or veggie crisps
- Spooned over tacos, burrito bowls, or nachos
- As a topper for grilled tofu, cauliflower steaks, or black bean burgers
- On the side of a tropical fruit platter for extra color and variety
It also makes a refreshing base for a fruit ceviche-style appetizer with jicama and lime.
5. Herby Green Goddess Avocado Dip
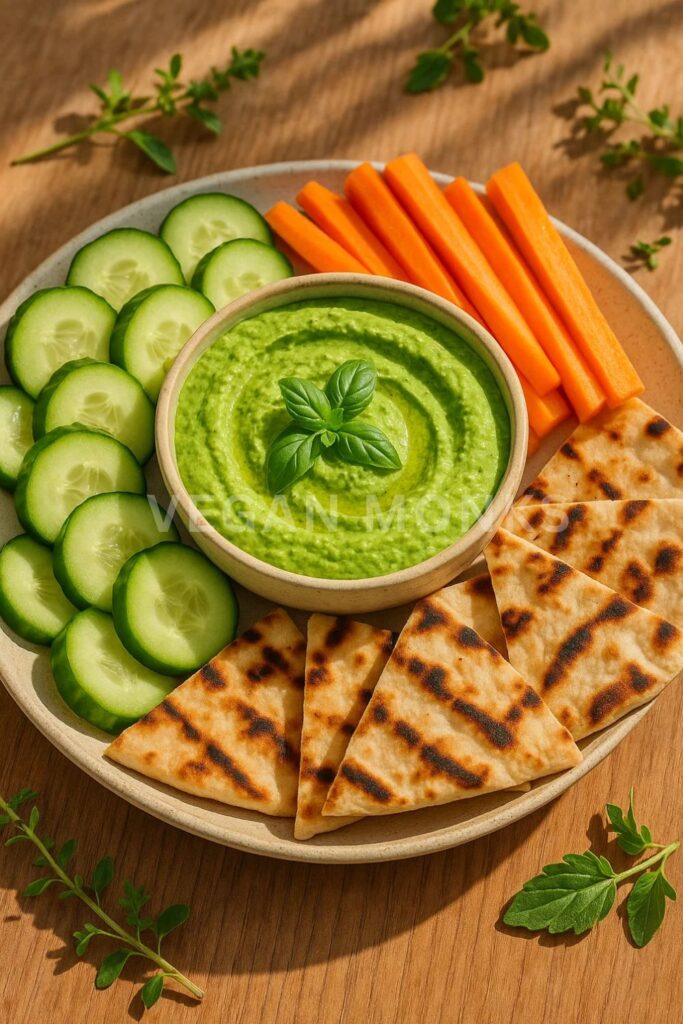
This Herby Green Goddess Dip is a cool, creamy, plant-based take on the classic dressing — turned into a thick, scoopable summer dip. It’s made with avocado, fresh basil, parsley, chives, lemon juice, and a bit of vegan yogurt or olive oil for silkiness.
The flavor is bright, herbaceous, and deeply satisfying — especially when paired with grilled vegetables, chips, or crudités. It’s one of those dips that looks fancy but takes minutes to make, which is exactly what I want in summer.
Ingredients
Makes about 1½ cups
- 1 large ripe avocado – Creamy base packed with healthy fats
- ¼ cup fresh parsley (loosely packed) – Earthy and clean
- ¼ cup fresh basil (loosely packed) – Fragrant and summery
- 2 tablespoons fresh chives or green onion – Adds mild onion flavor
- 2 tablespoons lemon juice – Brightens and balances
- 1 garlic clove (minced) – Subtle savory bite
- 3 tablespoons unsweetened vegan yogurt (or 2 tbsp olive oil) – Adds body and tang
- 2–3 tablespoons water – To thin the dip to desired texture
- Salt and black pepper to taste
- Optional: ½ teaspoon Dijon mustard for depth, or 1 tsp capers for a briny twist
Step-by-Step Process
1. Wash and Prep the Herbs
I rinse and pat dry all fresh herbs — parsley, basil, and chives — to avoid adding extra water to the dip. Then I roughly chop them so they blend more easily.
This herb trio brings layered green flavor — grassy from parsley, sweet from basil, and a gentle allium kick from chives.
2. Blend the Base
In a food processor or high-speed blender, I combine:
- Avocado flesh
- Chopped herbs
- Lemon juice
- Garlic
- Vegan yogurt (or olive oil)
- Salt and pepper
I pulse to combine, then slowly add 1 tablespoon of water at a time until it blends into a smooth, creamy dip.
The texture should be velvety but thick enough to scoop. If I’m using it as a dressing or drizzle, I thin it out further with extra lemon juice or water.
3. Taste and Adjust
I always taste and tweak at this stage. Depending on the herbs and ripeness of the avocado, I might need:
- More lemon for acidity
- More yogurt for tang
- A pinch more salt or black pepper
- A few drops of olive oil for added richness
If I’m feeling fancy, I’ll add a touch of Dijon mustard or capers for extra depth and that Green Goddess “edge.”
4. Chill (Optional) and Serve
This dip is fantastic served immediately, but chilling it for 15–30 minutes makes the flavors bloom and thickens the texture slightly.
I serve it in a wide, shallow bowl and garnish with:
- A few fresh herb leaves on top (basil, parsley, or chives)
- A drizzle of olive oil or yogurt swirl
- A sprinkle of flaky salt or cracked pepper
Why This Recipe Is Loved
This Green Goddess dip is a summer MVP because it’s:
- Creamy, cooling, and full of fresh herbs
- Naturally vegan, gluten-free, soy-free, and refined sugar–free
- A dip, dressing, or spread all in one
- Packed with healthy fats, chlorophyll-rich greens, and real flavor
It’s ideal for when I want something that feels indulgent but is secretly super nourishing.
Pro Tips for Green Goddess Greatness
- Use a perfectly ripe avocado — overripe can make it taste muddy.
- Don’t overblend — the herbs should stay vibrant green, not oxidized.
- Store with plastic wrap pressed onto the surface to prevent browning.
- For a lighter version, use coconut yogurt or blend with silken tofu.
Serving Suggestions
Serve this dip with:
- Grilled zucchini, asparagus, or sweet potato wedges
- Seed crackers, pita chips, or endive leaves
- As a dressing for potato salad, grain bowls, or pasta salad
- Slathered on sandwiches, veggie wraps, or burgers
You can also thin it out and use it as a creamy herb drizzle over tacos, roasted cauliflower, or pizza.
6. Grilled Corn & Jalapeño Guacamole
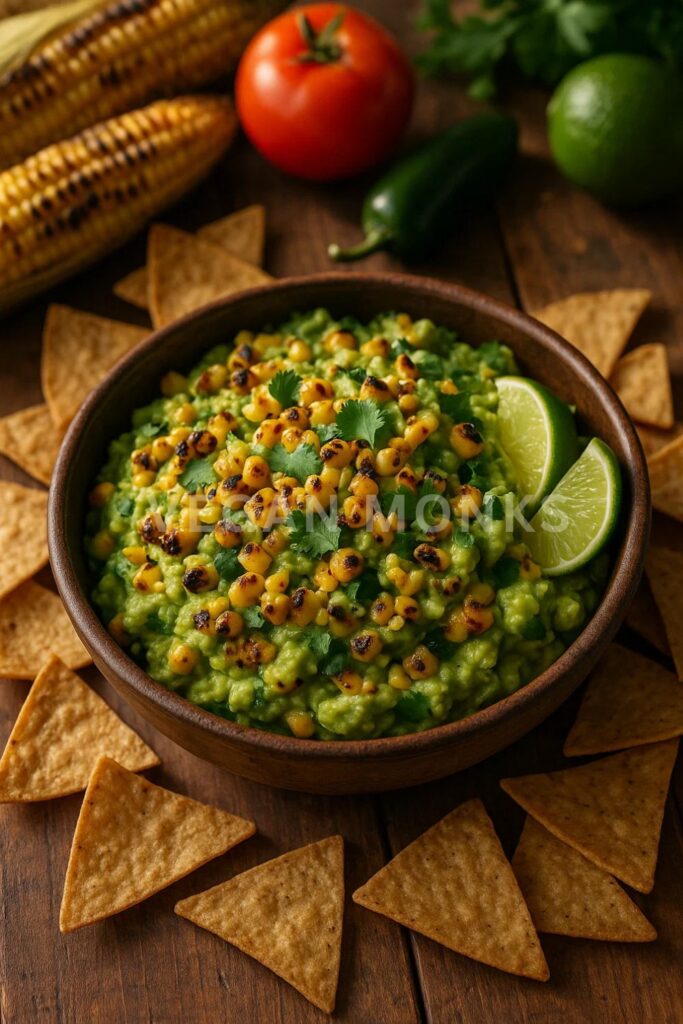
This isn’t just another guacamole — it’s a smoky, textured, sweet-and-spicy powerhouse that combines creamy avocado with grilled corn kernels and flame-charred jalapeños. It keeps all the creamy goodness of a classic guac but adds depth, crunch, and a subtle heat that makes it perfect for summer.
I love serving this with grilled tortilla chips, fresh veggie sticks, or spooned over tacos, burgers, or grilled tofu. It’s bold enough to stand alone and delicious enough to steal the show.
Ingredients
Makes about 2 cups
- 3 ripe avocados – Soft and creamy, the heart of the guac
- 1 ear of corn (grilled and kernels sliced off) – Sweet and charred
- 1 jalapeño pepper (grilled or roasted, finely chopped) – Smoky and spicy
- ¼ cup red onion (finely diced) – Adds sharp bite and color
- 2 tablespoons fresh cilantro (chopped) – Clean and herbal
- 2 tablespoons fresh lime juice – Brightens and balances
- 1 teaspoon lime zest (optional) – Boosts citrus flavor
- Salt and pepper to taste
- Optional: ½ Roma tomato (seeded and finely chopped), 1 tsp olive oil for richness
Step-by-Step Process
1. Grill the Corn and Jalapeño
For the corn:
I shuck the corn and place it directly on a hot grill (or grill pan), turning every couple of minutes until the kernels are charred in spots and slightly smoky — about 8–10 minutes total. Once cool, I slice off the kernels and set them aside.
For the jalapeño:
I place it whole on the grill or directly over a gas flame until the skin is blistered and blackened on all sides. I transfer it to a bowl, cover with a plate or plastic wrap, and let it steam for 5 minutes. Then I peel, deseed (optional for less heat), and finely chop the flesh.
2. Prep the Avocados
I cut the avocados in half, remove the pits, and scoop the flesh into a mixing bowl. I mash them gently with a fork, leaving some chunks for texture.
3. Add the Mix-Ins
To the mashed avocado, I fold in:
- Grilled corn kernels
- Chopped grilled jalapeño
- Diced red onion
- Chopped cilantro
- Lime juice and zest
- Salt and pepper
If I’m using tomatoes, I stir those in last to keep them from making the guac watery. For a richer finish, a drizzle of olive oil adds a luxurious mouthfeel.
4. Taste and Adjust
I give the guacamole a taste and adjust:
- More lime juice for brightness
- More salt to bring out the sweetness of the corn
- Extra jalapeño if I want more heat
The final flavor should be creamy, smoky, slightly sweet, and just a little spicy — the perfect mix of grilled summer flavors.
5. Serve and Garnish
I serve the guacamole in a shallow bowl, garnished with:
- A few extra grilled corn kernels
- A sprinkle of chopped cilantro
- A slice of grilled lime or a fresh lime wedge on the side
If serving for a crowd, I like to press parchment wrap onto the surface to prevent browning while it chills briefly in the fridge.
Why This Recipe Is Loved
This guac variation is a favorite because it’s:
- Smoky, creamy, sweet, and spicy — all at once
- Packed with summer produce and easy to scale up
- Great for dipping, spreading, topping, or straight-up scooping
- Always a showstopper at BBQs, potlucks, and game nights
It’s guacamole, but summer turned up to eleven.
Pro Tips for Killer Grilled Guac
- Use ripe avocados that yield to gentle pressure — not overripe.
- Char the jalapeño deeply, then steam and peel for mellow flavor.
- Don’t overmix — leave chunks of avocado and whole corn kernels for contrast.
- Add a splash of hot sauce or chipotle for a smoky kick.
Serving Suggestions
Serve with:
- Grilled or spiced tortilla chips
- Fresh veggies like cucumber, jicama, and bell pepper
- Spoon over BBQ tofu, jackfruit tacos, or black bean burgers
- Add to avocado toast with extra lime and chili flakes
It also makes an amazing base for vegan nachos or seven-layer dips.
7. White Bean Basil Garlic Dip
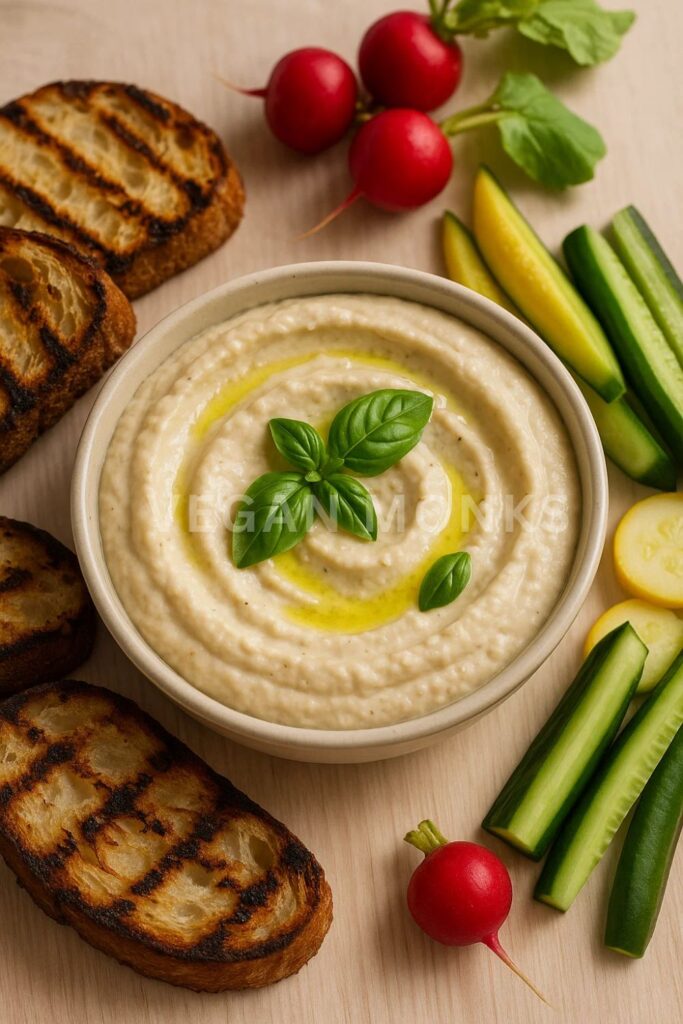
This White Bean Basil Garlic Dip is a fresh, summery take on a traditional bean spread — lighter than hummus, creamier than pesto, and endlessly versatile. The cannellini or navy beans give it a velvety smooth texture, while the basil and lemon make it bright and fresh.
It’s a perfect make-ahead dip for picnics, cookouts, or easy weekday snacking, and it’s absolutely delicious paired with grilled bread, crackers, or crudité.
Ingredients
Makes about 1¾ cups
- 1 can (15 oz) white beans (cannellini or navy beans), drained and rinsed
- 1 garlic clove (minced or grated) – Adds pungent depth
- ¼ cup fresh basil leaves (loosely packed) – Sweet and aromatic
- 2 tablespoons lemon juice (freshly squeezed) – For brightness
- 1 tablespoon tahini or olive oil – Optional, for creaminess
- 2–4 tablespoons cold water – To thin to desired consistency
- ½ teaspoon sea salt – To enhance flavor
- Black pepper to taste
- Optional: 1 tablespoon nutritional yeast for cheesy flavor
Step-by-Step Process
1. Prep the Beans
I start by draining and rinsing the canned white beans thoroughly. I let them drain well in a sieve or colander — excess liquid can dilute the flavor and make the dip too loose.
If I’m cooking beans from scratch, I make sure they’re fully cooked and soft, and cooled before blending.
2. Blend the Dip Base
In a food processor or high-speed blender, I combine:
- White beans
- Garlic
- Basil
- Lemon juice
- Tahini or olive oil (optional)
- Salt and pepper
I begin blending, slowly adding cold water a tablespoon at a time until the dip becomes smooth and creamy. I typically use about 3 tablespoons, but adjust based on the desired texture.
It should end up thick but spoonable, and incredibly smooth thanks to the softness of the beans.
3. Taste and Adjust
Once blended, I always taste and adjust:
- More lemon juice if it needs more brightness
- More salt to bring out the herb and garlic
- A handful of extra basil for stronger herbal notes
- A bit more garlic if I want a punchier finish
The final flavor should be savory and lemony with a gentle basil aroma, and just enough garlic to give it bite without overpowering the other ingredients.
4. Chill and Serve
This dip can be served right away, but it tastes even better after 30 minutes in the fridge. The garlic mellows, and the basil becomes more pronounced.
I serve it in a low bowl and garnish with:
- A swirl of olive oil
- A few small basil leaves or sliced radishes
- Cracked black pepper or a pinch of chili flakes for color
It’s as beautiful as it is delicious.
Why This Recipe Is Loved
This dip is a go-to because it’s:
- Creamy, light, and packed with protein
- Naturally gluten-free, oil-optional, and 100% plant-based
- Quick to make and perfect for batch prepping
- A subtle, sophisticated option that’s always a hit at parties
It’s one of those quiet dips that surprises people — no one expects it to be this flavorful from such a short ingredient list.
Pro Tips for a Silky Smooth Dip
- Use canned beans at room temperature for easier blending.
- Add water slowly — you want creamy, not runny.
- Use young, fresh basil for the best color and aroma.
- If your garlic is strong, try roasting it first for a milder dip.
- Store with plastic wrap pressed onto the surface to prevent discoloration.
Serving Suggestions
Serve this dip with:
- Grilled sourdough or toasted baguette slices
- Carrots, snap peas, or radishes
- As a spread for wraps, veggie sandwiches, or open-faced toasts
- Dolloped onto roasted vegetables or grain bowls
You can also use it as a base for a layered dip, topping it with diced tomatoes, olives, and cucumber for a Mediterranean twist.
8. Vegan French Onion Dip
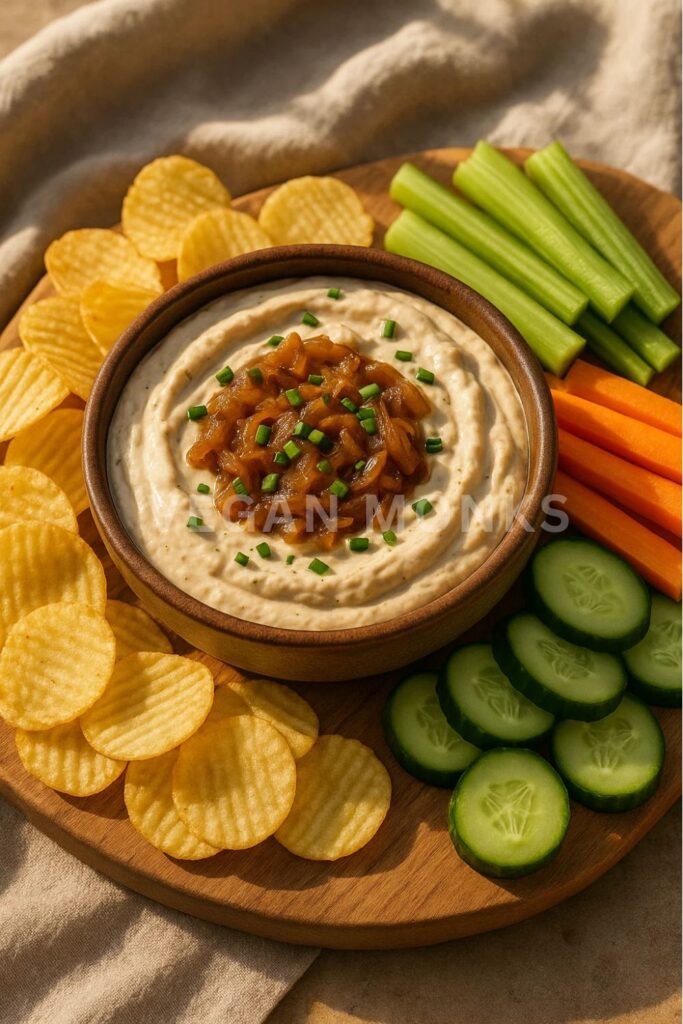
This Vegan French Onion Dip is a full-on flavor bomb. It takes inspiration from the classic party dip made with sour cream and dried onion mix, but transforms it into a plant-based masterpiece using golden caramelized onions, creamy cashew or tofu base, and a hit of lemon and garlic.
The result is rich and savory, with that unmistakable sweet-salty depth that only real caramelized onions can bring. It’s a little more effort than a blender dip — but the payoff is huge.
Ingredients
Makes about 2 cups
For the dip base:
- 1 cup raw cashews (soaked 4 hours or boiled for 10 minutes)
or 1½ cups soft silken tofu – Both create a creamy, neutral base - 2 tablespoons lemon juice – Adds brightness and tang
- 1 teaspoon apple cider vinegar – For that subtle fermented note
- 1 garlic clove (minced) – Adds savory sharpness
- ½ teaspoon onion powder – Boosts the onion flavor
- Salt and pepper to taste
- 2–4 tablespoons water – To blend to a dip-like consistency
For the caramelized onions:
- 2 medium yellow onions (thinly sliced)
- 1 tablespoon olive oil or vegan butter
- Pinch of salt
- Optional: ½ teaspoon coconut sugar or maple syrup to enhance browning
Step-by-Step Process
1. Caramelize the Onions
I start by heating olive oil in a wide skillet over medium-low heat. I add the thinly sliced onions and a pinch of salt, stirring occasionally. The key here is patience — I cook the onions low and slow for 30–40 minutes, until they turn golden brown, soft, and sweet. If they start to dry out or brown too quickly, I lower the heat and add a splash of water to deglaze the pan. If I want extra depth, I stir in a tiny bit of maple syrup near the end to enhance their natural sweetness.
Once caramelized, I let them cool completely before adding to the dip — this keeps the texture smooth and helps the flavors meld.
2. Prepare the Dip Base
While the onions cool, I make the base:
In a blender or food processor, I combine:
- Soaked cashews or silken tofu
- Lemon juice
- Apple cider vinegar
- Garlic
- Onion powder
- Salt and pepper
I blend until smooth and creamy, adding water a tablespoon at a time until it reaches a thick dip consistency — similar to sour cream.
If using cashews, I blend for at least 1–2 minutes to make sure the texture is silky. If using tofu, the result will be slightly lighter but still creamy and rich.
3. Fold in the Onions
Once the base is smooth, I stir in most of the cooled caramelized onions by hand, reserving a spoonful for garnish.
This step adds texture, sweetness, and that signature French onion flavor throughout the dip.
4. Taste and Adjust
I give the dip a taste and adjust:
- More lemon juice for tang
- More onion powder if I want a stronger onion kick
- A pinch of black pepper or smoked salt for depth
Then I chill it for at least 1 hour before serving — this thickens the dip slightly and lets the onion flavor really bloom.
5. Serve and Garnish
Before serving, I top the dip with:
- The reserved caramelized onions
- A drizzle of olive oil (optional)
- A sprinkle of chives or parsley for color
I serve it in a shallow bowl or ramekin surrounded by crunchy dippers.
Why This Recipe Is Loved
This Vegan French Onion Dip is a total hit because it’s:
- Creamy, savory, and packed with real caramelized onions
- 100% dairy-free, gluten-free, and soy-optional
- A perfect plant-based substitute for the classic party dip
- Rich enough to feel indulgent, but made from whole-food ingredients
It’s the kind of dip that disappears fast — and no one guesses it’s vegan.
Pro Tips for the Best Onion Dip
- Caramelize the onions low and slow — no shortcuts. The flavor is in the process.
- Cool the onions before mixing to preserve texture and consistency.
- Use soft tofu for a lighter dip, or cashews for extra richness.
- Store in an airtight container for up to 5 days — it actually gets better the next day.
Serving Suggestions
Serve this dip with:
- Kettle chips, crackers, or toasted baguette slices
- Fresh veggie sticks (especially carrots, celery, and cucumber)
- As a spread for sandwiches, wraps, or burgers
- Swirled into mashed potatoes or over baked sweet potatoes
You can also use it as a savory base layer in a seven-layer dip or mix into cold pasta for a unique creamy salad dressing.
9. Watermelon Pico de Gallo

This Watermelon Pico de Gallo is my fresh twist on the classic Mexican salsa — and it’s always a crowd-pleaser. Instead of using just tomatoes, I swap in sweet, ripe watermelon for a juicy, refreshing spin that still brings all the bright flavors of traditional pico: lime, cilantro, onion, chili, and salt.
It’s light, hydrating, and perfect as a scoopable dip or spooned generously over tacos, grilled veggies, or plant-based proteins. I call it a “dip,” but honestly, I eat it like a salad.
Ingredients
Makes about 2½ cups
- 2 cups seedless watermelon (finely diced) – Juicy and sweet, with a crisp bite
- 1 medium Roma tomato (diced small) – Adds savory balance
- ¼ cup red onion (finely chopped) – For bite and sharpness
- 1 small jalapeño (seeded and minced) – Adds heat (adjust to taste)
- ¼ cup fresh cilantro (chopped) – Earthy and herbal
- Juice of 1 lime (about 2 tablespoons) – Brightens and ties everything together
- Zest of ½ lime (optional) – Adds citrus aroma
- Salt to taste (start with ½ tsp)
- Optional add-ins:
– ½ avocado (diced, added just before serving)
– 1 teaspoon Tajín seasoning or chili-lime salt for a tangy kick
– 1 tablespoon finely chopped cucumber or jicama for crunch
Step-by-Step Process
1. Dice and Prep the Ingredients
I start by cutting the watermelon into ¼-inch cubes, small enough to scoop with a chip but big enough to hold their shape. I do the same with the tomato and finely chop the red onion, jalapeño, and cilantro.
Tip: I let the diced watermelon sit in a colander for a few minutes to drain off excess juice — this helps prevent the pico from becoming too watery.
2. Combine Everything in a Bowl
In a medium mixing bowl, I gently combine:
- Diced watermelon
- Tomato
- Red onion
- Jalapeño
- Cilantro
- Lime juice and zest
- Salt
I toss gently to coat, being careful not to mash the watermelon.
If I’m using Tajín or chili-lime seasoning, I add it here for an extra layer of zing and spice.
3. Taste and Adjust
After tossing, I always taste and adjust:
- More lime juice for tang
- More jalapeño for heat
- A pinch more salt to balance the sweetness of the watermelon
- A drizzle of maple syrup if the tomato is overly acidic
I want the flavor to be bright, juicy, spicy, and a little sweet, with a clean, hydrating finish.
4. Chill (Optional) and Serve
This pico is best served immediately, but it can also be chilled for 15–20 minutes to let the flavors meld. If you’re prepping ahead, store it in the fridge and add avocado (if using) just before serving to avoid browning.
When ready to serve, I transfer it to a shallow bowl and garnish with:
- A sprinkle of Tajín
- A wedge of lime on the side
- A sprig of cilantro on top for a pop of green
Why This Recipe Is Loved
This Watermelon Pico de Gallo is a summer staple because it’s:
- Light, crisp, and bursting with fresh flavor
- Naturally vegan, gluten-free, oil-free, and low-calorie
- Takes less than 10 minutes to make
- A beautiful, vibrant contrast to creamy or smoky dips
It’s one of those recipes that looks fancy but is so easy, you’ll want to make it weekly.
Pro Tips for Pico Perfection
- Use cold, ripe watermelon for the best texture and sweetness.
- Drain the diced watermelon before mixing to avoid excess liquid.
- Wear gloves when handling jalapeños if you’re sensitive to spice.
- For more complexity, add a pinch of cumin or a splash of white vinegar.
- Don’t skip the lime zest — it makes the flavor pop.
Serving Suggestions
Serve this pico with:
- Tortilla chips, blue corn chips, or plantain chips
- Grilled skewers, tacos, burritos, or bowls
- As a topping for vegan ceviche, lettuce wraps, or black bean burgers
- Mixed into grain salads or served on a fresh romaine leaf as an appetizer
It’s also incredible served over chilled cucumber slices or jicama sticks as a crunchy, hydrating snack.
Your summer parties deserve dips that are as vibrant and fresh as the season itself. Homemade vegan dips bring the perfect mix of crunch and creaminess, pairing beautifully with fresh veggies, chips, or crusty bread. They’re easy to prepare, bursting with flavor, and perfect for sharing. Whether you prefer spicy, tangy, or herb-filled dips, these recipes let you customize every bite. You’ll find that dips can elevate any casual get-together into a celebration. With summer dips like these, you make snacking feel special and delicious every time. So stock your fridge, grab your favorite dippers, and snack your way through the season — deliciously.