Let’s be honest—the 4th of July is just better with good food, loud fireworks, and a whole lot of fun. But going plant-based doesn’t mean skipping out on the party favorites. I’ve gathered some of my absolute favorite vegan 4th of July recipes that’ll have everyone (yes, even the meat-lovers) coming back for seconds. Whether you’re hosting a backyard BBQ or bringing a dish to a cookout, these recipes are fresh, colorful, and totally summer-worthy.
4th Of July Recipes
1. Grilled BBQ Tempeh Skewers with Pineapple & Bell Peppers

When I think of the 4th of July, I think of smoky grills, charred edges, and bold, messy sauces — and these Grilled BBQ Tempeh Skewers bring all of that to the party without a single ounce of meat. They’re sweet, tangy, just a little spicy, and loaded with texture from the combination of chewy tempeh, juicy pineapple, and crisp bell peppers.
I love serving these skewers hot off the grill with extra BBQ sauce on the side. They’re super easy to prep in advance and always disappear fast at the table.
Ingredients
Serves 4–6 (makes 6–8 skewers)
For the skewers:
- 2 blocks (16 oz) tempeh – A protein-rich, meaty base that holds up beautifully on the grill.
- 1 cup fresh pineapple chunks – Sweet and juicy; balances the BBQ’s smoky heat.
- 1 large red bell pepper (cut into 1.5″ chunks) – Adds vibrant color and a light crunch.
- 1 large green bell pepper (cut into 1.5″ chunks) – For flavor contrast and color.
- 1 small red onion (cut into thick petals) – Adds sharpness and caramelizes on the grill.
- Wooden or metal skewers – Soak wooden ones in water for 30 minutes if using.
For the BBQ marinade:
- ¾ cup vegan BBQ sauce (store-bought or homemade) – Choose one that’s smoky, tangy, or spicy, depending on your flavor profile.
- 1 tablespoon olive oil – Helps the marinade coat and stick to the tempeh.
- 1 tablespoon soy sauce or tamari – Adds umami and saltiness.
- 1 teaspoon apple cider vinegar – Brightens and balances the richness.
- 1 teaspoon smoked paprika – Deepens the flavor with smoky warmth.
- ½ teaspoon garlic powder – Adds savory depth.
Step-by-Step Process
1. Prep the Tempeh
I begin by cutting the tempeh into 1.5-inch cubes — they should be big enough to thread securely onto a skewer without crumbling. To reduce bitterness and improve texture, I steam the tempeh for about 10 minutes in a steamer basket or saucepan with a bit of water.
Once steamed, I set it aside to cool while I prepare the marinade.
2. Make the BBQ Marinade
In a medium bowl, I whisk together:
- BBQ sauce
- Olive oil
- Soy sauce or tamari
- Apple cider vinegar
- Smoked paprika
- Garlic powder
This sauce is bold, sticky, and perfectly balanced — ideal for coating tempeh and caramelizing on the grill.
3. Marinate the Tempeh
Once the tempeh is cooled, I place the cubes in a shallow dish or a zip-top bag. I pour about two-thirds of the marinade over the tempeh and gently toss to coat.
I let it marinate for at least 30 minutes, or up to 4 hours if prepping in advance. The longer it soaks, the deeper the flavor.
4. Assemble the Skewers
I thread the marinated tempeh onto skewers, alternating with:
- Pineapple chunks
- Red and green bell peppers
- Onion petals
I make sure to leave a little space between each piece to help them cook evenly.
5. Grill the Skewers
Outdoor Grill Method:
I preheat the grill to medium heat and lightly oil the grates. I grill the skewers for 3–4 minutes per side, brushing occasionally with the reserved marinade, until the tempeh is nicely charred and the veggies are tender.
Stovetop Grill Pan Method:
I heat a grill pan over medium-high, brush with oil, and grill skewers for 3–5 minutes per side, turning gently with tongs.
6. Serve
I remove the skewers from the grill and serve immediately with:
- A small bowl of extra BBQ sauce
- A sprinkle of fresh parsley or green onion
- A side of vegan coleslaw or grilled corn
These skewers are best eaten hot, straight off the grill — but leftovers are great in wraps, bowls, or chopped into salads.
Why This Recipe Is Loved
This dish is always a 4th of July favorite because it’s:
- Protein-rich and satisfying without being heavy
- Packed with sweet, smoky, and tangy flavor
- Perfect for grilling — easy to prep and crowd-pleasing
- Naturally gluten-free (if you use GF tamari) and completely plant-based
Even the meat-eaters at your party will be asking for seconds.
Pro Tips for Grilling Success
- Steam the tempeh first — it softens the texture and mellows the bitterness.
- Don’t skip the marination — it’s essential for bold, layered flavor.
- Brush with BBQ sauce while grilling for that perfect sticky finish.
- Soak wooden skewers for 30 minutes if using, to prevent burning.
Serving Suggestions
Pair these skewers with:
- Grilled corn or vegan mac salad
- Watermelon cucumber salad for a cooling contrast
- A cold glass of iced hibiscus tea or sparkling lemonade
They’re also excellent for meal prep, picnics, and campfire cooking.
2. Red, White & Blue Vegan Potato Salad
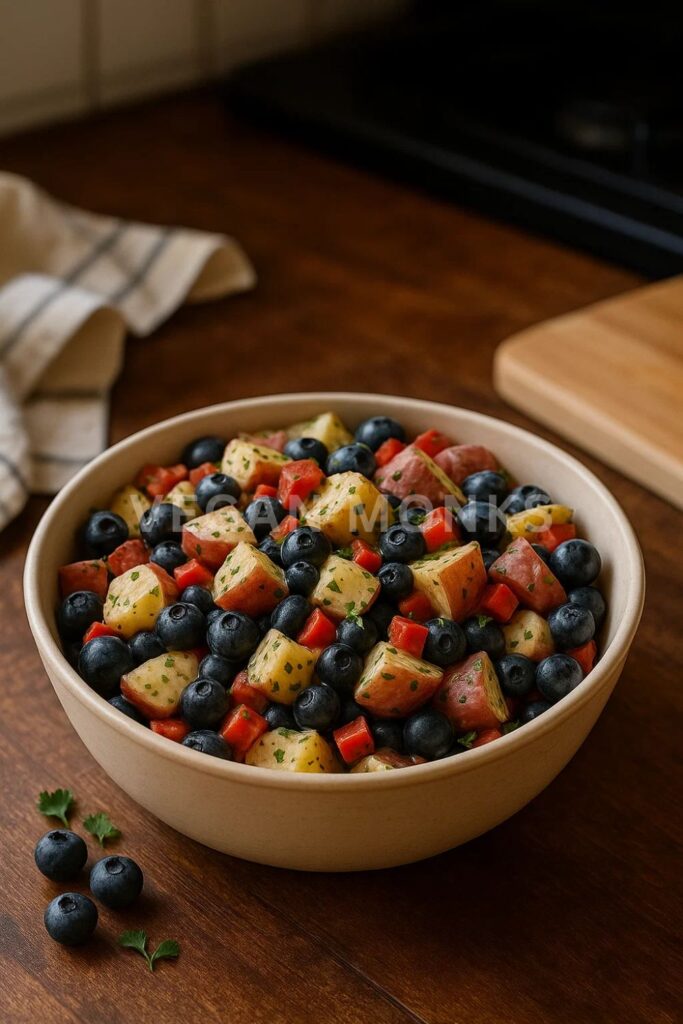
This Red, White & Blue Vegan Potato Salad has quickly become one of my favorite 4th of July staples. It’s creamy, herby, and perfectly chilled — with a festive color palette that makes it stand out on the buffet table. The addition of fresh blueberries might sound unconventional, but trust me: they bring a subtle burst of sweetness that complements the tangy dressing and hearty potatoes.
This isn’t your grandma’s potato salad — it’s lighter, dairy-free, and elevated with real ingredients and unexpected flavor pops.
Ingredients
Serves 6–8 as a side
For the salad:
- 2 lbs red potatoes – Creamy and naturally sweet; holds shape well when boiled.
- ½ cup fresh blueberries – Adds a pop of color and sweetness (yes, it works!).
- ¾ cup celery (finely chopped) – Crunch and freshness.
- ¼ cup red onion (finely chopped) – Adds bite and color contrast.
- ¼ cup fresh parsley or dill (chopped) – Brings an herbaceous, bright finish.
- Salt & pepper, to taste
For the vegan dressing:
- ½ cup vegan mayo – Store-bought or homemade; creates the creamy base.
- 1 tablespoon Dijon mustard – Adds zing and depth.
- 1 tablespoon apple cider vinegar – Brings acidity and balance.
- 1 tablespoon lemon juice – Brightens the entire dish.
- ½ teaspoon garlic powder – Adds savory flavor.
- ½ teaspoon celery seed (optional) – For that classic potato salad flavor.
Step-by-Step Process
1. Boil the Potatoes
I start by scrubbing and cutting the red potatoes into bite-sized chunks (about 1-inch pieces). I leave the skin on for extra color and texture — and because it keeps the potatoes from falling apart after cooking.
I place the potatoes in a large pot of cold, salted water, bring it to a boil, and then reduce the heat to a simmer. I cook them for about 12–15 minutes, or until just fork-tender, not mushy.
Once cooked, I drain the potatoes and spread them out on a baking sheet to cool slightly. This step helps stop the cooking process and allows any excess moisture to evaporate.
2. Make the Vegan Dressing
While the potatoes cool, I mix the dressing in a medium bowl:
- Vegan mayo
- Dijon mustard
- Apple cider vinegar
- Lemon juice
- Garlic powder
- Celery seed (if using)
- Salt and pepper, to taste
I whisk until smooth and creamy. I always taste and adjust — adding a splash more vinegar or mustard if I want extra tang.
3. Assemble the Salad
Once the potatoes are cool to the touch but still slightly warm (this helps them absorb flavor), I transfer them to a large mixing bowl.
I add:
- Chopped celery
- Red onion
- Half the fresh parsley or dill
- A light pinch of salt and pepper
Then I pour the dressing over everything and gently toss to coat. I’m careful not to break up the potatoes — the goal is creamy but not mashed.
Finally, I gently fold in the blueberries. They add bursts of sweetness and the “blue” in our red, white, and blue theme. I top the salad with the remaining herbs and a few extra blueberries for presentation.
4. Chill and Serve
I cover the salad and let it chill in the refrigerator for at least 1 hour, or up to 24 hours. The flavors deepen beautifully overnight.
Just before serving, I give it a light toss and taste for seasoning again. I like to serve it in a wide, shallow bowl for presentation, with a sprig of dill or a few more blueberries on top.
Why This Recipe Is Loved
This salad is a standout because it’s:
- Colorful and festive, with natural red, white, and blue hues
- Creamy and satisfying, without any eggs or dairy
- Balanced between tangy, savory, and subtly sweet
- A make-ahead dream, perfect for cookouts, potlucks, and picnics
Even skeptical guests are always surprised by how well the blueberries work.
Pro Tips for the Best Vegan Potato Salad
- Start potatoes in cold water so they cook evenly.
- Don’t overcook — fork-tender is key; mushy potatoes won’t hold their shape.
- Add dressing while potatoes are warm — they’ll absorb more flavor.
- Use fresh herbs generously — they brighten and balance the creaminess.
- Chill thoroughly — this salad gets better the longer it rests.
Serving Suggestions
Pair this potato salad with:
- Grilled tempeh skewers or vegan burgers
- A tall glass of iced mint lemonade or kombucha spritz
- Other colorful 4th of July favorites like grilled corn or berry shortcake
It’s also excellent as part of a picnic spread or vegan BBQ board.
3. All-American Vegan Burgers with Smoky Special Sauce
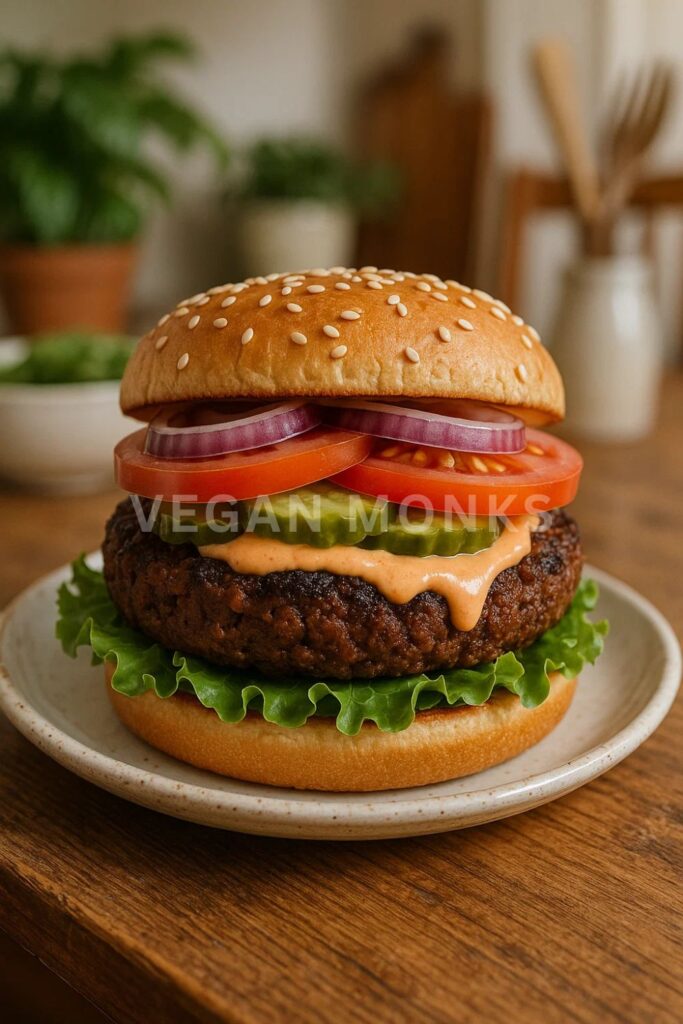
For me, the 4th of July isn’t complete without a big, messy, stacked-to-the-sky burger — and this one delivers all the cookout satisfaction without any meat, dairy, or compromise. These All-American Vegan Burgers are juicy and firm enough for the grill, layered with lettuce, tomato, pickles, and onion, and slathered with a creamy, smoky “special sauce” that’s finger-licking good.
The patty itself is made from black beans, mushrooms, and oats, giving it a meaty texture, deep flavor, and just the right amount of bite. Trust me — this is a burger everyone at your BBQ will remember.
Ingredients
Makes 6 hearty patties
For the vegan burger patties:
- 1 tablespoon olive oil – For sautéing.
- 1 cup finely chopped mushrooms – Adds umami, moisture, and “meatiness.”
- ½ cup finely chopped red onion – Adds texture and flavor.
- 2 garlic cloves (minced) – For aromatic depth.
- 1 ½ cups cooked black beans (rinsed and drained) – The hearty, protein-rich base.
- ¾ cup rolled oats – Acts as a binder and gives the burger structure.
- 2 tablespoons tomato paste – Adds richness and depth.
- 1 tablespoon soy sauce or tamari – For salty, umami complexity.
- 1 teaspoon smoked paprika – Infuses that essential grill flavor.
- 1 teaspoon cumin – Adds earthy warmth.
- Salt and pepper to taste
For the smoky special sauce:
- ½ cup vegan mayo – The creamy base.
- 1 tablespoon ketchup – For sweetness and color.
- 1 tablespoon dill pickle relish – Adds tang and crunch.
- 1 teaspoon apple cider vinegar – Brightens the sauce.
- ½ teaspoon smoked paprika – Gives it that signature BBQ kick.
- ½ teaspoon garlic powder
- Pinch of black pepper
For assembly:
- 6 vegan burger buns (toasted)
- Lettuce leaves
- Sliced tomatoes
- Sliced red onion
- Pickles
- Avocado (optional)
Step-by-Step Process
1. Sauté the Mushrooms and Aromatics
I heat the olive oil in a skillet over medium heat. Once hot, I add:
- Chopped mushrooms
- Red onion
- Garlic
I sauté for 6–8 minutes, until the mushrooms release their moisture and begin to caramelize. This step is key for building deep flavor and preventing soggy burgers later.
Once done, I set the mixture aside to cool slightly.
2. Prepare the Burger Base
In a large mixing bowl (or food processor), I add:
- Cooked black beans
- Sautéed mushroom mixture
- Rolled oats
- Tomato paste
- Soy sauce
- Smoked paprika
- Cumin
- Salt and pepper
I mash the mixture with a potato masher or pulse in a food processor just until combined, leaving a bit of texture. I don’t want a puree — a slightly chunky texture gives these burgers a real bite.
I let the mixture rest for 10 minutes to let the oats absorb moisture. Then I form 6 equal patties, about ¾-inch thick.
3. Chill the Patties (Optional but Recommended)
For the firmest, easiest-to-grill burgers, I chill the formed patties for at least 30 minutes. This helps them hold their shape on the grill and gives the flavors time to develop.
4. Grill or Pan-Fry
Outdoor Grill:
I preheat the grill to medium-high, brush the grates with oil, and grill the patties for 4–5 minutes per side, until charred and heated through.
Stovetop:
I heat a cast iron or nonstick pan over medium heat with a bit of oil and cook the patties for 5–6 minutes per side, flipping gently.They should develop a golden crust and hold together nicely.
5. Make the Smoky Special Sauce
While the patties cook, I stir together:
- Vegan mayo
- Ketchup
- Pickle relish
- Apple cider vinegar
- Smoked paprika
- Garlic powder
- Black pepper
I chill the sauce until ready to use — it thickens slightly and gets even more flavorful as it rests.
6. Build the Burgers
I toast the buns lightly, then build each burger starting from the bottom:
- Special sauce
- Lettuce
- Tomato slice
- Burger patty
- Red onion
- Pickles
- A final spoon of special sauce
- Avocado slices (if using)
- Top bun
The result? A full-sized, messy, loaded vegan burger that’s ready to be the main event of any 4th of July party.
Why This Recipe Is Loved
These burgers are beloved because they’re:
- Grillable — firm, smoky, and easy to flip
- Hearty and satisfying, thanks to black beans, mushrooms, and oats
- Boldly flavored, with that rich smoky sauce to tie it all together
- 100% vegan, dairy-free, egg-free, and customizable with any toppings
They’re proof that plant-based burgers can be just as indulgent and crowd-pleasing as anything off the grill.
Pro Tips for the Best Vegan Burgers
- Chill the patties before cooking — they’ll firm up and grill better.
- Use a bit of oil on the grill grates to prevent sticking.
- Don’t over-blend — some texture makes the burgers more satisfying.
- Make a double batch of the special sauce — you’ll want it on everything!
Serving Suggestions
Serve these burgers with:
- Grilled corn on the cob with lime and chili salt
- A side of crispy sweet potato fries or oven-roasted wedges
- A tall glass of iced tea, lemonade, or a watermelon mocktail
Perfect for backyard BBQs, camping trips, and patriotic party spreads.
4. Vegan Macaroni Salad with Cashew Herb Dressing
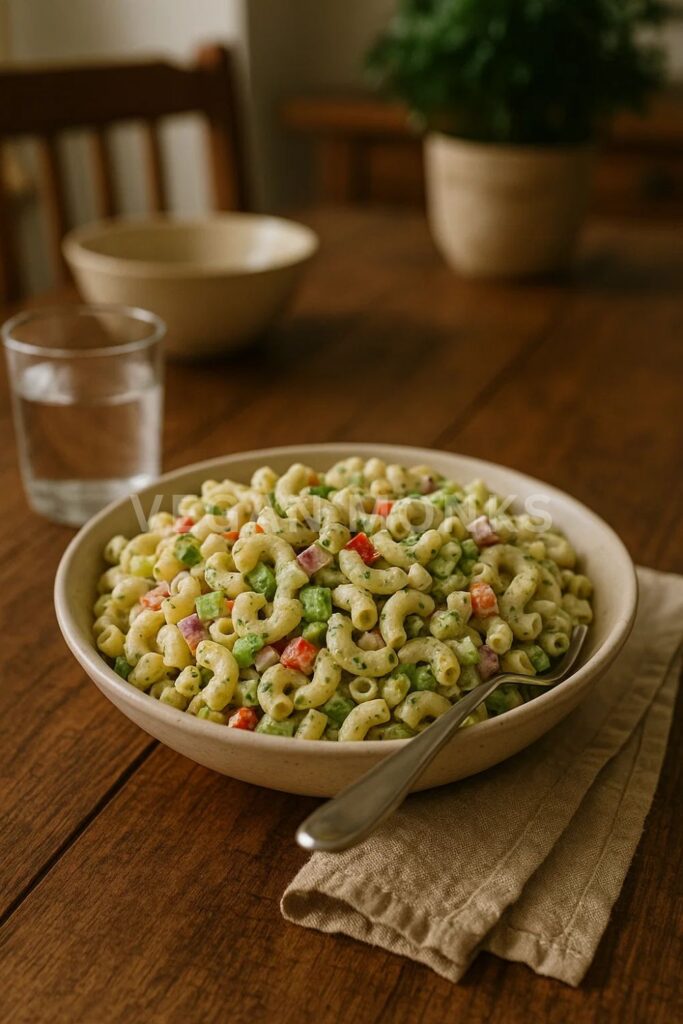
Every summer table needs a good, creamy pasta salad — and this Vegan Macaroni Salad with Cashew Herb Dressing has become my go-to. It’s everything I want from the classic version: tender pasta, crisp veggies, herby creaminess — but without the heaviness of traditional mayo-based dressings.
Instead, I use a homemade cashew cream dressing that’s luscious, lemony, and packed with fresh dill and parsley. It clings to every bite and tastes even better after a few hours in the fridge. This salad is always the first to disappear at summer parties.
Ingredients
Serves 6–8
For the salad:
- 3 cups elbow macaroni (or gluten-free pasta of choice) – Holds the dressing well and gives classic texture.
- 1 cup celery (finely chopped) – Crunchy and refreshing.
- ¾ cup red bell pepper (diced) – Adds sweetness and color.
- ½ cup shredded carrots – Subtle sweetness and texture.
- ¼ cup red onion (finely chopped) – For sharpness and bite.
- ½ cup dill pickles (diced) – Adds tang and texture.
- 2 tablespoons capers (optional) – For a briny flavor punch.
For the cashew herb dressing:
- ¾ cup raw cashews (soaked 4 hours or boiled for 10 minutes) – The creamy, dairy-free base.
- ½ cup water – For blending the cashews smoothly.
- 2 tablespoons lemon juice – Bright and tangy.
- 1 tablespoon apple cider vinegar – Adds acidity and zip.
- 1 garlic clove – Savory and aromatic.
- 1 teaspoon Dijon mustard – Helps emulsify and adds depth.
- ¼ teaspoon sea salt (or to taste)
- ¼ cup fresh parsley (chopped)
- 2 tablespoons fresh dill (or 1 tsp dried) – Classic herb in macaroni salad.
Step-by-Step Process
1. Cook the Pasta
I begin by cooking the macaroni in well-salted water according to package instructions — usually 7–8 minutes, until just al dente. Overcooked pasta can get mushy after chilling, so I keep it firm.
Once cooked, I drain and rinse the pasta under cold water to stop the cooking and cool it down quickly. I let it drain fully while I prep the rest.
2. Prep the Vegetables
While the pasta cools, I finely chop:
- Celery
- Red bell pepper
- Carrots
- Red onion
- Pickles
I love using crinkle-cut dill pickles for extra texture, and I’ll often throw in a spoonful of capers for added briny brightness.
3. Make the Cashew Herb Dressing
If I haven’t pre-soaked the cashews, I do a quick boil method: I simmer them in water for 10 minutes, then drain and let them cool slightly.
In a high-speed blender, I combine:
- Soaked cashews
- Water
- Lemon juice
- Apple cider vinegar
- Garlic
- Dijon mustard
- Salt
I blend on high for 1–2 minutes, until completely smooth and creamy. Then I stir in the fresh herbs (parsley and dill) either by pulsing briefly or folding them in by hand for visible flecks of green.
The dressing should be pourable but thick — like a rich mayo. If needed, I add 1–2 tablespoons of water to loosen it.
4. Combine and Toss
In a large mixing bowl, I combine:
- Cooked, cooled pasta
- All chopped veggies and pickles
- Cashew herb dressing
I toss everything gently but thoroughly until every piece is coated in creamy goodness. I season with extra salt and pepper to taste, and sometimes add another squeeze of lemon for brightness.
5. Chill and Serve
I cover the salad and refrigerate it for at least 1 hour before serving — this allows the flavors to develop and the dressing to thicken slightly.
Before serving, I give it a quick toss and garnish with extra fresh dill or parsley for a vibrant finish.
Why This Recipe Is Loved
This vegan macaroni salad checks all the boxes:
- Creamy and tangy, but light and dairy-free
- Loaded with fresh herbs and veggies
- Perfectly make-ahead friendly — gets better as it chills
- Naturally gluten-free optional and customizable
It’s the ideal cool-down dish for BBQs, cookouts, picnics, or meal prep.
Pro Tips for Perfect Vegan Mac Salad
- Use short pasta with grooves (elbows, shells, fusilli) — they hold the dressing well.
- Soak or boil cashews until very soft — it’s the key to a silky dressing.
- Chill before serving — at least 1 hour, but overnight is best for flavor.
- Taste before serving — chilled flavors mellow, so adjust seasoning if needed.
Serving Suggestions
This salad pairs perfectly with:
- BBQ tempeh skewers or vegan burgers
- A glass of iced tea or sparkling citrus water
- Grilled veggies, watermelon, or corn on the cob
It also holds up great on a buffet table and travels well in a cooler for picnics or beach days.
5. Spicy Grilled Corn Ribs with Lime Aioli

If you’ve never made corn ribs, prepare to be obsessed. Instead of serving corn on the cob, I slice each ear into long quarters — creating curved “ribs” that curl as they grill and get irresistibly crispy on the edges. I toss them in a spicy, smoky seasoning and finish them with a drizzle of creamy vegan lime aioli that cools the heat and ties it all together.
They’re the kind of side dish that becomes the main attraction — crunchy, messy, bold, and so much fun to eat.
Ingredients
Serves 4 as a side or snack
For the corn ribs:
- 4 ears of fresh corn – Husked and cleaned.
- 2 tablespoons olive oil – Helps the seasoning stick and promotes crisping.
- 1 teaspoon smoked paprika – Adds depth and a subtle smokiness.
- ½ teaspoon ground cumin – Earthy and savory.
- ¼ teaspoon garlic powder – A savory base note.
- ¼ teaspoon cayenne pepper – For heat (adjust to taste).
- Salt and black pepper, to taste
For the lime aioli:
- ½ cup vegan mayo – Creamy and neutral base.
- 1 tablespoon lime juice – Fresh and tangy.
- 1 teaspoon lime zest – Adds aromatic citrus punch.
- 1 garlic clove (grated or finely minced) – Adds a subtle kick.
- Pinch of salt
Optional Garnish:
- Fresh chopped cilantro
- Extra lime wedges
- Chili flakes or Tajín (for extra heat and color)
Step-by-Step Process
1. Prepare the Corn Ribs
Here’s how to cut the corn safely:
I place a cob vertically on a sturdy cutting board and use a very sharp chef’s knife to slice straight down the middle. Then I halve each half again lengthwise — creating four long ribs per cob.
Tip: Corn is tough to cut! I usually stand on the flat side of the knife with a bit of body weight, rocking gently, rather than forcing it.
Once cut, I set the corn ribs aside in a large bowl.
2. Season the Corn
In a small bowl, I whisk together:
- Olive oil
- Smoked paprika
- Cumin
- Garlic powder
- Cayenne
- Salt and pepper
I pour this spicy mixture over the corn ribs and toss well with my hands to coat every side. Letting them sit for 5–10 minutes helps the flavors soak in.
3. Grill the Corn Ribs
Outdoor Grill Method:
I preheat the grill to medium-high and place the corn ribs directly on the grates, curved side up. I grill for 5–7 minutes, flipping once, until they are lightly charred and the edges begin to curl.
Oven Method:
I preheat the oven to 425°F (220°C) and place the ribs on a parchment-lined baking sheet. I roast for 20–25 minutes, flipping halfway, until they’re curled, golden, and slightly crispy on the edges.
Either way, the corn ribs will curl into a rib-like shape and develop beautiful caramelization and char.
4. Make the Vegan Lime Aioli
While the corn cooks, I whisk together:
- Vegan mayo
- Lime juice
- Lime zest
- Garlic
- Salt
I keep it chilled in the fridge until ready to serve. This sauce is cool, creamy, citrusy, and balances the smoky heat perfectly.
5. Serve and Garnish
Once the corn ribs are grilled and golden, I transfer them to a serving platter. I drizzle generously with the lime aioli, then sprinkle with:
- Fresh cilantro
- Chili flakes or Tajín
- Extra lime zest or wedges on the side
You can also serve the aioli on the side for dipping if you’re going for a more hands-on, party-style presentation.
Why This Recipe Is Loved
These corn ribs are a total hit because they’re:
- Crispy on the edges, juicy in the center
- Bursting with smoky-spicy flavor
- Visually stunning and fun to eat
- Fully vegan, gluten-free, and grill-friendly
They’re a great finger food that brings the “wow” factor to your 4th of July spread — and they double as an appetizer, side, or even a snack.
Pro Tips for Perfect Corn Ribs
- Use a very sharp knife and cut carefully — corn is tough!
- Toss well with oil and spices for even coating.
- Don’t overcook — edges should crisp but kernels should stay juicy.
- Double the aioli — it’s that good and keeps well in the fridge.
Serving Suggestions
Serve corn ribs with:
- BBQ vegan burgers or grilled skewers
- A big bowl of macaroni salad or potato salad
- Cold lemonade, agua fresca, or a jalapeño-lime spritzer
They’re also perfect for serving on platters with toothpicks at parties — just watch them disappear.
6. Vegan Baked Beans with Maple & Smoked Paprika

No 4th of July cookout is complete without a bubbling pot of baked beans — and this vegan version is my go-to every summer. It’s sweetened naturally with maple syrup, gets its bold flavor from tomato, mustard, and smoked paprika, and has just enough tang to keep it from tasting one-note. The texture is thick, saucy, and rich — no mushy beans here.
It’s hearty enough to stand as a main dish, especially when paired with cornbread or grilled veggies, but also works beautifully as a classic side.
Ingredients
Serves 6–8 as a side
For the beans:
- 3 cups cooked navy beans or pinto beans (or two 15 oz cans, drained and rinsed) – Creamy and hearty, with great texture.
- 1 tablespoon olive oil – For sautéing aromatics.
- 1 small yellow onion (finely chopped) – Sweetens as it cooks and builds depth.
- 3 garlic cloves (minced) – For savory backbone.
For the sauce:
- 1 cup tomato sauce or crushed tomatoes – Creates a rich, savory base.
- ¼ cup maple syrup – Sweetens and caramelizes while baking.
- 2 tablespoons apple cider vinegar – Balances the sweetness.
- 1 tablespoon Dijon mustard – Adds complexity and zing.
- 1 tablespoon tamari or soy sauce – Adds umami and salt.
- 1 tablespoon molasses – Gives a deep, traditional baked bean flavor.
- 1 teaspoon smoked paprika – Brings that essential BBQ smokiness.
- ½ teaspoon ground cumin – Warmth and earthiness.
- Salt and pepper, to taste
Step-by-Step Process
1. Sauté the Aromatics
In a large oven-safe pot, Dutch oven, or deep skillet, I heat 1 tablespoon olive oil over medium heat.
I add:
- Chopped onion
- Minced garlic
I cook, stirring frequently, for about 5–7 minutes, until the onions are soft and just beginning to caramelize. This base adds natural sweetness and depth to the sauce.
2. Add the Sauce Ingredients
To the sautéed onions and garlic, I add:
- Tomato sauce
- Maple syrup
- Apple cider vinegar
- Dijon mustard
- Tamari
- Molasses
- Smoked paprika
- Cumin
I stir well and let the sauce simmer for 5–10 minutes, allowing the flavors to meld and slightly thicken.
3. Add the Beans
Next, I stir in the:
- Cooked or canned beans (drained and rinsed)
I gently fold the beans into the sauce and bring the whole mixture to a gentle simmer.
4. Simmer or Bake
Option 1: Stovetop Simmer (Faster Method):
I lower the heat and simmer uncovered for 25–30 minutes, stirring occasionally, until the sauce is thick and glossy. This method is faster and still delivers great flavor.
Option 2: Oven Bake (Deeper Flavor):
I preheat the oven to 350°F (175°C) and transfer the pot (or oven-safe dish) to the oven. I bake uncovered for 45–50 minutes, until the top is caramelized and the beans are bubbling and thick.
Either way, I let the beans sit for 10–15 minutes before serving — this helps the sauce set up and intensifies the flavor.
5. Taste and Adjust
Just before serving, I taste and adjust:
- More maple syrup if you like it sweeter
- A splash of vinegar if it needs more tang
- A pinch of salt or smoked paprika to deepen the flavor
Then I garnish with chopped parsley, chili flakes, or even crushed red pepper for a hint of heat.
Why This Recipe Is Loved
These beans are always a hit because they’re:
- Sweet, smoky, tangy, and savory — everything a baked bean should be
- Made with real ingredients, no artificial sweeteners or flavors
- Hearty and satisfying, with a perfect thick, sticky sauce
- Naturally vegan, gluten-free, and packed with plant-based protein
Plus, they’re easy to double for a crowd and taste even better the next day.
Pro Tips for Perfect Baked Beans
- Simmer or bake uncovered — it thickens the sauce beautifully.
- Use molasses for richness — it’s a small ingredient that makes a big difference.
- Don’t skip the vinegar — it keeps the flavor balanced.
- Let them sit before serving — the flavors intensify as they rest.
Serving Suggestions
Serve with:
- Grilled burgers, corn ribs, or veggie skewers
- A slice of vegan cornbread or grilled sourdough
- Topped with chopped scallions or jalapeños
They also work well in BBQ bowls, served over rice or roasted sweet potatoes.
7. Star-Spangled Vegan Berry Shortcake Cups
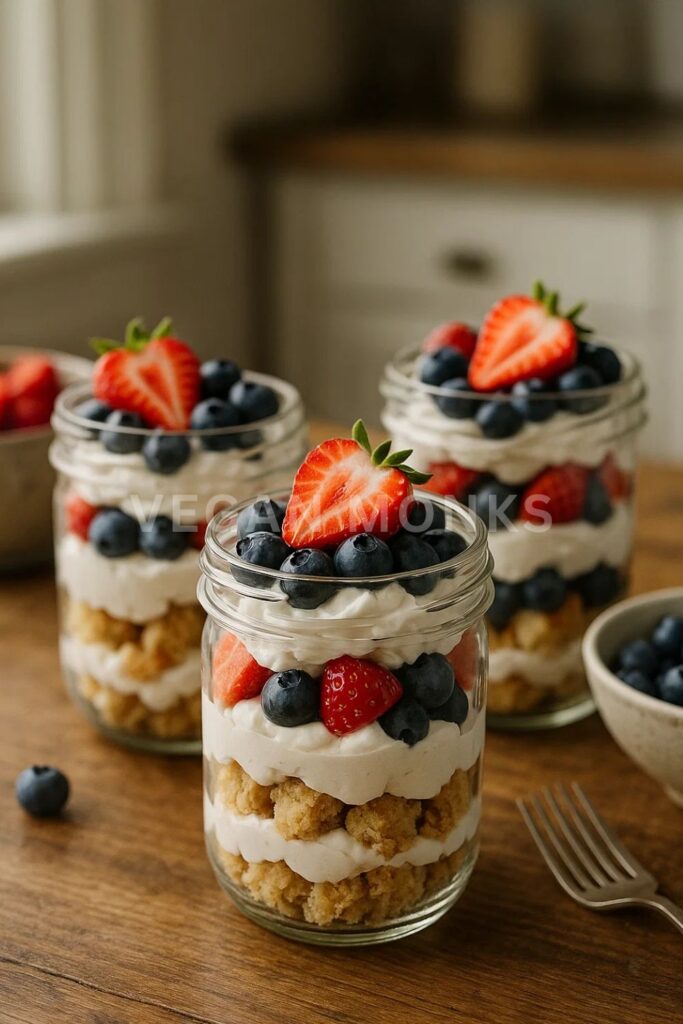
If you’re looking for a dessert that looks impressive, tastes like summer, and keeps things light and plant-based, these Star-Spangled Vegan Berry Shortcake Cups are it. They’re built in individual glasses or jars for easy serving, made with layers of fluffy vanilla shortcake, whipped coconut cream, and a mix of fresh strawberries and blueberries.
Each bite is creamy, juicy, and just the right balance of sweet and tart — and they hold up surprisingly well in the fridge if you want to make them in advance.
Ingredients
Makes 6 individual dessert cups (8 oz each)
For the vegan shortcake:
- 1 ½ cups all-purpose flour
- 2 tablespoons organic cane sugar – Lightly sweetens the dough.
- 1 tablespoon baking powder – For lift and fluffiness.
- ¼ teaspoon salt
- ⅓ cup cold vegan butter or coconut oil – Adds richness and structure.
- ½ cup non-dairy milk (almond, soy, or oat) – Adds moisture.
- 1 teaspoon apple cider vinegar – Reacts with the baking powder for tenderness.
- 1 teaspoon vanilla extract
For the whipped coconut cream:
- 1 can full-fat coconut milk or cream (chilled overnight) – Only the solid part.
- 2 tablespoons maple syrup or powdered sugar – For sweetness.
- ½ teaspoon vanilla extract
For the berry layer:
- 1 ½ cups fresh strawberries (hulled and sliced)
- 1 cup fresh blueberries
- 1 tablespoon maple syrup (optional) – Enhances sweetness if berries are tart.
- 1 teaspoon lemon juice – Balances and brightens the flavor.
Step-by-Step Process
1. Make the Shortcake
a. Preheat & Prep:
I preheat my oven to 400°F (200°C) and line a baking sheet with parchment paper.
In a mixing bowl, I whisk together:
- Flour
- Sugar
- Baking powder
- Salt
Then I cut in the cold vegan butter (or solid coconut oil) using a pastry cutter or my fingers until the mixture resembles coarse crumbs.
In a small bowl, I mix:
- Plant-based milk
- Apple cider vinegar
- Vanilla extract
I pour the wet mixture into the dry ingredients and stir just until combined. The dough should be soft but not sticky.
b. Bake:
I drop spoonfuls of dough onto the prepared baking sheet, forming 6 rustic mounds.
Bake for 13–15 minutes, or until golden brown on top. Let them cool completely before assembling. You can also split the shortcakes in half horizontally for layering, or break them into chunks for a trifle-style look.
2. Prep the Berries
While the shortcakes bake, I prep the berry filling:
In a bowl, I combine:
- Strawberries
- Blueberries
- Maple syrup (if needed)
- Lemon juice
I let the berries macerate for 10–15 minutes. This softens them slightly and draws out their juices, creating a light syrup.
3. Make the Coconut Whipped Cream
I scoop the solid part of the chilled coconut milk into a bowl (discard or save the liquid for smoothies).
I whip with a hand mixer or stand mixer until fluffy, about 1–2 minutes. Then I add:
- Maple syrup or powdered sugar
- Vanilla extract
I whip again until soft peaks form, then chill until ready to use.
4. Assemble the Dessert Cups
In 8-ounce glasses, mason jars, or parfait cups, I build each dessert in layers:
- Shortcake base – Either a split biscuit half or a few chunks.
- Spoonful of macerated berries with a bit of juice.
- Dollop of coconut whipped cream.
- Repeat layers once, ending with whipped cream on top.
- Garnish with a whole blueberry and strawberry slice, or even a mini American flag for extra flair.
5. Chill (Optional) and Serve
These can be served immediately, or chilled for up to 2–3 hours. The shortcake will absorb some of the berry juices and become even more flavorful — like a naturally sweet sponge cake.
Right before serving, I might dust the tops with a bit of powdered sugar, fresh mint, or a festive sprinkle for visual impact.
Why This Recipe Is Loved
These berry shortcake cups are a hit because they’re:
- Visually stunning and perfectly patriotic
- Light, sweet, and satisfying without being heavy
- Portion-controlled, easy to serve, and easy to clean up
- Completely dairy-free, egg-free, and full of whole, fresh ingredients
Plus, they’re make-ahead friendly and totally adaptable to other fruits like raspberries, blackberries, or even grilled peaches.
Pro Tips for Dessert Success
- Chill your coconut milk overnight — solid cream is key to whipped texture.
- Don’t overmix the shortcake dough — tender texture depends on a light hand.
- Use a clear glass or jar — the layered look is part of the magic.
- Let the berries macerate — it brings out their full flavor and color.
Serving Suggestions
Serve these shortcakes with:
- A sparkling berry mocktail, iced lavender lemonade, or a cold brew float
- A scoop of vegan vanilla ice cream for extra indulgence
- As part of a DIY shortcake bar, where guests can build their own
They’re the perfect ending to a hot July day — festive, refreshing, and full of flavor.
This 4th of July, you don’t have to choose between tradition and plant-based eating you can have both. With these vibrant vegan recipes, you’ll serve food that’s just as festive and flavourful as the classics, minus the animal products. Whether you’re grilling, chilling, or hosting a backyard feast, these dishes are guaranteed crowd-pleasers. So fire up the grill, pass the berry shortcake, and celebrate freedom flavourfully and compassionately.