When the heat kicks in and you’re craving something sweet, there’s nothing better than a refreshing dessert, especially when it’s plant-based and guilt-free. Whether you’re vegan or just trying to eat a little lighter, these vegan summer desserts are proof that you don’t need dairy or eggs to make something delicious. From frozen treats to no-bake wonders, I’ve rounded up some of my go-to recipes that keep summer sweet and simple. Trust me, these are the kinds of desserts that disappear faster than you can say “just one more bite!”
Summer Desserts
Summer calls for light, refreshing desserts that keep you cool without sacrificing flavor. You can whip up vegan treats that are creamy, fruity, and delightfully satisfying. These desserts let you enjoy indulgence while feeling fresh and energized. Your summer gatherings just got a whole lot tastier.
1. Vegan Strawberry Shortcake

When I think about summer desserts, Vegan Strawberry Shortcake instantly comes to mind. It’s one of those timeless treats that feels so fresh and indulgent without being heavy. The buttery biscuit layers, juicy strawberries, and fluffy whipped coconut cream come together in a way that’s simply magical — and best of all, it’s 100% plant-based. Here’s how I make it:
Ingredients
For the shortcake biscuits:
- 2 cups all-purpose flour — Provides the structure for the shortcake.
- 2 tablespoons organic cane sugar — Adds a subtle sweetness to the biscuit.
- 1 tablespoon baking powder — Ensures the biscuits are light and fluffy.
- ½ teaspoon sea salt — Balances the flavors perfectly.
- ½ cup vegan butter (cold and cubed) — Creates that classic, flaky biscuit texture.
- ¾ cup full-fat coconut milk — Adds moisture and richness.
For the strawberry filling:
- 3 cups fresh strawberries (sliced) — The star of the show, bringing natural sweetness and juiciness.
- 2 tablespoons maple syrup — Enhances the natural sweetness without refined sugars.
- 1 teaspoon lemon juice — Brightens the flavor of the strawberries.
For the coconut whipped cream:
- 1 can full-fat coconut milk (refrigerated overnight) — The base for a creamy, dairy-free whipped topping.
- 1 tablespoon powdered sugar — Lightly sweetens the whipped cream.
- ½ teaspoon vanilla extract — Adds warmth and depth to the flavor.
Step-by-Step Process
1. Prepare the Strawberries
First, I start by prepping the strawberries. I slice them thinly and toss them in a bowl with the maple syrup and lemon juice. Then I let them sit at room temperature while I make the biscuits. This maceration draws out their juices, creating a natural, syrupy sauce that’s absolutely perfect for layering.
2. Make the Shortcake Biscuits
In a large mixing bowl, I whisk together the flour, sugar, baking powder, and salt. Then, I add the cold, cubed vegan butter, cutting it into the dry ingredients using a pastry cutter or my fingertips until the mixture looks like coarse crumbs.
Next, I pour in the coconut milk gradually, stirring just until the dough comes together — it’s important not to overmix here, or the biscuits will turn tough.
I turn the dough out onto a floured surface, pat it into a 1-inch thick rectangle, and use a round cutter to punch out biscuits. I place them on a baking sheet lined with parchment paper and bake at 425°F (220°C) for 12-15 minutes, or until golden brown on top.
3. Make the Coconut Whipped Cream
While the biscuits are baking, I prepare the coconut whipped cream. I scoop the solid coconut cream from the chilled can (avoiding the liquid) into a mixing bowl. Using a hand mixer, I whip it until fluffy, then add the powdered sugar and vanilla extract, whipping again until smooth and luscious.
4. Assemble the Shortcakes
Once the biscuits have cooled slightly, I slice them in half horizontally. I layer the bottom half with a generous spoonful of the juicy strawberries and a dollop of coconut whipped cream, then cap it with the biscuit top. I add more strawberries and cream on top for an irresistible presentation.
Why This Vegan Strawberry Shortcake Is Loved
This recipe is loved because it’s the ultimate combination of light, fruity freshness, and rich, comforting textures. The coconut whipped cream adds a silky, decadent element that pairs beautifully with the vibrant, syrupy strawberries. Plus, the shortcakes themselves are flaky and tender — a dream come true for anyone craving a classic dessert made vegan.
Pro Tips for Perfect Shortcake
- Keep the vegan butter as cold as possible — it helps create flakiness.
- Do not overmix the dough — this keeps the biscuits tender.
- Chill your mixing bowl for the coconut whipped cream — it helps the cream whip faster and stay fluffy.
Serving Suggestions
I love serving this shortcake with a glass of iced mint tea or a freshly brewed cold brew coffee for the ultimate summer dessert experience. You can also top it with extra mint leaves for a little color pop.
2. No-Bake Vegan Lemon Cheesecake
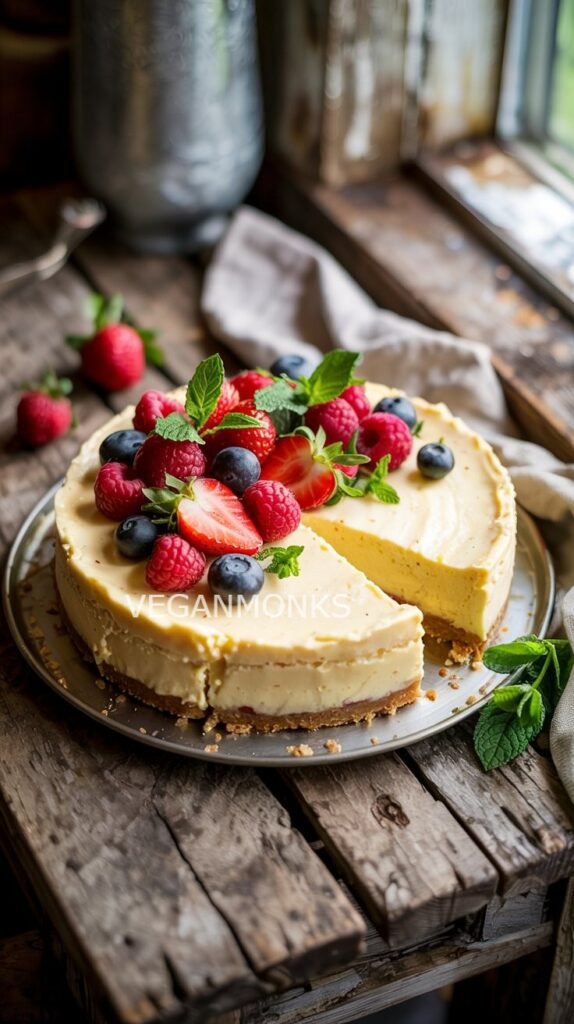
When summer is in full swing and the kitchen feels like an oven, the last thing I want to do is actually turn one on. That’s where this No-Bake Vegan Lemon Cheesecake saves the day. It’s rich, creamy, tangy, and completely refreshing — yet made without any dairy, eggs, or refined sugars. Best of all, it requires zero baking, making it an absolute summer essential for me.
This cheesecake has the perfect balance of tartness from fresh lemons and smoothness from soaked cashews. It’s light yet indulgent, sweet but never overpowering — a truly unforgettable vegan dessert.
Ingredients
For the crust:
- 1 ½ cups Medjool dates (pitted) — These sticky dates are essential for naturally binding the crust without the need for processed sugars.
- 1 cup raw almonds — Adds structure, crunch, and a warm, nutty flavor to the base.
- 1 tablespoon coconut oil (melted) — Helps solidify the crust and gives it a hint of richness.
For the filling:
- 2 cups raw cashews (soaked for 4 hours or overnight) — When soaked, cashews blend into a silky, creamy base that perfectly mimics a traditional cheesecake texture.
- ⅓ cup fresh lemon juice — Provides the bright, tangy flavor that defines this dessert.
- 2 tablespoons lemon zest — Intensifies the citrus aroma and brings depth to the lemon flavor.
- ½ cup maple syrup — A natural sweetener that balances out the tartness of the lemons.
- ⅓ cup coconut cream — Adds a luxurious richness to the cheesecake, making it velvety smooth.
- 1 teaspoon vanilla extract — Gives a warm, aromatic background note that complements the lemon beautifully.
- Pinch of turmeric (optional) — Adds a subtle golden hue to the filling without affecting the flavor.
Step-by-Step Process
1. Prepare the Crust
I always start by making the crust because it needs a bit of time to firm up while I prepare the filling. I place the dates, raw almonds, and coconut oil into a food processor. I pulse the mixture until it becomes crumbly yet sticky enough to hold its shape when pressed between my fingers.
Next, I press the mixture firmly into the bottom of a springform pan lined with parchment paper, making sure it’s even and compact. Then, I pop it into the freezer to chill while I work on the creamy lemon filling.
2. Blend the Filling
For the filling, I drain the soaked cashews and add them to a high-speed blender along with the lemon juice, lemon zest, maple syrup, coconut cream, vanilla extract, and a tiny pinch of turmeric if I want a natural yellow color.
I blend everything on high until the mixture is completely smooth and creamy. Depending on the power of your blender, this can take a few minutes — I sometimes scrape down the sides once or twice to ensure everything is evenly incorporated. I know it’s ready when it looks glossy and thick, like a luscious lemon custard.
3. Assemble and Freeze
I pour the lemon cashew filling over the chilled crust, using a spatula to smooth out the top for a neat finish. Then I gently tap the pan on the counter to release any air bubbles trapped inside.
After that, I transfer the cheesecake to the freezer and let it firm up for at least 4 hours, or ideally overnight if I can be patient. Freezing gives the cheesecake its firm, sliceable texture.
4. Serve
About 15-20 minutes before serving, I remove the cheesecake from the freezer to soften slightly for easier slicing. I run a warm knife around the edges to loosen it, then gently release it from the springform pan. I slice it with a sharp, clean knife and garnish it with fresh berries or thin lemon slices for that stunning final touch.
Why This No-Bake Vegan Lemon Cheesecake Is Loved
This dessert is a hit because it checks all the boxes: it’s refreshing, rich, naturally sweetened, gluten-free, and of course completely dairy-free. The brightness of the lemon cuts through the richness of the coconut and cashew base, creating a dessert that feels indulgent yet light — exactly what I crave in the summertime.
Plus, because it’s no-bake, it’s practically foolproof and doesn’t heat up the kitchen, making it perfect for hot weather entertaining.
Pro Tips for Perfect Vegan Lemon Cheesecake
- Always soak your cashews properly — Soaking softens them, ensuring your filling is ultra-smooth and creamy.
- Use fresh lemon juice and zest — It makes a world of difference in flavor compared to bottled lemon juice.
- Chill thoroughly before slicing — The longer the cheesecake chills, the better its texture and flavor.
Serving Suggestions
I love topping this cheesecake with a mix of fresh berries like raspberries, blueberries, and blackberries. A light dusting of powdered sugar or a few sprigs of fresh mint can elevate the presentation for special occasions. I also love pairing it with a glass of chilled sparkling water with lemon slices for a refreshing summer vibe.
3. Vegan Mango Coconut Popsicles
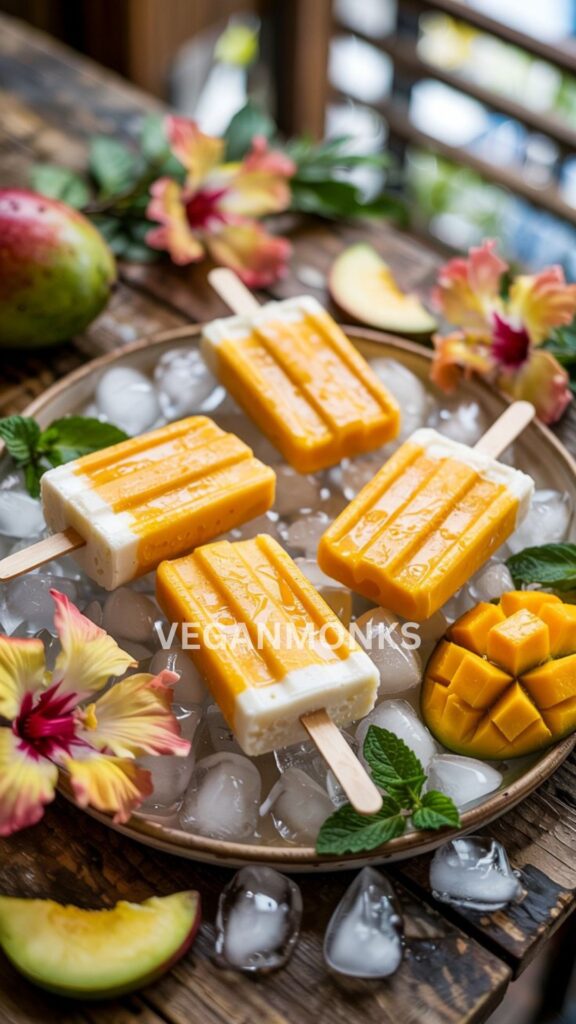
When summer temperatures soar, I crave desserts that are refreshing, naturally sweet, and cooling. That’s where these Vegan Mango Coconut Popsicles come in. They’re vibrant, tropical, and incredibly creamy — yet so light that I can enjoy one (or two) without feeling weighed down. These popsicles are incredibly easy to make, requiring just a handful of wholesome ingredients and a good freezer.
They capture the pure, juicy flavor of ripe mangoes, elevated by the lush creaminess of coconut milk, making every bite a mini vacation.
Ingredients
- 2 large ripe mangoes (peeled and chopped) — The main flavor and natural sweetener; ripe mangoes provide that luscious tropical taste.
- 1 cup full-fat coconut milk — Gives the popsicles their rich, creamy texture and slight natural sweetness.
- 2 tablespoons maple syrup — Optional, depending on how sweet your mangoes are; it enhances the natural fruit sweetness without overpowering.
- ½ teaspoon vanilla extract — Adds a subtle warmth and depth to the overall flavor.
- Juice of ½ lime — A splash of tartness brightens the mango and cuts through the richness.
Step-by-Step Process
1. Prepare the Ingredients
I start by peeling and chopping the mangoes into chunks, making sure they’re ripe and juicy. Ripe mangoes will blend much more smoothly and naturally sweeten the popsicles without needing much added sugar.
2. Blend the Mixture
Into my blender, I add the mango chunks, coconut milk, maple syrup (if using), vanilla extract, and lime juice. I blend everything on high until the mixture becomes completely smooth and creamy. Depending on the ripeness of the mangoes, the blend can be quite thick and rich — exactly what I want for a popsicle that doesn’t turn icy.
3. Fill the Popsicle Molds
Once the mixture is silky smooth, I pour it carefully into popsicle molds. I like to gently tap the molds on the counter to eliminate any trapped air bubbles, which ensures an even freeze and a perfect final texture.
4. Insert Sticks and Freeze
After filling the molds, I insert popsicle sticks into each mold. Then I place the tray in the freezer and let the popsicles freeze solid for at least 4–6 hours, though overnight is ideal for the best results.
5. Unmold and Serve
To release the popsicles, I run warm water briefly over the outside of the molds for about 10 seconds, then gently pull them out. They pop out beautifully when frozen correctly.
Why These Vegan Mango Coconut Popsicles Are Loved
These popsicles are so loved because they’re the perfect combination of creamy, fruity, and refreshing — without any artificial ingredients or heavy sugars. The sweetness of the mango, the luxurious mouthfeel from the coconut milk, and the hint of citrus from lime juice make them completely addictive.
They’re kid-friendly, adult-approved, and perfect for cooling down after a day in the sun.
Pro Tips for Perfect Mango Coconut Popsicles
- Use the ripest mangoes you can find — The better your mangoes, the more naturally sweet and flavorful your popsicles will be.
- Blend thoroughly — A perfectly smooth mixture freezes into a creamy texture instead of an icy one.
- Freeze overnight if possible — This ensures the popsicles are fully set and come out cleanly from the molds.
Serving Suggestions
While these popsicles are delicious on their own, I sometimes love to take them a step further by:
- Dipping them halfway in melted vegan dark chocolate and sprinkling with shredded coconut.
- Rolling them lightly in crushed pistachios for a beautiful, nutty finish.
- Serving them on a tray with fresh tropical fruit like kiwi, pineapple, or passionfruit for a colorful, festive summer dessert platter.
They’re a fantastic dessert option for pool parties, picnics, or just a regular sunny afternoon treat.
4. Vegan Chocolate Avocado Mousse
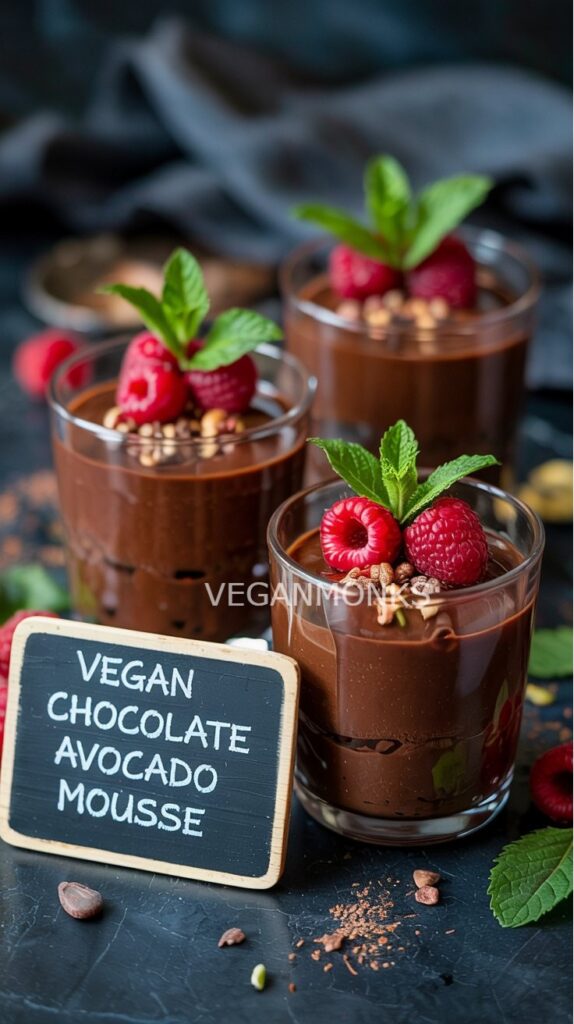
When I’m craving something decadent yet wholesome, I always turn to this Vegan Chocolate Avocado Mousse. It’s incredibly rich, smooth, and satisfying — and the best part? It’s made with just a handful of real, plant-based ingredients. No dairy, no refined sugars, and absolutely no compromise on flavor.
This mousse is a true game-changer. The ripe avocados create a silky base that blends seamlessly with cacao to deliver a deep chocolate flavor that’s pure indulgence. Plus, it’s a no-cook dessert, perfect for when I want a luxurious treat without heating up the kitchen.
Ingredients
- 2 ripe avocados — They form the creamy base of the mousse, offering richness and a silky texture without any detectable “avocado” flavor once blended with chocolate.
- ¼ cup raw cacao powder (or cocoa powder) — Provides an intense, rich chocolate flavor.
- ¼ cup pure maple syrup — Naturally sweetens the mousse without using processed sugars.
- 1 teaspoon vanilla extract — Adds warmth and depth, balancing the chocolate.
- Pinch of sea salt — Enhances the chocolate flavor and rounds out the sweetness.
Step-by-Step Process
1. Prepare the Avocados
I start by slicing the ripe avocados in half, removing the pits, and scooping the flesh into a food processor or high-speed blender. The key here is to make sure the avocados are perfectly ripe — soft, but not brown or overripe — to ensure a smooth, neutral-tasting base.
2. Blend the Mousse
Into the food processor with the avocados, I add the cacao powder, maple syrup, vanilla extract, and a small pinch of sea salt. I blend everything on high until the mixture is completely smooth and creamy.
It usually takes about 1–2 minutes, and I make sure to scrape down the sides of the bowl a couple of times to get everything incorporated. I know it’s ready when the mousse looks glossy and luxurious with absolutely no lumps.
3. Taste and Adjust
At this point, I always do a quick taste test. If I want it a bit sweeter, I add an extra splash of maple syrup. If I want a deeper chocolate flavor, I might add a touch more cacao powder. Customizing it to taste is what makes this recipe so special.
4. Chill
Once the mousse is silky and perfectly flavored, I spoon it into small serving glasses or ramekins. I cover and refrigerate them for at least 1 hour to allow the mousse to set and deepen in flavor.
The chilling step is optional if you’re in a rush, but it definitely improves the texture and taste.
Why This Vegan Chocolate Avocado Mousse Is Loved
This dessert is adored because it’s luxuriously creamy, deeply chocolatey, and packed with nutrient-dense, whole-food ingredients. No one ever guesses that the secret to its luscious texture is avocado!
It’s perfect for those looking for a dessert that’s gluten-free, dairy-free, refined sugar-free, and still satisfies serious chocolate cravings.
Pro Tips for Perfect Chocolate Avocado Mousse
- Use perfectly ripe avocados — Firm avocados won’t blend smoothly, and overripe ones can add an off-flavor.
- Blend until absolutely smooth — Texture is key for a mousse that feels indulgent and silky.
- Chill before serving — The flavors meld and deepen, and the mousse thickens to the perfect consistency.
Serving Suggestions
I love to elevate this mousse by topping it with:
- Fresh raspberries or sliced strawberries for a fruity contrast.
- A sprinkle of cacao nibs for a crunchy texture.
- A dollop of coconut whipped cream for an extra touch of luxury.
- A few mint leaves for a refreshing pop of color and flavor.
This mousse also pairs beautifully with a glass of cold-brew coffee or a light plant-based espresso latte for a café-style dessert experience at home.
5. Berry Coconut Chia Pudding
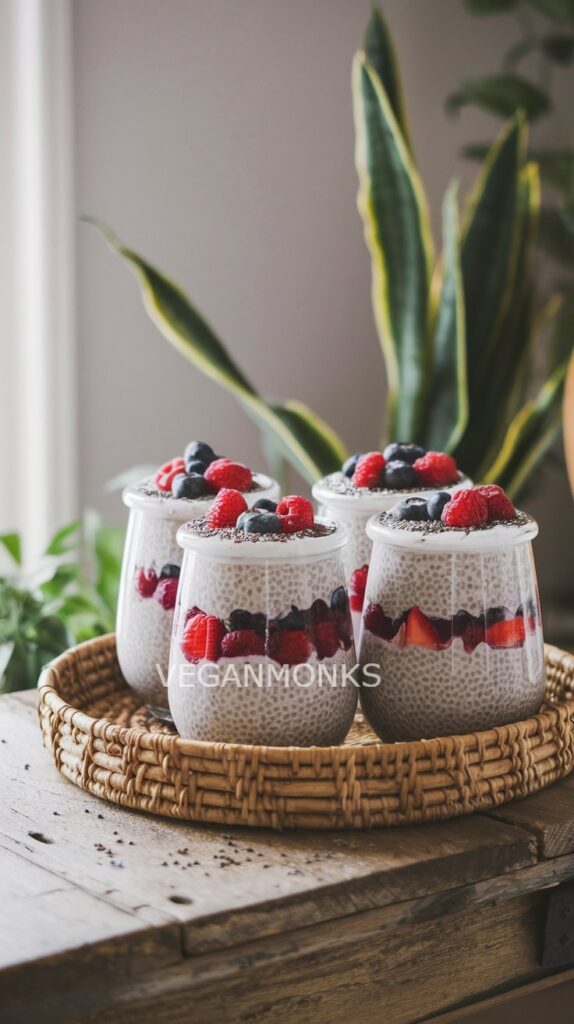
When I need a refreshing, make-ahead dessert that’s both nourishing and beautiful, I always turn to this Berry Coconut Chia Pudding. It’s the perfect combination of cool, creamy coconut milk, plump chia seeds, and fresh, juicy berries — ideal for summer days when you want something light but still satisfying.
What I love most about this chia pudding is how easy it is to customize. It feels fancy enough for entertaining yet simple enough for everyday snacking. Plus, it’s packed with fiber, healthy fats, and antioxidants, making it a guilt-free treat.
Ingredients
For the chia pudding base:
- ¼ cup chia seeds — These tiny seeds absorb liquid and expand to form a thick, pudding-like consistency, while delivering a powerful dose of fiber and omega-3s.
- 1 cup full-fat coconut milk (from a can) — Provides a rich, creamy texture and luxurious mouthfeel.
- 2 tablespoons maple syrup — Naturally sweetens the pudding without overpowering the flavor.
- ½ teaspoon vanilla extract — Adds a warm, aromatic depth to the coconut base.
For the topping:
- 1 cup mixed fresh berries (such as strawberries, blueberries, raspberries) — Adds vibrant color, juicy texture, and refreshing sweetness.
Optional extras:
- Toasted coconut flakes — For extra crunch and a tropical flair.
- Additional maple syrup — For drizzling before serving, if desired.
- Mint leaves — For a fresh, decorative touch.
Step-by-Step Process
1. Mix the Chia Pudding Base
I start by grabbing a medium-sized mixing bowl. I pour in the coconut milk, maple syrup, and vanilla extract, whisking everything together until smooth and well combined.
Once the liquid mixture is ready, I slowly sprinkle in the chia seeds, whisking continuously as I go. This step is important because it helps prevent the chia seeds from clumping together. I make sure the seeds are evenly distributed throughout the coconut milk.
2. Let It Sit and Thicken
After mixing, I let the chia pudding sit uncovered at room temperature for 10 minutes. After the 10 minutes are up, I give it another good stir to break up any small clumps that may have formed.
Then, I cover the bowl with plastic wrap or a lid and place it in the refrigerator to set. I like to let it chill for at least 4 hours, but overnight is even better for the thickest, creamiest texture.
During this time, the chia seeds absorb the coconut milk, swell up, and transform into a luscious, pudding-like consistency.
3. Prepare the Fresh Berries
While the pudding chills, I wash and prepare my fresh berries. I slice any larger strawberries into halves or quarters so that all the berries are bite-sized and easy to eat with a spoon.
I also like to pat the berries dry gently with a paper towel — especially if I’m preparing them in advance — to prevent them from becoming watery and diluting the pudding.
4. Assemble the Chia Pudding
Once the chia pudding has thickened and is nicely set, I take it out of the fridge. I give it one final stir to fluff it up and ensure even consistency.
Then, I layer it into serving glasses or jars. I spoon some chia pudding into the bottom, add a layer of fresh berries, and repeat until the glass is full, finishing with a generous pile of berries on top.
This layering makes each serving look beautiful and feel a little more special — perfect if I’m serving guests or just treating myself.
5. Final Touches
Right before serving, I sometimes sprinkle a few toasted coconut flakes on top for extra texture and flavor. If I’m feeling indulgent, I drizzle a bit more maple syrup over the berries. A few small mint leaves tucked into the berries add a lovely fresh aroma and an elegant finish.
Why This Berry Coconut Chia Pudding Is Loved
This chia pudding is beloved because it’s creamy, refreshing, nutrient-packed, and incredibly versatile. It feels indulgent thanks to the rich coconut milk, but it’s nourishing enough to enjoy anytime, even for breakfast!
The contrast of textures — creamy pudding, juicy berries, crunchy coconut flakes — keeps every bite exciting. Plus, it’s naturally vegan, gluten-free, refined sugar-free, and customizable.
Pro Tips for Perfect Berry Coconut Chia Pudding
- Stir twice — Once immediately after mixing and again after 10 minutes to prevent chia clumps from forming.
- Use canned full-fat coconut milk — It’s much creamier and richer than the boxed kind, leading to a more luxurious pudding.
- Chill overnight for best results — The longer the pudding sets, the thicker and creamier it becomes.
- Layer strategically — Put sturdier berries like blueberries in the middle layers and more delicate raspberries and strawberries on top for the best presentation.
Serving Suggestions
This Berry Coconut Chia Pudding is perfect as:
- A light summer dessert after a barbecue or picnic.
- A wholesome snack for hot afternoons.
- A beautiful make-ahead brunch option, especially when layered into small glass jars.
It pairs wonderfully with a cold herbal tea or a fresh smoothie for a refreshing and satisfying combo.
6. Vegan Peach Crisp
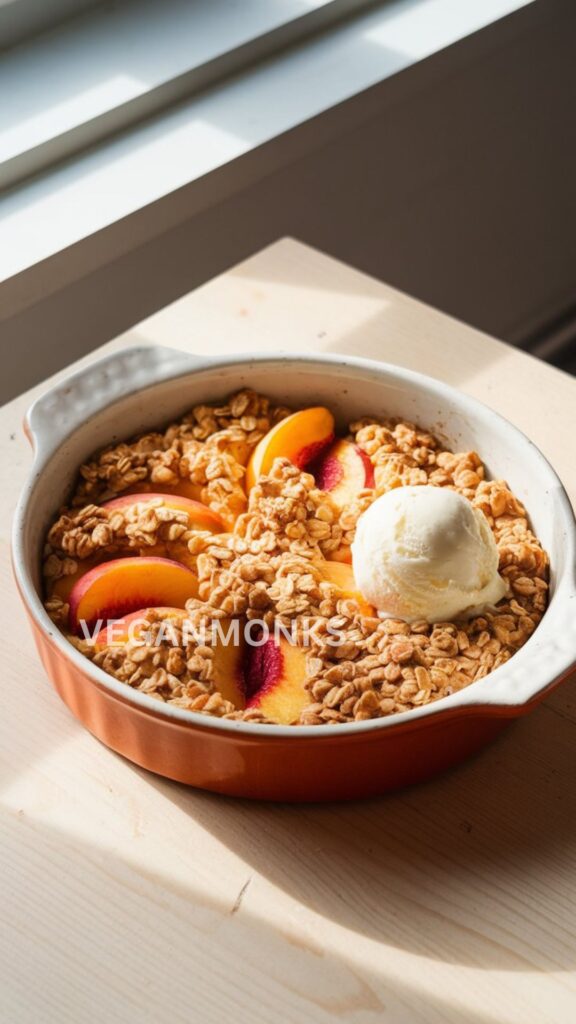
There’s something about a Vegan Peach Crisp that feels like pure summer comfort to me. Sweet, juicy peaches bubbling under a golden, crumbly oat topping — it’s rustic, simple, and incredibly satisfying. Best of all, it’s completely dairy-free and made with wholesome ingredients, yet every bite tastes just as rich and comforting as the traditional version.
This is the dessert I turn to when I want something cozy but still light enough for a warm evening. It’s quick to throw together, smells incredible while baking, and shines when served warm with a scoop of vegan ice cream.
Ingredients
For the peach filling:
- 5–6 ripe peaches (sliced thin, skins on or off) — The star of the dessert; ripe peaches provide natural sweetness and juiciness.
- 2 tablespoons maple syrup — Enhances the peaches’ natural sugars and creates a delicious syrup as they bake.
- 1 tablespoon cornstarch — Thickens the peach juices so the crisp isn’t runny.
- 1 teaspoon lemon juice — Brightens the flavor and balances the sweetness.
For the oat topping:
- 1 cup rolled oats — Gives the topping its hearty, crispy texture.
- ½ cup almond flour — Keeps the topping light and gluten-free while adding a nutty flavor.
- ⅓ cup coconut sugar — Provides a deep, caramel-like sweetness without being overpowering.
- ¼ cup coconut oil (melted) — Binds the topping ingredients and adds richness.
- 1 teaspoon cinnamon — Adds a warm spice that beautifully complements the peaches.
- Pinch of sea salt — Enhances and balances all the flavors.
Step-by-Step Process
1. Preheat the Oven
I always start by preheating my oven to 350°F (175°C). Having the oven ready ensures the peaches go in while they’re still fresh and juicy, and it allows the topping to crisp up perfectly.
2. Prepare the Peach Filling
In a large mixing bowl, I combine the sliced peaches with the maple syrup, cornstarch, and lemon juice. I gently toss everything together with a spatula until the peaches are evenly coated.
If my peaches are extremely ripe and juicy, I might add just a little extra cornstarch (about half a tablespoon more) to make sure the filling isn’t too watery after baking.
Once everything is mixed, I spread the peach mixture evenly into a lightly greased baking dish, making sure to pour in all the juices as well — they’ll turn into a delicious syrup as it bakes.
3. Make the Crisp Topping
In a separate bowl, I prepare the topping. I stir together the rolled oats, almond flour, coconut sugar, cinnamon, and sea salt until combined.
Then, I drizzle in the melted coconut oil and mix with a fork or my fingers until the mixture looks crumbly and all the dry ingredients are lightly coated. The mixture must have a crumbly texture rather than a wet batter — that’s how you get those beautiful crispy chunks on top.
4. Assemble and Bake
I sprinkle the oat topping evenly over the peaches, covering them completely but allowing some of the fruit to peek through for a rustic look.
I bake the crisp in the preheated oven for 35–40 minutes, or until the topping is golden brown and the peach filling is bubbling around the edges. The smell that fills the kitchen at this point — sweet, buttery, and spiced — is absolutely irresistible.
If I want an extra-crispy topping, I sometimes broil the crisp for an additional 1–2 minutes at the end, but I watch carefully to avoid burning.
5. Cool Slightly Before Serving
After removing the crisp from the oven, I let it cool for about 10–15 minutes. This short resting time allows the juices to thicken slightly, making it easier to serve without the filling running everywhere.
Why This Vegan Peach Crisp Is Loved
This crisp is a favorite because it captures the very essence of summer — juicy peaches, warm cinnamon spice, and that irresistible crunchy topping. It’s naturally vegan, gluten-free, and refined sugar-free without sacrificing any of the flavor or texture of a classic crisp.
It’s quick to make, customizable with different fruits, and perfect for feeding a crowd.
Pro Tips for Perfect Vegan Peach Crisp
- Use ripe but slightly firm peaches — They hold their shape better during baking and don’t turn to mush.
- Don’t skimp on the lemon juice — A little acidity balances the sweet peaches perfectly.
- Spread the topping evenly — Make sure there are no thick clumps so everything bakes evenly and crisps up beautifully.
- Let it rest after baking — This small step makes the filling thicker and easier to serve.
Serving Suggestions
I always recommend serving Vegan Peach Crisp warm, right out of the oven (after the brief cooling period), with:
- A generous scoop of vegan vanilla ice cream — the contrast between warm crisp and cold ice cream is pure magic.
- A drizzle of coconut cream for extra richness.
- A sprinkle of chopped toasted pecans for added crunch if you want to take it even further.
It also tastes incredible cold the next day for breakfast — I’m not even kidding.
7. Watermelon Mint Granita
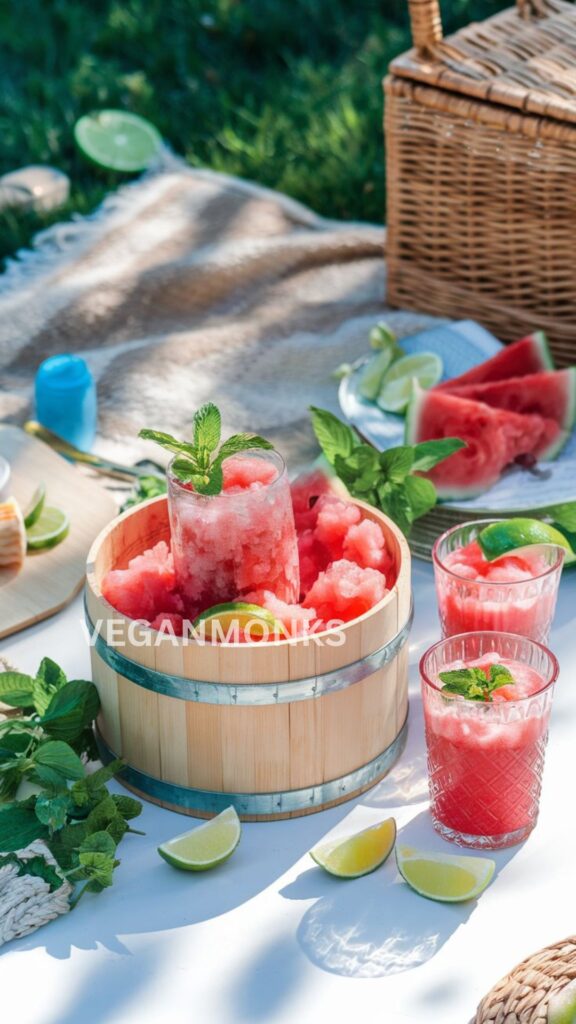
When the summer heat feels relentless, I always crave something icy, fresh, and ultra-light — and that’s where my Watermelon Mint Granita comes in. This dessert is the ultimate heat-buster: simple, vibrant, naturally sweet, and ridiculously refreshing.
Granita is like a fancy Italian snow cone, but so much better. It’s made from just a few wholesome ingredients and requires no ice cream maker — just a fork and a little patience. The texture is beautifully flaky, the flavor is bright and clean, and it’s completely plant-based.
This is one of those recipes that feels fancy enough for a dinner party, yet casual enough for an afternoon treat on the patio.
Ingredients
- 4 cups seedless watermelon (cubed) — The hero ingredient, loaded with natural sweetness, juiciness, and a vibrant red color.
- 2 tablespoons fresh lime juice — Adds a zingy brightness that enhances the natural flavor of the watermelon.
- 2 tablespoons maple syrup — Lightly sweetens and balances the tartness of the lime; optional depending on the sweetness of the watermelon.
- Handful of fresh mint leaves — Infuses the dessert with a cool, herbal note that pairs beautifully with the watermelon.
- Pinch of sea salt — Just a touch to sharpen and enhance the overall flavors.
Step-by-Step Process
1. Prepare the Watermelon
I start by cubing my watermelon into small chunks, making sure to remove any stray seeds, even if it’s a “seedless” variety. Even a few seeds can interrupt the silky-smooth texture we’re aiming for in the granita.
For best results, I use very ripe, sweet watermelon — it makes the flavor so much more intense and naturally vibrant.
2. Blend the Ingredients
Next, I add the watermelon cubes, lime juice, maple syrup (if using), fresh mint leaves, and a pinch of sea salt into a high-speed blender.
I blend everything together until the mixture is completely smooth and liquid. This usually takes about 30–45 seconds. I always give it a quick taste after blending — sometimes, if the watermelon is ultra-sweet, I skip the maple syrup entirely.
3. Strain (Optional)
If I want an ultra-smooth granita, I pour the blended mixture through a fine mesh strainer into a bowl to remove any remaining pulp. This step is optional, but I usually do it for a lighter, flakier texture.
If I’m short on time or don’t mind a slightly more rustic finish, I skip the straining.
4. Freeze the Mixture
I pour the blended (and optionally strained) watermelon mixture into a shallow metal baking pan or dish. A metal pan works best because it helps the granita freeze faster and more evenly.
I place the pan flat in the freezer and set a timer for 30–40 minutes.
5. Scrape the Granita
After the first 30–40 minutes, I take the pan out of the freezer. The edges will start to freeze first. Using a fork, I scrape the frozen edges toward the center, breaking up any large ice crystals.
I repeat this scraping process every 30 minutes for about 2–3 hours total, depending on my freezer. Each time I scrape, the granita becomes flakier and more delicate. It’s a bit of a labor of love, but worth it.
The goal is to create fine, fluffy ice crystals — not a solid block of ice. I continue scraping until the entire pan has transformed into a mound of light, refreshing ice.
6. Serve Immediately or Store
Once the granita is fully frozen and fluffy, it’s ready to serve. If I’m not serving it right away, I keep it in the freezer and give it a quick scrape again right before scooping it into glasses.
Why This Watermelon Mint Granita Is Loved
This granita is adored because it’s pure summer in a glass. It’s:
- Incredibly refreshing — cooling you down instantly.
- Naturally sweet, highlighting the best of fresh, ripe watermelon.
- Light and hydrating — perfect for hot days when heavy desserts just won’t do.
- Quick and low-effort, requiring no special equipment beyond a fork and a pan.
It’s also visually stunning with its brilliant pink hue, and the hint of mint takes it from simple to spectacular.
Pro Tips for Perfect Watermelon Mint Granita
- Use a shallow metal pan — It freezes the mixture faster and more evenly than glass or plastic.
- Scrape consistently — Every 30 minutes is key to achieving the fine, flaky texture instead of a hard icy block.
- Taste before freezing — Adjust the sweetness if needed based on how sweet your watermelon is naturally.
- Use fresh mint, not dried — Fresh mint leaves offer a clean, bright flavor that dried herbs just can’t replicate.
Serving Suggestions
I love serving this granita in:
- Chilled cocktail glasses or small dessert bowls, garnished with extra mint leaves for a fancy finish.
- Layered with a few fresh watermelon balls for texture.
- Topped with a squeeze of extra lime juice for an even brighter flavor pop.
It pairs perfectly with a crisp, cool cucumber-mint sparkling water or even a light vegan white wine for a luxurious summer evening treat.
These vegan summer desserts prove that plant-based sweets can be just as rich, refreshing, and indulgent. From creamy no-bake treats to fruity frozen favorites, there’s something here for every craving. Each recipe is simple, seasonal, and made to impress — no dairy, no compromise.
So go ahead, chill out and treat yourself, the sweetest summer starts here.