Summer is the season of sunshine, cookouts, and potlucks—and let’s be real, the sides are often the stars of the show. Whether you’re firing up the grill or just keeping it chill with a backyard spread, having a few go-to vegan summer side dishes makes entertaining (or just weekday dinners) way more delicious. I’ve pulled together my absolute favorite plant-based sides that are fresh, colorful, and crowd-pleasing—even the meat-eaters will be going back for seconds. Grab your biggest serving bowl, because things are about to get tasty.
Summer Side Dishes
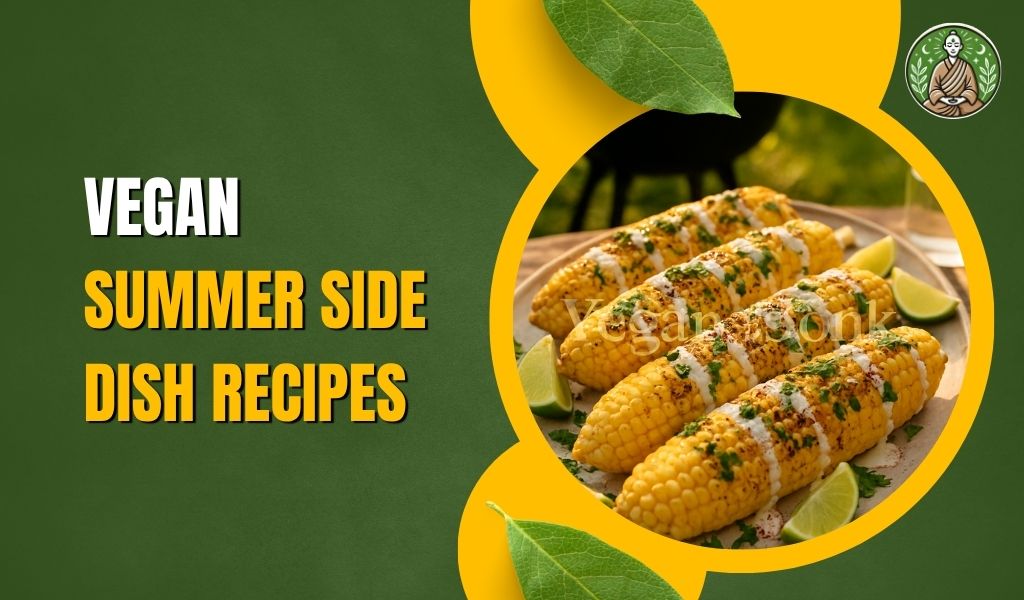
1. Grilled Corn with Vegan Lime Crema
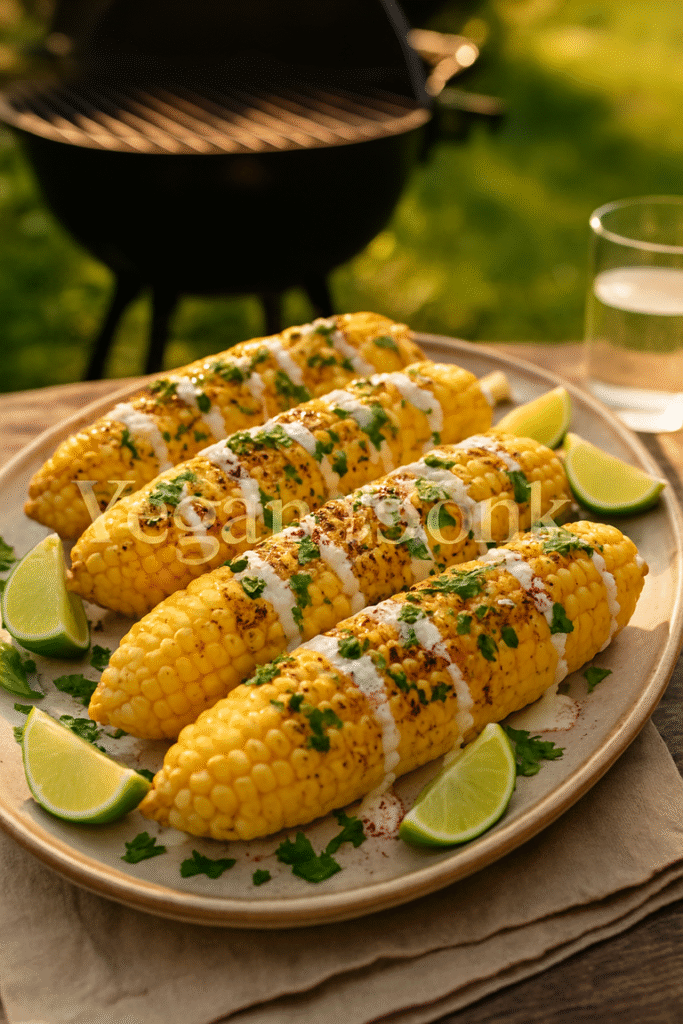
There’s nothing quite like fresh corn charred over a grill. The natural sweetness, smokiness, and juicy crunch are summer perfection. In this recipe, I dress up grilled corn with a creamy, tangy vegan lime crema, a dusting of chili powder, and fresh herbs for a flavor combo that’s part street food, part backyard gourmet.
It’s easy to prep, grill-friendly, and totally dairy-free — but rich enough to feel indulgent.
Ingredients
Serves 4
For the grilled corn:
- 4 ears of fresh corn, husked
- 1 tablespoon olive oil – For brushing
- Pinch of salt
For the vegan lime crema:
- ½ cup raw cashews, soaked 4 hours or boiled 10 minutes
- ¼ cup water – To blend
- 2 tablespoons fresh lime juice
- 1 teaspoon lime zest
- 1 garlic clove
- ½ teaspoon salt
- 1 teaspoon maple syrup or agave – Optional, to balance acidity
For topping
- Chili powder or smoked paprika – For color and heat
- Chopped fresh cilantro or parsley
- Extra lime wedges for serving
Step-by-Step Process
1. Soak the Cashews (if needed)
If I haven’t already soaked the cashews, I do a quick boil method:
Place them in a small pot with water, bring to a boil, then simmer for 10 minutes. Drain and let them cool before blending.
2. Make the Vegan Lime Crema
In a high-speed blender or food processor, I combine:
- Soaked cashews
- Water
- Lime juice
- Lime zest
- Garlic
- Salt
- Maple syrup (optional)
I blend on high until completely smooth and creamy, scraping down the sides as needed. If it’s too thick, I add a splash more water — the texture should be like sour cream or Greek yogurt.
I transfer the crema to a small bowl and refrigerate for at least 20 minutes to let it thicken and the flavors develop. It keeps well for 3–4 days in a sealed jar.
3. Grill the Corn
I preheat my grill (or grill pan) over medium-high heat. I brush each ear of corn lightly with olive oil and sprinkle with a pinch of salt.
Place the corn directly on the grill grates and cook, turning occasionally, for about 10–12 minutes or until there’s a nice char on all sides. The kernels should be golden, slightly smoky, and tender.
Once grilled, I remove the corn from the heat and let it cool slightly before dressing.
4. Assemble and Serve
When ready to serve, I either:
- Leave the corn whole on the cob for street-style presentation, or
- Slice off the kernels and serve in a bowl for easier sharing.
I spoon or drizzle the vegan lime crema generously over the corn, sprinkle with chili powder or smoked paprika, and finish with chopped cilantro and a few lime wedges on the side.
It’s zesty, smoky, and completely addictive.
Why This Recipe Is Loved
This grilled corn dish is a summer go-to because it’s:
- Bold, creamy, and full of citrusy punch
- Easy to prepare on any grill or grill pan
- A fun and interactive dish for parties and BBQs
- Naturally vegan, gluten-free, and kid-friendly
It’s the kind of side that gets devoured and guests always ask about the crema.
Pro Tips for Perfect Grilled Corn
- Use fresh, in-season corn for the sweetest flavor.
- Grill just until charred — overcooking can dry it out.
- Make the crema in advance for quick assembly.
- Add a pinch of cayenne for extra heat if you like it spicy.
- Use this crema on tacos, roasted veggies, or grain bowls too — it’s incredibly versatile.
Serving Suggestions
Serve with:
- BBQ tofu or grilled veggie skewers
- A side of black bean salad or avocado-lime slaw
- As part of a street food–inspired spread with chips and guacamole
- Alongside ice-cold lemonade, agua fresca, or a citrusy mocktail
2. Lemon-Herb Quinoa Salad
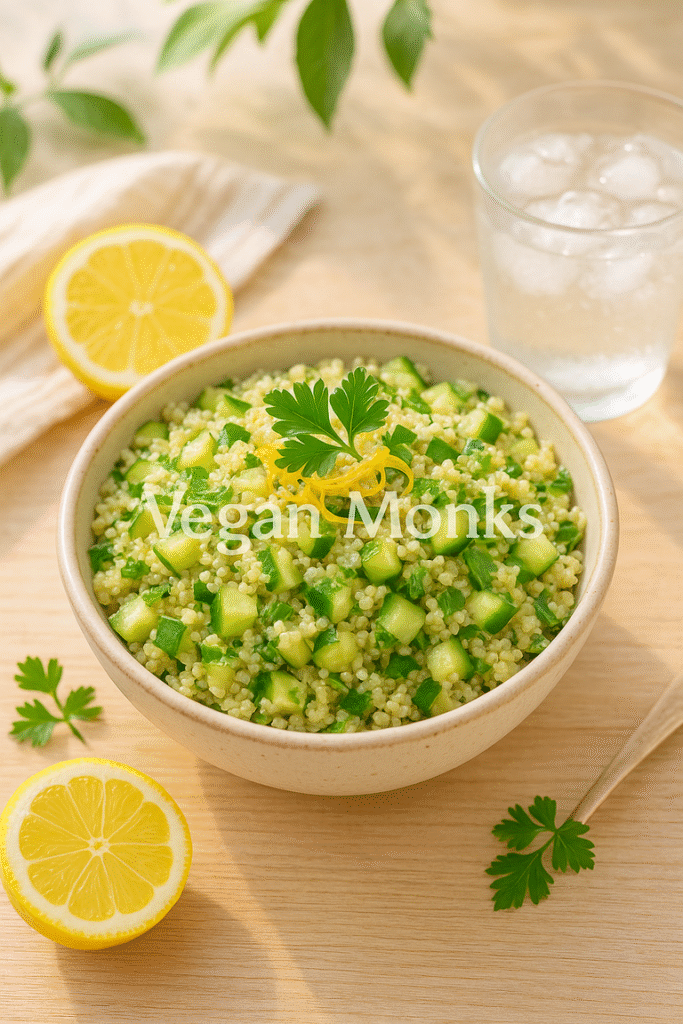
This Lemon-Herb Quinoa Salad is the kind of side dish I always keep in my fridge during the summer. It’s light and fluffy but still filling, and the combination of lemon juice, olive oil, and a garden’s worth of herbs makes it taste like a sunny afternoon in a bowl.
It’s great served cold or room temp, making it ideal for picnics and meal prep. And the best part? It comes together in under 30 minutes with ingredients you probably already have on hand.
Ingredients
Serves 4–6
- 1 cup dry quinoa (any color), rinsed
- 2 cups water or vegetable broth – For extra flavor
- 1½ tablespoons olive oil
- Zest of 1 lemon – For citrus aroma
- 3 tablespoons lemon juice (freshly squeezed)
- ½ teaspoon sea salt, plus more to taste
- Black pepper to taste
Fresh mix-ins:
- ½ cup chopped cucumber – Crisp and hydrating
- ¼ cup chopped scallions or red onion – Adds bite
- ⅓ cup fresh parsley (flat-leaf), chopped
- ¼ cup fresh mint, chopped
- 2 tablespoons fresh dill (optional, but recommended)
- Optional: ½ cup cherry tomatoes, halved or quartered
- Optional: ¼ cup toasted pine nuts, sunflower seeds, or slivered almonds for crunch
Step-by-Step Process
1. Cook the Quinoa
I begin by rinsing the quinoa under cold water using a fine-mesh strainer — this removes the natural saponins that can make quinoa taste bitter.
In a saucepan, I bring 2 cups of water or vegetable broth to a boil. I add the quinoa and a pinch of salt, reduce the heat to low, cover, and simmer for 15 minutes, or until the water is absorbed and the quinoa is fluffy.
Once it’s done, I remove it from the heat and let it sit, covered, for 5 minutes, then fluff it with a fork and transfer it to a large mixing bowl to cool slightly.
2. Make the Lemon-Herb Dressing
In a small bowl or jar, I whisk together:
- Olive oil
- Lemon juice
- Lemon zest
- Salt and pepper
This creates a light, clean, citrusy dressing that brightens the quinoa without weighing it down.
3. Chop the Fresh Ingredients
While the quinoa cools, I prep my fresh mix-ins:
- Chop cucumbers, scallions, parsley, mint, dill, and optional tomatoes
- If using nuts or seeds, I give them a quick toast in a dry skillet for 2–3 minutes until golden and fragrant. This adds extra crunch and flavor.
4. Combine and Toss
Once the quinoa is no longer steaming, I add all the chopped herbs and vegetables to the bowl. I pour the lemon dressing over the top and toss gently to combine, making sure the flavors are evenly distributed.
I give it a taste and adjust with more salt, lemon juice, or pepper as needed. Sometimes I add a bit more olive oil if it needs a smoother finish.
5. Chill and Serve
This salad can be served right away at room temperature, but it’s even better after chilling for 30 minutes in the fridge. The flavors meld, and the lemon and herbs infuse the quinoa.
To serve, I fluff it again with a fork and top with extra herbs or a sprinkle of toasted seeds.
Why This Recipe Is Loved
This quinoa salad is always a hit because it’s:
- Light, zesty, and ultra-fresh
- Naturally vegan, gluten-free, and full of plant-based protein
- Perfect for make-ahead meals, potlucks, or picnics
- Customizable based on what you have in your kitchen
I also love that it keeps well for up to 4 days in the fridge, making it a meal prep hero.
Pro Tips for Best Results
- Use fresh, vibrant herbs — they’re the star here.
- Let the quinoa cool before adding herbs to avoid wilting them.
- Toasted nuts or seeds add incredible texture and nutty depth.
- Use a mix of lemon and white wine vinegar for extra acidity if desired.
- Add chickpeas or grilled tofu to make it a complete, protein-packed lunch.
Serving Suggestions
This salad pairs well with:
- Grilled vegetables or veggie burgers
- Stuffed peppers or zucchini boats
- As a base for a falafel or Mediterranean bowl
- Alongside roasted cauliflower steaks or corn on the cob
It’s also delicious with a side of hummus, olives, and warm pita for a light summer mezze spread.
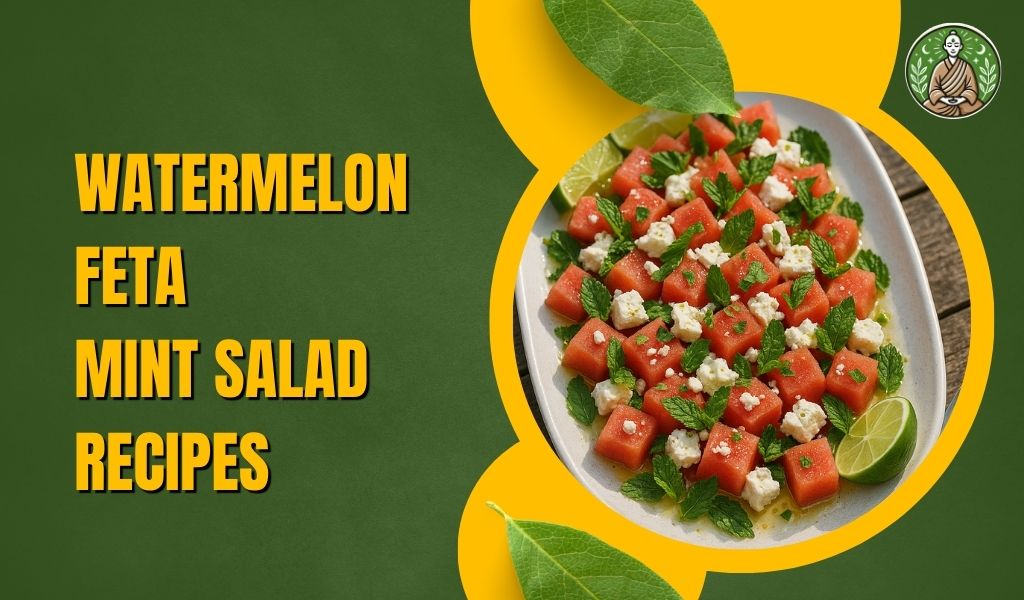
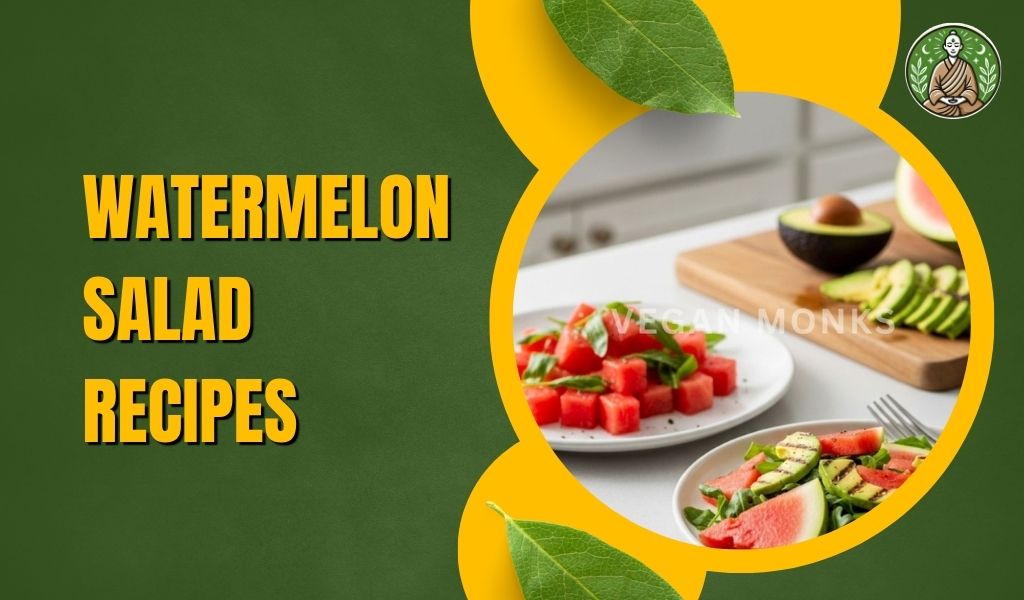
3. Watermelon Cucumber Salad with Mint and Vegan Feta
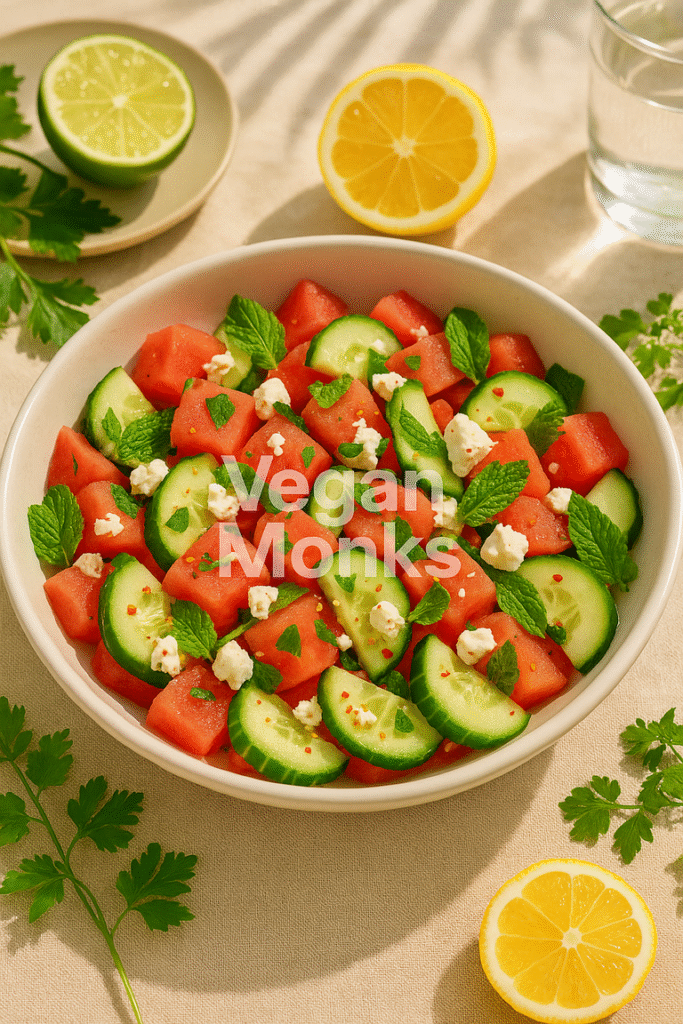
This Watermelon Cucumber Salad is what summer tastes like: crisp cucumber, juicy watermelon, creamy vegan feta, and bright mint all come together in a chilled bowl of flavor and freshness. It’s light, incredibly easy to assemble, and makes a gorgeous addition to any table.
The real magic happens in the contrast — sweet fruit + tangy cheese + cool herbs, all tied together with a splash of lime juice and a hint of sea salt.
Ingredients
Serves 4 as a side
- 3 cups seedless watermelon, cubed or balled – Juicy, sweet, and hydrating
- 1 large English cucumber, thinly sliced or halved into half-moons – Crisp and cool
- ¾ cup vegan feta, crumbled or cubed – Adds creamy, salty contrast
- ¼ cup fresh mint leaves, torn – For herbal brightness
- 2 tablespoons fresh lime juice – Balances and brightens
- 1 teaspoon lime zest – Optional, for added citrus aroma
- 1 teaspoon extra virgin olive oil – Optional, for richness
- Pinch of sea salt and cracked black pepper, to taste
Optional Add-ins:
- Chili flakes or Aleppo pepper for subtle heat
- Thinly sliced red onion for sharpness
- Toasted pepitas for added crunch
Step-by-Step Process
1. Prep the Watermelon and Cucumber
I start by cutting the watermelon into bite-sized cubes or using a melon baller for a rounded, elegant look. I lay the pieces on a paper towel to drain excess juice — this keeps the salad crisp.
For the cucumber, I thinly slice it into coins or half-moons. If I’m using a standard cucumber, I scoop out the seeds before slicing. English or Persian cucumbers work best for their thin skins and low moisture content.
2. Assemble the Base
In a large serving bowl or platter, I combine:
- Watermelon cubes
- Cucumber slices
- Crumbled or cubed vegan feta
- Torn mint leaves
I mix gently with my hands or a wooden spoon to keep the feta from breaking apart and the watermelon from getting mushy.
3. Dress the Salad
I drizzle the salad with:
- Fresh lime juice
- A touch of olive oil (optional)
- A pinch of sea salt and black pepper
Then I finish with lime zest for extra brightness and aroma.
I toss again very gently, just enough to coat everything without damaging the watermelon or herbs.
4. Serve Chilled
This salad is best served cold and freshly tossed, but it can also be made a couple of hours in advance if the dressing is added just before serving. If making ahead, I store the watermelon and cucumber in the fridge separately and combine when ready.
For garnish, I like to add:
- A few whole mint leaves
- An extra squeeze of lime
- A light sprinkle of chili flakes for contrast
Why This Recipe Is Loved
This salad is a warm-weather winner because it’s:
- Refreshing, juicy, and packed with contrasting flavors
- Naturally vegan, gluten-free, and oil-optional
- Perfect as a side or light meal on hot days
- Beautiful on the table and low-effort
It’s also incredibly customizable and travels well to picnics or potlucks.
Pro Tips for the Perfect Watermelon Cucumber Salad
- Use cold, ripe watermelon for the best texture and sweetness.
- Don’t overdress — lime juice and a pinch of salt are enough.
- Add the feta last and toss gently to preserve its shape.
- Chill all ingredients before combining for extra refreshment.
- Want a heartier version? Add avocado, quinoa, or serve over greens.
Serving Suggestions
Pair this salad with:
- Grilled skewers, tofu steaks, or plant-based sausages
- As part of a mezze platter with hummus, olives, and flatbread
- Alongside stuffed peppers, wraps, or grain bowls
- With a mint lemonade or sparkling lime mocktail
It also shines as a light starter or side at any summer brunch or picnic.
4. Charred Zucchini with Garlic and Lemon
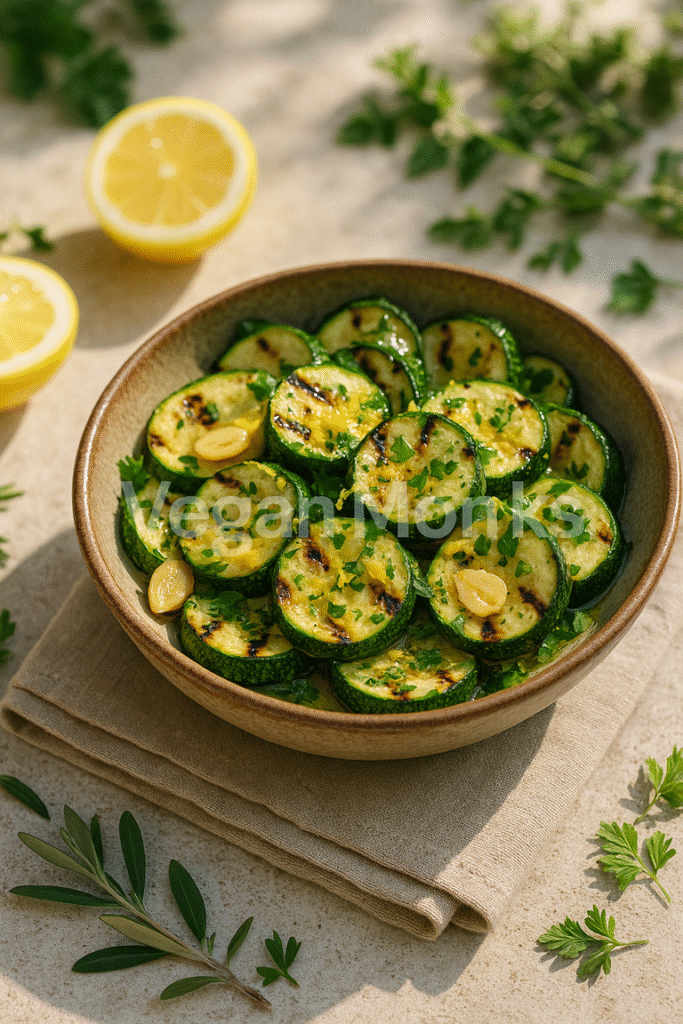
This Charred Zucchini with Garlic and Lemon is a minimalist summer side that celebrates fresh produce with just a few powerful additions. By searing zucchini slices until golden and caramelized, then tossing them with fragrant garlic, lemon juice, and fresh herbs, you get a dish that’s savory, zesty, and deeply satisfying.
It’s naturally vegan, gluten-free, and endlessly versatile — great on its own, but even better alongside grilled mains or tossed into salads and bowls.
Ingredients
Serves 4
- 3 medium zucchini, sliced into thick rounds or half-moons
- 1½ tablespoons olive oil, divided
- 2 garlic cloves, thinly sliced or minced
- Zest of 1 lemon – Adds brightness and aroma
- 1 tablespoon fresh lemon juice – For acidity and contrast
- Salt and freshly ground black pepper, to taste
- Optional: pinch of red chili flakes or smoked paprika for heat/smoke
- Fresh herbs for garnish – Chopped parsley, basil, or mint
Optional Add-ins:
- Toasted pine nuts or almonds for texture
- Vegan parmesan or nutritional yeast for a savory finish
- Grilled corn kernels for extra summer flair
Step-by-Step Process
1. Slice and Prep the Zucchini
I begin by trimming the ends and slicing the zucchini into ½-inch thick rounds or diagonal slices for a more elegant look. If the zucchini are very large, I cut the rounds into half-moons.
I pat the slices dry with a clean towel or paper towel to remove excess moisture — this is key for achieving a nice char.
2. Preheat and Sear
I heat 1 tablespoon of olive oil in a large cast-iron skillet or grill pan over medium-high heat until hot but not smoking.
I add the zucchini slices in a single layer (working in batches if needed to avoid overcrowding), and cook without stirring for 2–3 minutes per side, or until golden brown and lightly charred.
Once charred, I remove them from the pan and place them in a large bowl.
Pro tip: Don’t stir too soon — letting the zucchini sit gives them time to caramelize and develop flavor.
3. Add Garlic and Finish Cooking
Once all the zucchini is charred, I reduce the heat to medium and add the remaining ½ tablespoon olive oil and the garlic slices to the same pan.
I sauté the garlic for about 30–60 seconds, just until fragrant and lightly golden, not browned. Then I return the zucchini to the pan, add a pinch of salt, pepper, lemon juice, and zest, and toss everything gently for another minute or two, just to coat and warm through.
If using chili flakes or smoked paprika, I add them here for a subtle kick or smokiness.
4. Garnish and Serve
I transfer the finished zucchini to a serving platter or bowl and garnish with:
- A handful of fresh chopped herbs
- A sprinkle of toasted pine nuts (if using)
- A dusting of vegan parmesan or nutritional yeast for extra umami (optional)
Serve warm, at room temp, or even chilled — it’s delicious all three ways.
Why This Recipe Is Loved
This charred zucchini dish is a summer staple because it’s:
- Simple yet flavorful, with only a few key ingredients
- Naturally vegan, gluten-free, soy-free, and nut-optional
- Quick to make — just 15 minutes start to finish
- A flexible side dish that works with almost anything
The garlic and lemon combo brings this humble veggie to life, and the char gives it a complexity that always surprises guests.
Pro Tips for Success
- Use a cast-iron or grill pan for the best sear and caramelization.
- Don’t skip the patting-dry step — moisture prevents charring.
- Add garlic after the sear to avoid burning it.
- Double the batch — this dish goes fast and stores well in the fridge.
- Want to serve cold? Let it chill and toss with a splash of olive oil before serving.
Serving Suggestions
Serve this dish with:
- Grilled tofu, lentil burgers, or kebabs
- As a side to quinoa or couscous bowls
- Tossed with pasta, chickpeas, or orzo for a light meal
- Alongside roasted tomatoes, hummus, and crusty bread for a Mediterranean spread
It also works beautifully layered into wraps or sandwiches with hummus and greens.
5. Vegan Caprese with Heirloom Tomatoes and Cashew Mozzarella
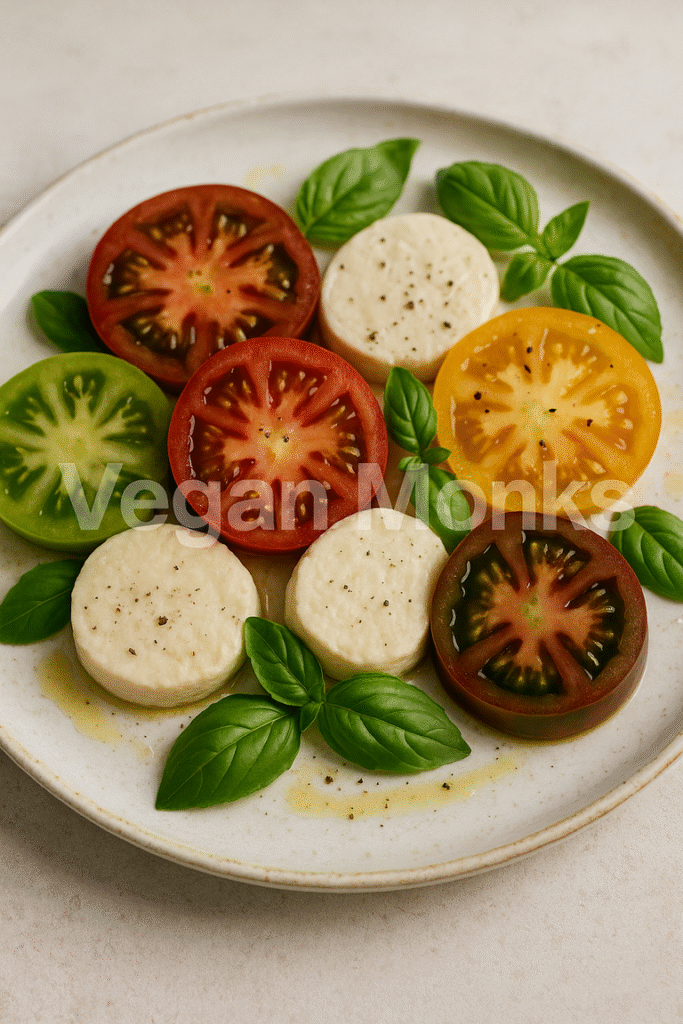
This Vegan Caprese Salad takes everything I love about the classic Italian dish sweet tomatoes, creamy cheese, and herbaceous basil, and gives it a 100% plant-based makeover with a homemade cashew mozzarella that’s soft, sliceable, and full of flavor.
Layered on a platter and drizzled with olive oil and balsamic reduction, this dish is light, fresh, and restaurant-worthy, but surprisingly easy to prepare. It’s my go-to when heirloom tomatoes are in season and I want to show off summer at its absolute best.
Ingredients
Serves 4
For the cashew mozzarella:
- 1 cup raw cashews, soaked for 4 hours or boiled for 10 minutes
- ¾ cup water
- 2 tablespoons tapioca starch – Creates the “stretchy” mozzarella texture
- 1 tablespoon lemon juice
- 1 teaspoon apple cider vinegar
- ¾ teaspoon sea salt
- 1 garlic clove – Optional, for mild savory depth
For the salad:
- 3–4 large heirloom tomatoes, sliced into ¼-inch rounds – Use a variety of colors
- ¾ cup fresh basil leaves – Washed and whole or torn
- 1 tablespoon extra virgin olive oil – For drizzling
- 1–2 teaspoons balsamic glaze or reduction – Sweet acidity
- Sea salt and freshly cracked black pepper, to taste
Optional Add-ins:
- Thinly sliced avocado
- Toasted pine nuts or pumpkin seeds
- Microgreens or arugula for extra texture
Step-by-Step Process
1. Make the Cashew Mozzarella
If using store-bought vegan mozzarella, skip to the salad assembly below — otherwise, here’s how I make the homemade version:
Soak the cashews
If I haven’t soaked them overnight, I do a quick boil: cover with water, bring to a boil, and simmer for 10 minutes, then drain.
Blend
In a high-speed blender, I add:
- Soaked cashews
- Fresh water
- Tapioca starch
- Lemon juice
- Apple cider vinegar
- Salt
- Garlic (if using)
I blend on high until the mixture is completely smooth and creamy — about 1–2 minutes.
Cook
I pour the mixture into a nonstick saucepan and cook over medium heat, stirring constantly with a silicone spatula or wooden spoon. After a few minutes, it begins to thicken and stretch, just like melted cheese.
Once thick, glossy, and slightly stretchy (this takes about 5–7 minutes), I remove it from the heat. I let it cool to room temperature, then refrigerate to firm up for 30 minutes to 1 hour. It will set to a sliceable, creamy consistency.
2. Slice the Tomatoes
While the cheese sets, I slice the heirloom tomatoes into even rounds. I use a mix of red, yellow, orange, and even green tomatoes for a beautiful, layered effect.
Tip: I sprinkle the slices with a pinch of sea salt and let them rest for 5–10 minutes to draw out juices and enhance their sweetness.
3. Assemble the Caprese
On a large serving platter, I alternate layers of:
- Heirloom tomato slices
- Slices or spoonfuls of vegan cashew mozzarella
- Fresh basil leaves
I build a circular pattern or lay them out in rows, depending on the presentation I’m going for.
Then I drizzle with olive oil, balsamic glaze, and finish with a generous sprinkle of sea salt and cracked black pepper.
4. Serve and Enjoy
This salad is best served immediately, when the tomatoes are at their peak and the basil is still fresh. It can also be made an hour ahead and chilled — just cover loosely and bring to room temp before serving.
I often garnish with:
- Microgreens
- A few pine nuts for crunch
- Extra drizzle of balsamic glaze right before serving
Why This Recipe Is Loved
This vegan Caprese is a standout because it’s:
- Elegant, simple, and stunning on the plate
- Completely dairy-free but still rich and satisfying
- A perfect balance of sweet, tangy, creamy, and herbal
- A delicious celebration of seasonal heirloom tomatoes
Whether I’m hosting a dinner party or bringing a dish to a gathering, this is one that always impresses.
Pro Tips for a Perfect Vegan Caprese
- Use ripe, in-season heirloom tomatoes — the flavor makes all the difference.
- Make the cashew mozzarella ahead so it has time to set.
- Use a very sharp knife to slice the cheese cleanly.
- Don’t overdress — a drizzle of oil and balsamic is plenty.
- Add a pinch of flaky sea salt right before serving for a flavor boost.
Serving Suggestions
This Caprese salad is perfect with:
- Grilled sourdough or ciabatta slices
- As a side to pasta, risotto, or grilled veggie mains
- Alongside a chilled glass of white wine or sparkling water with lemon
- Layered into a sandwich or wrap with pesto and roasted peppers
It also shines as a light starter course for summer dinner parties.
These simple summer sides prove that plant-based cooking can be vibrant, filling, and fuss-free. Each dish brings something unique, crunch, creaminess, citrus, without ever heating up the kitchen. They’re perfect for everything from laid-back lunches to festive summer spreads. So go ahead, skip the heavy stuff and let these fresh vegan sides steal the spotlight.